
Has anyone done this, is it even possible?

RBP LX
RBP LX
Discussion starter
71 posts
·
Joined 2007
Official How To
OK here we go. I'm not going to go into detail about how to take apart the dash . There is a great description with pictures found HERE. I will however emphasize that you must disconnect the battery negative, DO NOT attempt this mod without disconnecting the battery because you will be removing the driver's side airbag.
Once you have the dash apart the next thing to do is remove the steering wheel airbag. To do this you need to undo each of the Torx screws, one on each side of the steering wheel. While you are doing this remove the 2 Philips screws on each side that secure the audio/cruise control trim piece.
![Image]()
Now that the screws are out the next thing to do is disconnect the electrical connections for the air bag and wiring harness. The connectors are found on the underside of the steering wheel behind a removable trim piece.
![Image]()
![Image]()
Once these connections are undone you can pull the air bag forward and remove it. Now tou need to remove the remaining screws securing the trim piece as well as disconnecting the remaining connector.
![Image]()
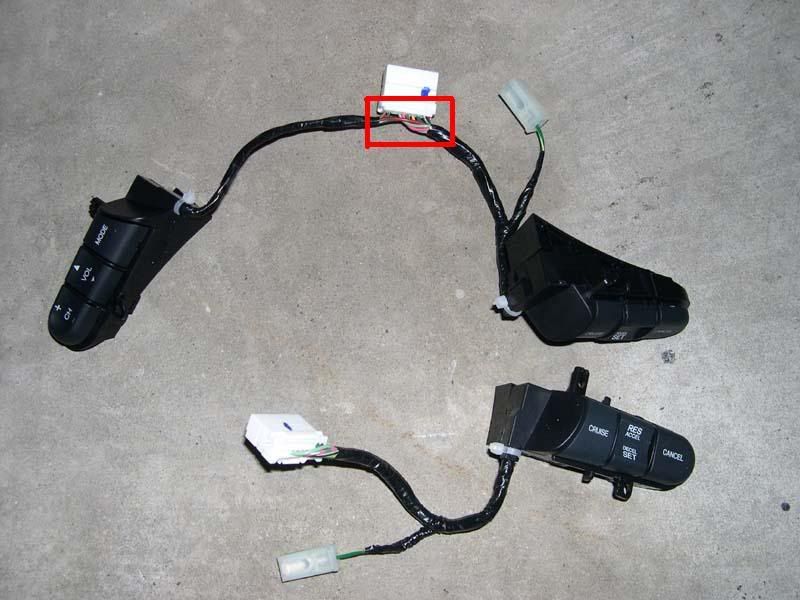
Here is the removed trim piece with the wiring from the existing cruise controls.
![Image]()
This is the back side of the trim where the audio controls will be installed. First you need to remove the 2 Philips screws on each side that secure the existing cruise controls and the blank where the audio controls will go.
![Image]()
Here is a picture of the old and new control harnesses
![Image]()
And the new controls installed in the trim piece.
![Image]()
Everything on the steering wheel put back together the reverse of how it came apart.
![Image]()
Now on to the hard part JK:laughing:
Next you need to remove the upper steering colum shroud. I still have not figered a way to do this without breaking the little plastic snaps that holds it together but a bit of super glue puts them back together.
![Image]()
![Image]()
![Image]()
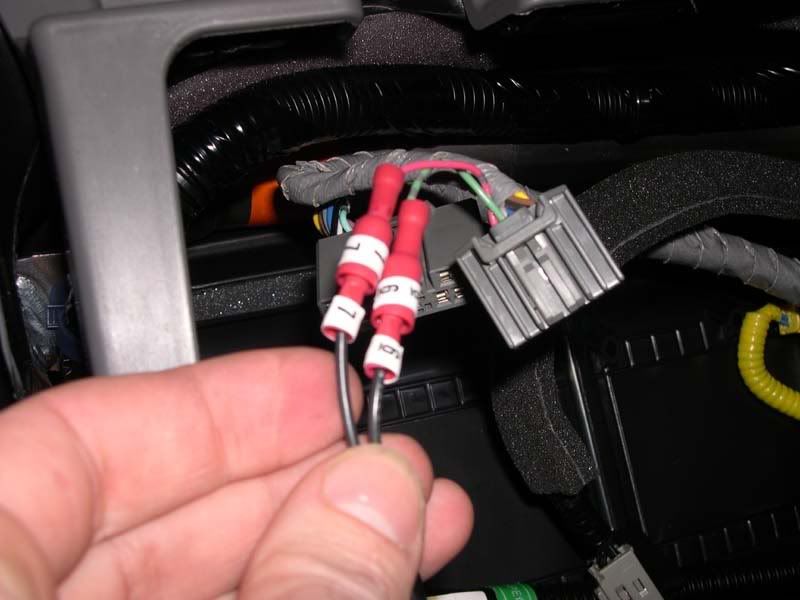
If you choose to you can remove the bottom piece as well, it is held on by 3 Philips screws. If you are like me you will have to do this to glue the broken pieces back together. With the shroud removed you now have easy access to the steering wheel wiring connector which I forgot to take a picture of prior to installing my wiring harness. Speaking of which it is now time to destroy one wiring harness and make another. From the old cruise control harness you need to steal 4 female pins. They look like this when removed.
![Image]()
The old wiring harness will look like this. Notice the plastic is peeled back. The pins lock into position when installed so they are hard to remove. You can either peel the plastic back or use a small screw driver (eyeglass) and hammer them out from the front.
![Image]()
The pins will be used to make the new connections at the steerig wheel connector and the radio connector like this. You can refer to my diagram on the fist page of this thread for pinout locations but steering wheel is 3&4 radio is 6&7. For ease of installation I use red/pink and green/green wires from the old harness to make it easier to remember which wire went were, I also labeled everything. They can be hard to push into the new slots and may require the help of a screw driver pushing them to get them all the way in. Notice that they should only go in one way, make sure to install them the right side up, just mimic the existing ones.
![Image]()
![Image]()
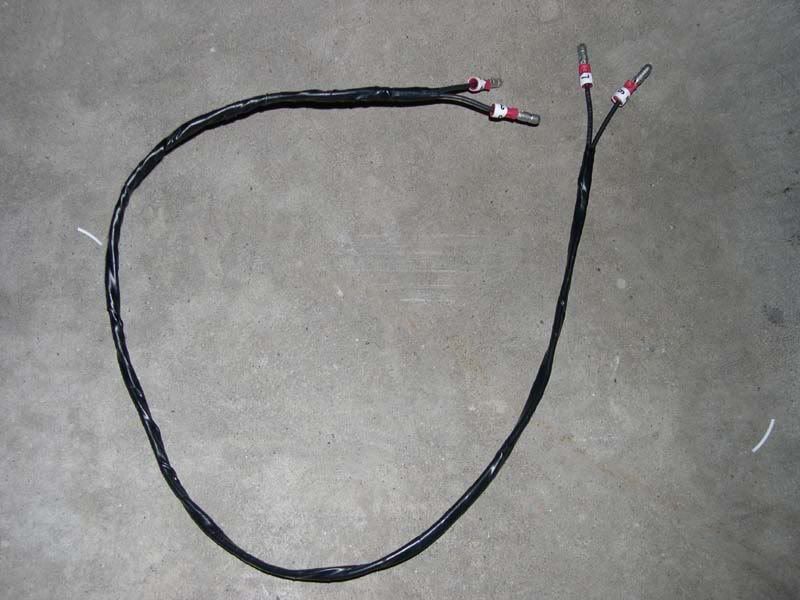
Next you need to make a wiring harness to connect the new plugs. This harness needs to be at least 24" long 30" would be better. This allows enough slack when putting everything back together.
![Image]()
Wiring harness installed.
![Image]()
![Image]()
Now you are ready to test. Reconnect the radio and all harness connections, have your security code ready. Reconnect the battery negative and turn the ignition to the accessory position II. You shoul now have to turn the radio on by pressing the power button, enter your code and test the steering wheel controls. If everthing is fine start to put everything back together and enjoy.
OK here we go. I'm not going to go into detail about how to take apart the dash . There is a great description with pictures found HERE. I will however emphasize that you must disconnect the battery negative, DO NOT attempt this mod without disconnecting the battery because you will be removing the driver's side airbag.
Once you have the dash apart the next thing to do is remove the steering wheel airbag. To do this you need to undo each of the Torx screws, one on each side of the steering wheel. While you are doing this remove the 2 Philips screws on each side that secure the audio/cruise control trim piece.

Now that the screws are out the next thing to do is disconnect the electrical connections for the air bag and wiring harness. The connectors are found on the underside of the steering wheel behind a removable trim piece.


Once these connections are undone you can pull the air bag forward and remove it. Now tou need to remove the remaining screws securing the trim piece as well as disconnecting the remaining connector.

Here is the removed trim piece with the wiring from the existing cruise controls.

This is the back side of the trim where the audio controls will be installed. First you need to remove the 2 Philips screws on each side that secure the existing cruise controls and the blank where the audio controls will go.

Here is a picture of the old and new control harnesses

And the new controls installed in the trim piece.

Everything on the steering wheel put back together the reverse of how it came apart.

Now on to the hard part JK:laughing:
Next you need to remove the upper steering colum shroud. I still have not figered a way to do this without breaking the little plastic snaps that holds it together but a bit of super glue puts them back together.


If you choose to you can remove the bottom piece as well, it is held on by 3 Philips screws. If you are like me you will have to do this to glue the broken pieces back together. With the shroud removed you now have easy access to the steering wheel wiring connector which I forgot to take a picture of prior to installing my wiring harness. Speaking of which it is now time to destroy one wiring harness and make another. From the old cruise control harness you need to steal 4 female pins. They look like this when removed.

The old wiring harness will look like this. Notice the plastic is peeled back. The pins lock into position when installed so they are hard to remove. You can either peel the plastic back or use a small screw driver (eyeglass) and hammer them out from the front.

The pins will be used to make the new connections at the steerig wheel connector and the radio connector like this. You can refer to my diagram on the fist page of this thread for pinout locations but steering wheel is 3&4 radio is 6&7. For ease of installation I use red/pink and green/green wires from the old harness to make it easier to remember which wire went were, I also labeled everything. They can be hard to push into the new slots and may require the help of a screw driver pushing them to get them all the way in. Notice that they should only go in one way, make sure to install them the right side up, just mimic the existing ones.


Next you need to make a wiring harness to connect the new plugs. This harness needs to be at least 24" long 30" would be better. This allows enough slack when putting everything back together.

Wiring harness installed.


Now you are ready to test. Reconnect the radio and all harness connections, have your security code ready. Reconnect the battery negative and turn the ignition to the accessory position II. You shoul now have to turn the radio on by pressing the power button, enter your code and test the steering wheel controls. If everthing is fine start to put everything back together and enjoy.
42 posts
·
Joined 2008
OK here we go. I'm not going to go into detail about how to take apart the dash . There is a great description with pictures found HERE. I will however emphasize that you must disconnect the battery negative, DO NOT attempt this mod without disconnecting the battery because you will be removing the driver's side airbag.
Once you have the dash apart the next thing to do is remove the steering wheel airbag. To do this you need to undo each of the Torx screws, one on each side of the steering wheel. While you are doing this remove the 2 Philips screws on each side that secure the audio/cruise control trim piece.
![Image]()
Now that the screws are out the next thing to do is disconnect the electrical connections for the air bag and wiring harness. The connectors are found on the underside of the steering wheel behind a removable trim piece.
![Image]()
![Image]()
Once these connections are undone you can pull the air bag forward and remove it. Now tou need to remove the remaining screws securing the trim piece as well as disconnecting the remaining connector.
![Image]()
Here is the removed trim piece with the wiring from the existing cruise controls.
![Image]()
This is the back side of the trim where the audio controls will be installed. First you need to remove the 2 Philips screws on each side that secure the existing cruise controls and the blank where the audio controls will go.
![Image]()
Here is a picture of the old and new control harnesses
![Image]()
And the new controls installed in the trim piece.
![Image]()
Everything on the steering wheel put back together the reverse of how it came apart.
![Image]()
Now on to the hard part JK:laughing:
Next you need to remove the upper steering colum shroud. I still have not figered a way to do this without breaking the little plastic snaps that holds it together but a bit of super glue puts them back together.
![Image]()
![Image]()
![Image]()
If you choose to you can remove the bottom piece as well, it is held on by 3 Philips screws. If you are like me you will have to do this to glue the broken pieces back together. With the shroud removed you now have easy access to the steering wheel wiring connector which I forgot to take a picture of prior to installing my wiring harness. Speaking of which it is now time to destroy one wiring harness and make another. From the old cruise control harness you need to steal 4 female pins. They look like this when removed.
![Image]()
The old wiring harness will look like this. Notice the plastic is peeled back. The pins lock into position when installed so they are hard to remove. You can either peel the plastic back or use a small screw driver (eyeglass) and hammer them out from the front.
![Image]()
The pins will be used to make the new connections at the steerig wheel connector and the radio connector like this. You can refer to my diagram on the fist page of this thread for pinout locations but steering wheel is 3&4 radio is 6&7. For ease of installation I use red/pink and green/green wires from the old harness to make it easier to remember which wire went were, I also labeled everything. They can be hard to push into the new slots and may require the help of a screw driver pushing them to get them all the way in. Notice that they should only go in one way, make sure to install them the right side up, just mimic the existing ones.
![Image]()
![Image]()
Next you need to make a wiring harness to connect the new plugs. This harness needs to be at least 24" long 30" would be better. This allows enough slack when putting everything back together.
![Image]()
Wiring harness installed.
![Image]()
![Image]()
Now you are ready to test. Reconnect the radio and all harness connections, have your security code ready. Reconnect the battery negative and turn the ignition to the accessory position II. You shoul now have to turn the radio on by pressing the power button, enter your code and test the steering wheel controls. If everthing is fine start to put everything back together and enjoy.
the pic not display
 ics:
ics:
3,745 posts
·
Joined 2006
Pictures courtesy of "RBP LX".OK here we go. I'm not going to go into detail about how to take apart the dash . There is a great description with pictures found HERE. I will however emphasize that you must disconnect the battery negative, DO NOT attempt this mod without disconnecting the battery because you will be removing the driver's side airbag.
Once you have the dash apart the next thing to do is remove the steering wheel airbag. To do this you need to undo each of the Torx screws, one on each side of the steering wheel. While you are doing this remove the 2 Philips screws on each side that secure the audio/cruise control trim piece.
![Image]()
Now that the screws are out the next thing to do is disconnect the electrical connections for the air bag and wiring harness. The connectors are found on the underside of the steering wheel behind a removable trim piece.
![Image]()
![Image]()
Once these connections are undone you can pull the air bag forward and remove it. Now tou need to remove the remaining screws securing the trim piece as well as disconnecting the remaining connector.
![Image]()
Here is the removed trim piece with the wiring from the existing cruise controls.
![Image]()
This is the back side of the trim where the audio controls will be installed. First you need to remove the 2 Philips screws on each side that secure the existing cruise controls and the blank where the audio controls will go.
![Image]()
Here is a picture of the old and new control harnesses
![Image]()
And the new controls installed in the trim piece.
![Image]()
Everything on the steering wheel put back together the reverse of how it came apart.
![Image]()
Now on to the hard part JK:laughing:
Next you need to remove the upper steering colum shroud. I still have not figered a way to do this without breaking the little plastic snaps that holds it together but a bit of super glue puts them back together.
![Image]()
![Image]()
![Image]()
If you choose to you can remove the bottom piece as well, it is held on by 3 Philips screws. If you are like me you will have to do this to glue the broken pieces back together. With the shroud removed you now have easy access to the steering wheel wiring connector which I forgot to take a picture of prior to installing my wiring harness. Speaking of which it is now time to destroy one wiring harness and make another. From the old cruise control harness you need to steal 4 female pins. They look like this when removed.
![Image]()
The old wiring harness will look like this. Notice the plastic is peeled back. The pins lock into position when installed so they are hard to remove. You can either peel the plastic back or use a small screw driver (eyeglass) and hammer them out from the front.
![Image]()
The pins will be used to make the new connections at the steerig wheel connector and the radio connector like this. You can refer to my diagram on the fist page of this thread for pinout locations but steering wheel is 3&4 radio is 6&7. For ease of installation I use red/pink and green/green wires from the old harness to make it easier to remember which wire went were, I also labeled everything. They can be hard to push into the new slots and may require the help of a screw driver pushing them to get them all the way in. Notice that they should only go in one way, make sure to install them the right side up, just mimic the existing ones.
![Image]()
![Image]()
Next you need to make a wiring harness to connect the new plugs. This harness needs to be at least 24" long 30" would be better. This allows enough slack when putting everything back together.
![Image]()
Wiring harness installed.
![Image]()
![Image]()
Now you are ready to test. Reconnect the radio and all harness connections, have your security code ready. Reconnect the battery negative and turn the ignition to the accessory position II. You shoul now have to turn the radio on by pressing the power button, enter your code and test the steering wheel controls. If everthing is fine start to put everything back together and enjoy.


3,745 posts
·
Joined 2006
Dang, great job!!!
I would think the part no. would be different for the coupe? 36770-SVA-A41?? Cost about twice as much as the sedan...WTF????
I would think the part no. would be different for the coupe? 36770-SVA-A41?? Cost about twice as much as the sedan...WTF????
618 posts
·
Joined 2007
RBP LX...I thought you said this was easy...this doesn't look that easy to me...I can't see the pics...Are they too big to upload?
4 posts
·
Joined 2007
That is pretty easy. The fact that it is possible for cheap is great. This will definitely factor into my LX vs Hybrid equation. We all have our stupid things we must have and steering wheel audio controls is a must for me.ct20 said:RBP LX...I thought you said this was easy...this doesn't look that easy to me...I can't see the pics...Are they too big to upload?
Now if we could just get climate control (for a reasonable cost), I'd be getting an LX. I don't want a sunroof and the other stuff doesn't matter that much to me....
RBP LX
Discussion starter
71 posts
·
Joined 2007
Easy for me may not be easy for you but on a scale of 1 to 10 I'd say this is a 4. It only requires minimal electrical skill i.e. strip wires and crimp fittings, doesn't get much easier than that. BTW I can see the pics fine they are 800 x 600.ct20 said:RBP LX...I thought you said this was easy...this doesn't look that easy to me...I can't see the pics...Are they too big to upload?
3,745 posts
·
Joined 2006
What gauge wire can I use for the harness?RBP LX said:Next you need to make a wiring harness to connect the new plugs. This harness needs to be at least 24" long 30" would be better. This allows enough slack when putting everything back together.
13 posts
·
Joined 2007
I see that the part numbers are different for the 2007 EX coupe and the 2007 EX sedan. I want to install this in my 2007 LX coupe. Has anyone done this mod for a 2007 LX coupe? Thanks you!
RBP LX
Discussion starter
71 posts
·
Joined 2007
I don't see any difference in the wiring harnesses from the schematics that I have but someone may want to go to a dealer that has each part in stock and compare them.bridugcox said:I see that the part numbers are different for the 2007 EX coupe and the 2007 EX sedan. I want to install this in my 2007 LX coupe. Has anyone done this mod for a 2007 LX coupe? Thanks you!
The schematics that I have only show that they are for EX and Si they don't say 2 or 4 door, but if I'm correct the Si is only a 2 door.
3,745 posts
·
Joined 2006
I just ordered one: http://tinyurl.com/39bfqk.bridugcox said:I see that the part numbers are different for the 2007 EX coupe and the 2007 EX sedan. I want to install this in my 2007 LX coupe. Has anyone done this mod for a 2007 LX coupe? Thanks you!
I'll let you know what happens.
3,745 posts
·
Joined 2006
I think he's questioning the fit of the controls. 3-spoke vs. 2-spoke.RBP LX said:I don't see any difference in the wiring harnesses from the schematics that I have but someone may want to go to a dealer that has each part in stock and compare them.
The schematics that I have only show that they are for EX and Si they don't say 2 or 4 door, but if I'm correct the Si is only a 2 door.
And the Si can also be a 4 door.
13 posts
·
Joined 2007
I did not realize that all the steering wheels are different. But what are the controls just below the volume on the 2 door ex and si wheels? Also I saw 2 additional buttons on the 4 door ex below the audio controls? They are missing from your installed pic, is that for something different? I saw the wheels at Honda's web site.
3,745 posts
·
Joined 2006
I think that's for the navigation.bridugcox said:I did not realize that all the steering wheels are different. But what are the controls just below the volume on the 2 door ex and si wheels? Also I saw 2 additional buttons on the 4 door ex below the audio controls? They are missing from your installed pic, is that for something different? I saw the wheels at Honda's web site.


13 posts
·
Joined 2007
Is that an Acura emblem on the wheel? What is the talking face emblem on the lower control for? Thank you for all the help!
3,745 posts
·
Joined 2006
CSX...voice recognition.bridugcox said:Is that an Acura emblem on the wheel? What is the talking face emblem on the lower control for? Thank you for all the help!
3,745 posts
·
Joined 2006

RBP LX, how come the connections are different from these two pictures?
BTW, I just received the audio controls for my coupe and I think they are the same except the connection is blue instead of white and the tape around the wires are gray instead of black. I'll try to take pics.
3,847 posts
·
Joined 2006
2 Questions/Concerns.
1. I noticed the same thing. What happens inside the steering wheel that changes the pinout location?
The answer given didn't answer the question. If you look at the two pins you'll notice the pinout locations are different. It just seems odd that in the pictures quoted above, the pinout locations are entirely different.
2. I have a 2006 sedan. I ordered the 'A11' part but saw that it has been overridden by the 'A12' piece. Is there a difference between the two?
My wires are pink/green and brown, located on the top two right slots (wires coming toward you, harness clip facing up).
I'm doing a bit extra with this project and want to make sure this is right.
RBP LX
Discussion starter
71 posts
·
Joined 2007
The connections are different because they are 2 different connectors. One is the new audio/cruise control wiring harness that plugs into the steering wheel behind the air bag, the other is the portion of the main dash wiring harness that plugs into the top of the steering column. The dash harness that plugs into the top of the steering column is the one missing the nesessary wires that run to the back of the radio.
3,745 posts
·
Joined 2006
Man, I'm having a tough time doing this project.
First off, the 2 torx screw for the airbag was PITA. One of them is really stripped but still usable. Then I had to unscrew the 6 screws for the bracket that is holding the controls.
![Image]()
And then taking the dash out. I was half-way through and then I ran into this:
![Image]()
There are two screws hidden. I unscrewed one of them and I gave up on the second one...it was getting dark.
After I put everything back, I couldn't start my car...scared the hell out of me. I can listen to the radio, but once I try to start the car, everything goes dead. Dash lights, radio, all power is gone. And it never cranked. Can't unlock/lock with my transmitter, either. I had to remove and re-connect the negative cable. Pressed the lock button on my transmitter to lock the car, but the lights didn't blink. Pressed to see if the horn honks, nothing. I then left the negative cable disconnected for a few hours and finally was able to start the car.
I will continue this later in the week, when I have the luxury of downtime.
Here is a picture of the control:
![Image]()
Sorry I don't have more pics, I was so pissed to be worried about taking pics.
First off, the 2 torx screw for the airbag was PITA. One of them is really stripped but still usable. Then I had to unscrew the 6 screws for the bracket that is holding the controls.
And then taking the dash out. I was half-way through and then I ran into this:

There are two screws hidden. I unscrewed one of them and I gave up on the second one...it was getting dark.
After I put everything back, I couldn't start my car...scared the hell out of me. I can listen to the radio, but once I try to start the car, everything goes dead. Dash lights, radio, all power is gone. And it never cranked. Can't unlock/lock with my transmitter, either. I had to remove and re-connect the negative cable. Pressed the lock button on my transmitter to lock the car, but the lights didn't blink. Pressed to see if the horn honks, nothing. I then left the negative cable disconnected for a few hours and finally was able to start the car.
I will continue this later in the week, when I have the luxury of downtime.
Here is a picture of the control:

Sorry I don't have more pics, I was so pissed to be worried about taking pics.
3,745 posts
·
Joined 2006
Yep, it works.CivicCoupe06 said:I just ordered the controls 71$. Are you positive this works?>
It's been a couple of weeks since I've done it and it's great!!
Let me know if you run into any problems.
3,190 posts
·
Joined 2007
Can you show me how to do the wire harness? and what wires to move from where?
3,745 posts
·
Joined 2006
Just follow the instructions.CivicCoupe06 said:Can you show me how to do the wire harness? and what wires to move from where?
-
?
-
?
-
?
-
?
-
?
-
?
-
?
-
?
-
?
-
?
-
?
-
?
-
?
-
?
-
?
-
?
-
?
-
?
-
?
-
?
- posts
- 12M
- members
- 168K
- Since
- 2005
We’re a community for 8th Gen 2006 - 2011 Civic owners to discuss performance mods, body kits, Si models, turbo kits and accessories. Come Join the club!
Explore Our Forums


