8th Generation Honda Civic Forum banner
21 - 40 of 54 Posts
I just replaced the serpentine belt on my LX this weekend, I read all the tips mentioned in this thread and some. Please allow me to share my experience.

As a summary, here are the steps I followed.
1. Remove front right wheel (make sure to use jack stand for safety)
2. Unclip service access panel (so you can see the crankshaft), this will be helpful later.
3. Locate the tensioner bolt, I used Gearwrench 3680 tool as suggested here and slowly pushed the handle bar towards the rear of the car.
4. Slide the belt off the alternator, then remove the Gearwrench tool and keep it near.
5. Before removing the belt completely, make a mental picture of the belt route around the pulleys. Better yet, use Smorgasborg's diagram (that's easier for me).
6. Install the new belt (I bought Bando #7PK2170, $18.41 + shipping from Amazon). I found it easier to start from the crankshaft and working my way up.
7. Hold the belt near the alternator pulley, put back the Gearwrench tool on the tensioner bolt. Slowly push the handle bar towards the rear of the car, and slide the belt onto the alternator pulley when able.

The entire job probably took 40-45 minutes (leisurely). Many thanks to everyone who previously shared their advices.
 
I had a lot of trouble changing the belt. First, I could not loosen the belt without a serpentine belt tool that had a ratchet built in. I rented 2 from Auto Zone and O’Reily and they did not work. I had to buy this GearWrench 3680 Ratcheting Wrench Serpentine Belt Tool from Amazon . It worked great! The second main problem was I finally found out was that Honda changed the belt routing. So every new belt I bought was longer than the old one. You need the new belt routing diagram. See the old and the new routing.
Tip: it is MUCH easier to work on the belt if you take the time to jack up and remove the passenger site front tire and open the little access door.

Old Belt Routing (do not try to use with new belts)
image


New Belt Routing

image
I tried routing this with the new diagram and it is extremely tight and I have been unable to get the belt back over the alternator. I don't remember it being this tight taking it off. I have a 2009 civic.
 
its a hydraulic tensioner so it'll give you some resistance. install the belt on all
the other pulley and leave the tensioner pulley last. then rotate the tensioner
bolt towards the windshield slowly until you can slip the belt onto the pulley.
 
How am I able to know if my car needs the new pivot bolt and new rerouting with a different size belt?

Purchased my car used and not sure what the owner did previously.

2008 Honda Civic LX
 
Thanks everyone for all the info. I just purchased a Dayco serpentine belt from Pep Boys but after reading all this I'm thinking I need push this off to next week and order the Gearwrench 3680 tool. That or price this job out with a local mechanic figuring that this tool costs $50 it might be worth paying a mechanic between $125 - $170 to put it on a lift and save me time, hassle, headache, and sweat. If the job coast above $200 then I'll reconsider doing this myself. I rather do most of the repairs to my car myself but this just might be a total PITA worth avoiding. Thoughts? JB
 
JB - Two thoughts:
1. You don't need the special tool as long as you have an extra long 0 degree offset box wrench (see this link for the type of wrenches I have and that I used for this job): GearWrench 85988 12 Piece Set Metric XL GearBox Ratcheting Wrench - - Amazon.com
If you happen to already have wrenches that are long and flat, they will work great.

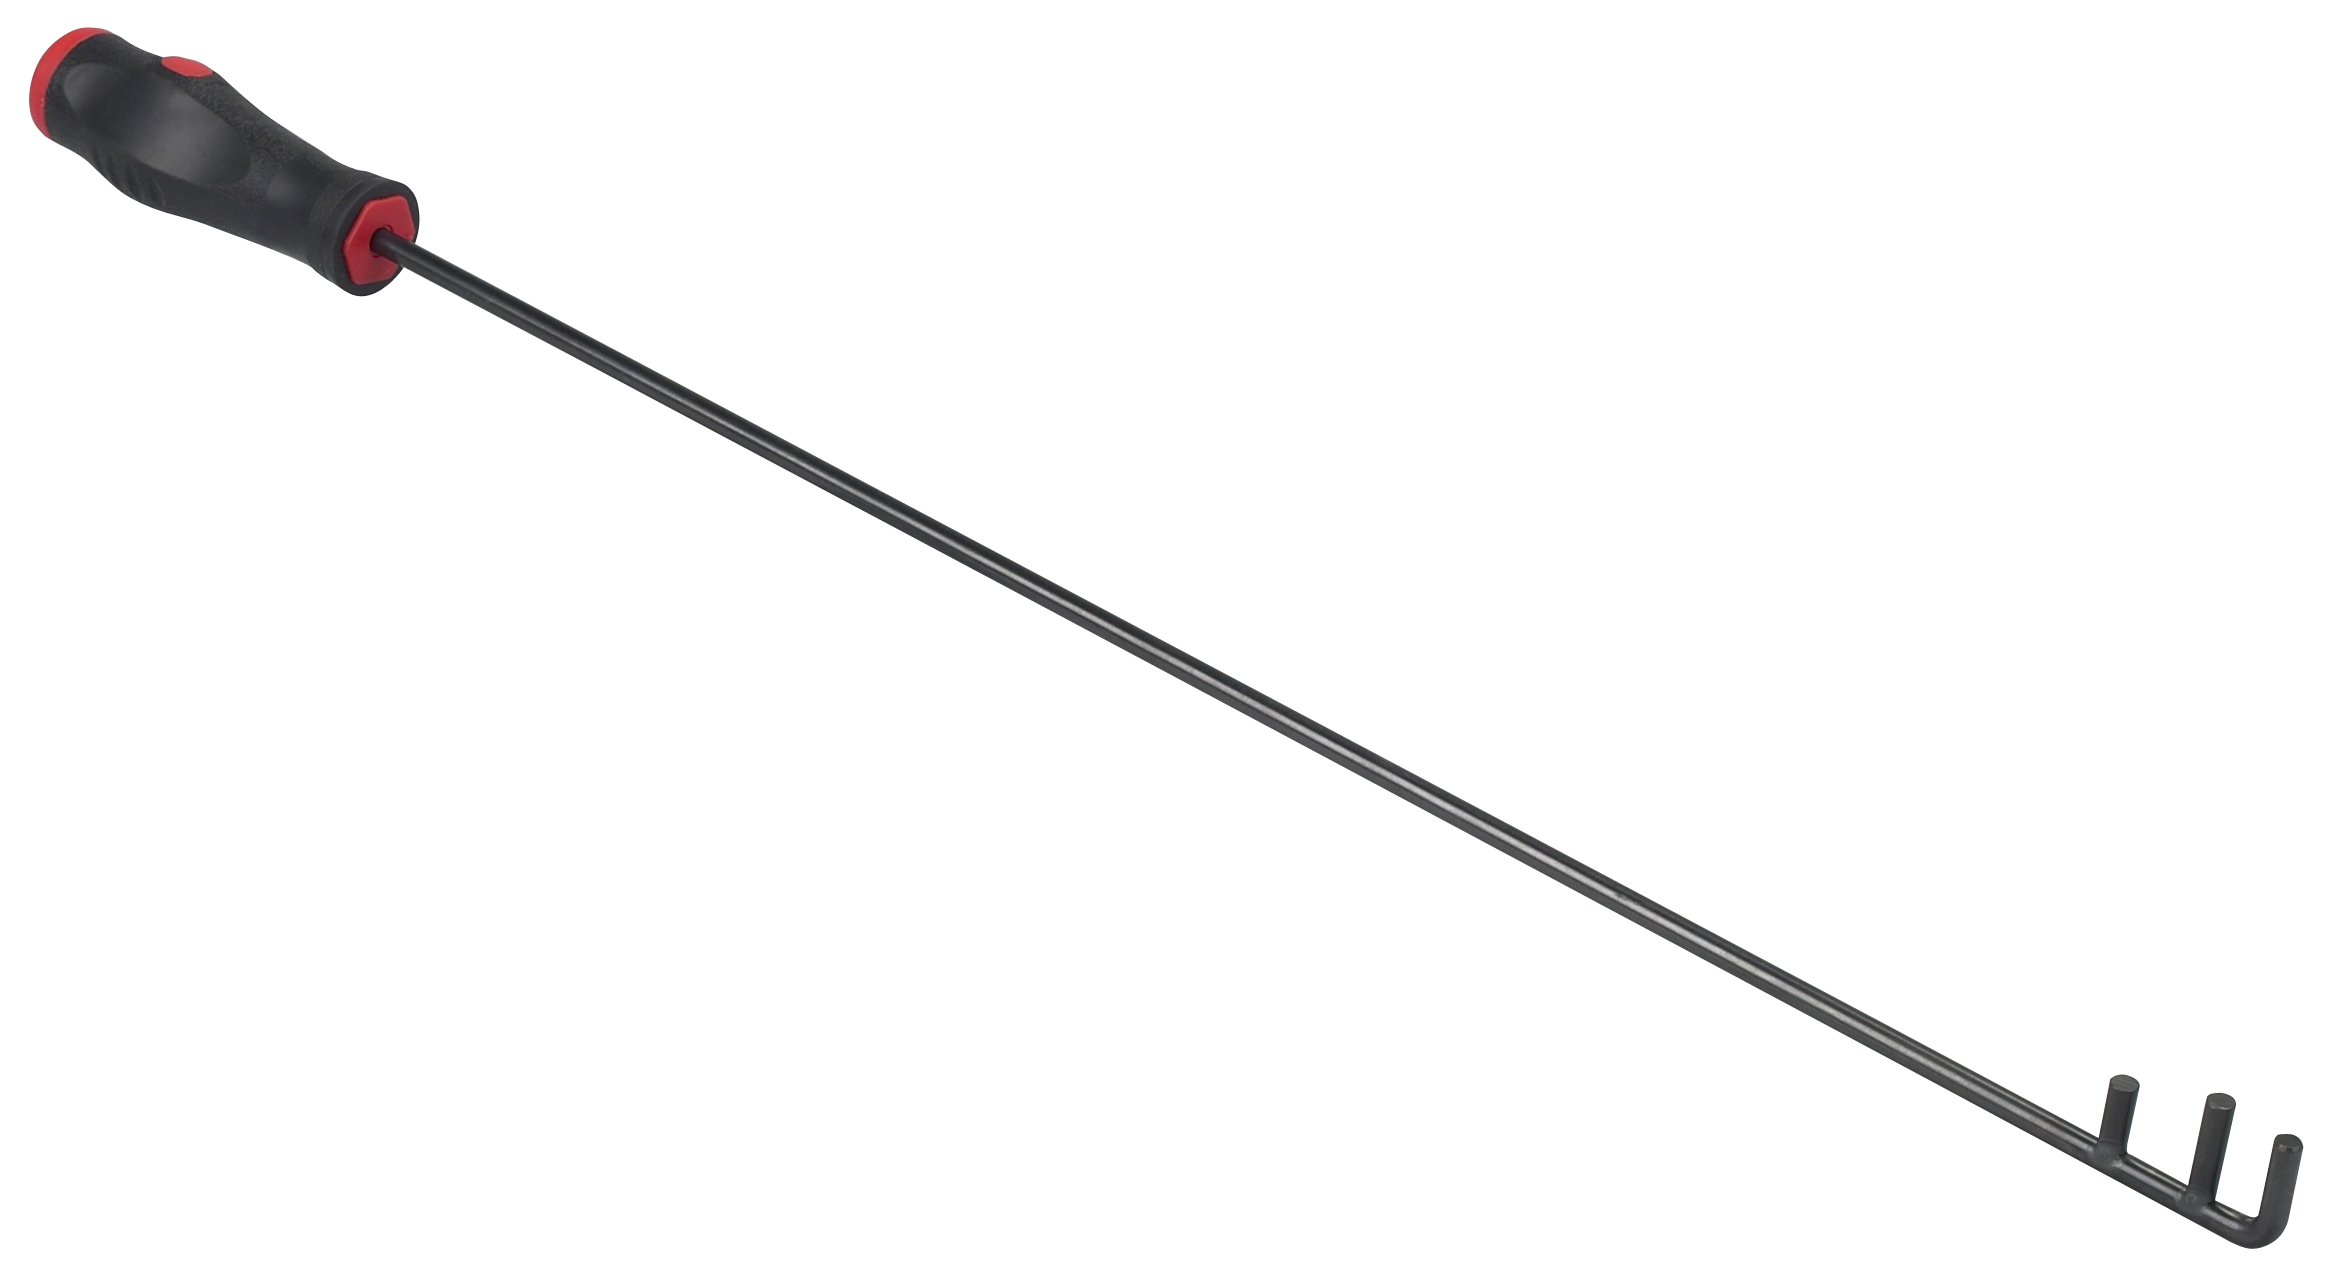
2. The hardest part about this job is not the removal. It's the installation. Make sure you have the correct diagram and this tool: [ame]http://www.amazon.com/Wilmar-W84012-Belt-Hook-Tool/dp/B0002KO3YW/ref=sr_1_6?ie=UTF8&qid=1434286158&sr=8-6&keywords=serpentine+belt+tool[/ame]
This tool is great for manipulating the belt onto the pulleys when you can't fit your hand in.
 
Just changed mine out with a new Conti belt. Got it installed in about 45 minutes.

You definitely need one of the low profile serpentine belt tools. But I did not spend the extra for the extra money for the gearwrench version. I also used a coat hanger to push the new belt down into place, that was the hardest part, as mentioned.
 
It a easy job

I just replaced Engine mount last night and should replace serpentine belt at the same time. Anyway, tools I need to complete this job are

Set metric wrench from Harbor Freight for $25 was on sale
1 1/2in of 18" steal pine $11 at Mernard.

Removed the belt was easy with front right wheel off and removed 3 retainers of plash guard in a wheel well, so I can see part of the last pulley. Without remove the wheel I can not remove and install the belt.

Installed new belt a bit challenging, my wife car just past 100K and the belt still in good shape-no crake at all. Checked old belt dimension just about 1/4" longer compare with new one part 04301-RNA-307. Prior crank tensioner back to install new belt, I taped the bottom of last pulley and belt tensioner(pulley on top of CS's pulley). This will prevent a belt come off while install the belt on alternator. When crank tensioner touch the engine mount bracket, the new belt is really tight to install. The best way is push it in on side way. Caution: DO NOT PUT YOUR FINGER IN BETWEEN PULLEY AND BELT.

Most of parts I order from Honda online like honda bernardi, honda village part is cheaper.

By the way, I have a water pump for $103 (06192-R1A-305) but not use it. Anyone interest please txt to 316.290.nightoneseveneight. I will ship it 2 day free
 
instructions without removing wheel

Hi,

I just finished this job. It took me a while to figure this out so i am sharing..

I did not want to remove the wheel. One key thing i got from this thread was to use two wrenches, one 19 and then another larger one connected together. This is a pretty well known trick and i had to google it to see and understand it. Also, in my case, when i connected the 19 mm, it was angled too far down and i had to use a wrench to leverage the 19 up above the front bumper assembly so that i could connect the larger wrench to the 19 (3 wrenched used at the same time). From that point on, i kept pushing up towards the windshield and put a wooden block on top of the bumper/plastic top to hold the larger wrench in place. Be sure to use a larger wrench that is not so large that it can slip off of the 19. The wrenches need to lock together, otherwise potential injury.

Once the old belt was off, i removed the wrenches.

This is the belt routing. The red route is used if there is no ac.

Image


First we need to align the belt on the upper and lower pulleys. This can be done with a serpentine belt tool:

Image


I used a home made one with some old thin steel tubing, a metal u clamp and some tape.

Its fairly easy to work the belt into this position. Note that the leftmost pulley is close to the car wall, and once in place, the car wall keeps the belt from slipping off the pulley. So basically the left side of belt is held in place naturally.

Image


The next step is to keep the belt from slipping off of the CS pulley. It might slide off a bit, but as long as it does not slide off completely, its fairly easy to slip it back in place. I used a 1/2 inch copper tube to hold the belt in place. In the diagram, its illustrated as the vertical line.

Image


I then used the tool to slip the belt around the water pump:

Image


The next step was the toughest one to figure out. The tensioner pulley was the toughest one to put the belt around. If you bend down and look towards the back for the belt between the power steering pulley and the crank shaft pully, grab it in the middle and start pulling it back. Keep the belt somewhat taut when doing this to keep the belt on the pulleys.

Image


Some of the belt might fall off of the crankshaft when you do this, but the tool can be used to put it back on. The main thing is that the vertical bar will keep it mostly in place. If the belt falls off of the crankshaft completely, you will probably need to start over.

This is what it looks like when you have success:

Image


At this point, looping over the AC pulley is fairly easy. Keep the belt taut.

Image


I then used the box wrench trick and the wood blocks to keep the tensioner/pulley open and looped the belt around the alternator pulley. I then checked all the pulleys to make sure that the belt was on properly. If not, loosen the tensioner just enough to push the belt in place.

Hope this helps.
 
missing pictures if not logged in

Hi,

It seems that the pictures i provided are missing if you are not logged in. I have also put the urls to the pics... You might still need to be logged in, but at least you know there are pics to help...

Hi,

I just finished this job. It took me a while to figure this out so i am sharing..

I did not want to remove the wheel. One key thing i got from this thread was to use two wrenches, one 19 and then another larger one connected together. This is a pretty well known trick and i had to google it to see and understand it. Also, in my case, when i connected the 19 mm, it was angled too far down and i had to use a wrench to leverage the 19 up above the front bumper assembly so that i could connect the larger wrench to the 19 (3 wrenched used at the same time). From that point on, i kept pushing up towards the windshield and put a wooden block on top of the bumper/plastic top to hold the larger wrench in place. Be sure to use a larger wrench that is not so large that it can slip off of the 19. The wrenches need to lock together, otherwise potential injury.

Once the old belt was off, i removed the wrenches.

This is the belt routing. The red route is used if there is no ac.

http://www.8thcivic.com/forums/members/309394-albums13130-picture84610.jpg
image


First we need to align the belt on the upper and lower pulleys. This can be done with a serpentine belt tool:

https://www.otctools.com/sites/default/files/7654A_9263_0.jpg
image


I used a home made one with some old thin steel tubing, a metal u clamp and some tape.

Its fairly easy to work the belt into this position. Note that the leftmost pulley is close to the car wall, and once in place, the car wall keeps the belt from slipping off the pulley. So basically the left side of belt is held in place naturally.

http://www.8thcivic.com/forums/members/309394-albums13130-picture84618.jpg
image


The next step is to keep the belt from slipping off of the CS pulley. It might slide off a bit, but as long as it does not slide off completely, its fairly easy to slip it back in place. I used a 1/2 inch copper tube to hold the belt in place. In the diagram, its illustrated as the vertical line.

http://www.8thcivic.com/forums/members/309394-albums13130-picture84626.jpg
image


I then used the tool to slip the belt around the water pump:

http://www.8thcivic.com/forums/members/309394-albums13130-picture84634.jpg
image


The next step was the toughest one to figure out. The tensioner pulley was the toughest one to put the belt around. If you bend down and look towards the back for the belt between the power steering pulley and the crank shaft pully, grab it in the middle and start pulling it back. Keep the belt somewhat taut when doing this to keep the belt on the pulleys.

http://www.8thcivic.com/forums/members/309394-albums13130-picture84642.jpg
image


Some of the belt might fall off of the crankshaft when you do this, but the tool can be used to put it back on. The main thing is that the vertical bar will keep it mostly in place. If the belt falls off of the crankshaft completely, you will probably need to start over.

This is what it looks like when you have success:

http://www.8thcivic.com/forums/members/309394-albums13130-picture84650.jpg
image


At this point, looping over the AC pulley is fairly easy. Keep the belt taut.

http://www.8thcivic.com/forums/members/309394-albums13130-picture84658.jpg
image


I then used the box wrench trick and the wood blocks to keep the tensioner/pulley open and looped the belt around the alternator pulley. I then checked all the pulleys to make sure that the belt was on properly. If not, loosen the tensioner just enough to push the belt in place.

Hope this helps.
 
tricks

Interesting approach, I might have to try that.
I was once told that every job is somewhat easy once you know the tricks of the trade. I spent two hours futzing around with the belt without a strategy and without success. I actually took off the work gloves, went into the house and drew a diagram of what needed to be done to devise a strategy. Basically, its almost impossible to get the belt around the tension pulley without some sort of "trick". And to try and picture the solution while working on the car was impossible for me. Once i figured things out on paper, the belt was on in 10 minutes.
 
Because it's a hydrolic tensioner, you need to ease into the ccw direction, retain pressure, and allow the tensioner to slowly loosen.
The tensioner will not suddenly release. like a normal bolt.
 
Question about doing this job.

Considering doing this on a 2007 LX.
The belt they sold me is a Goodyear Gatorback 7PK2165. Everything I find online about this job refers to a 2170mm belt.

Can I use this belt or is the 5mm difference enough to make an already challenging job undoably?

Thanks for any feedback on this!
 
I just replaced by serpentine belt today using the longer routing and new belt with part number 56992-RNA-A03 bought from a local shop.

I tried leaving out the alternator pulley at first but it was just too hard. So I did a different approach. Instead of the alternator, I chose to leave out a/c pulley. I then grabbed and pushed towards the floor the portion of the belt between the water pump pulley and alternator pulley. There should be enough slack to partially install the belt on the a/c pulley.

You will then have two choices: start seating from the water pump pulley or from the alternator pulley. I chose the former (spare me the lecture on the disadvantages of rotating the crankshaft counter-clockwise, I know where you are coming from). Let an assistant turn the crank shaft in the counter-clockwise direction while torquing the tensioner bolt and guiding the belt to fully seat on the a/c pulley (the belt may come out of the alternator pulley so watch out). After a few turns, the belt is fully installed on all pulleys.
 
21 - 40 of 54 Posts