

I installed the Skunk2 Pro-C Coilovers today with the help of a few members from here (Will, Donovan and Chico). Before you even start, unless you have a set of tools like a shop would have or you've done this a bunch of times before, this will take you longer than the 2 hours I've seen posted in a few places. Installing the suspension itself is not extremely hard or time consuming, adjusting it to your preferences is what takes up a lot of time.
While the car was on the ground, i loosened the front lug nuts so that when I jacked the car, removing the front wheels wouldn't be a problem. I also jacked both sides and placed the car on 4 jack stands, which allowed me to work on the front and rear without having to lower and raise the car a few times.
FRONT
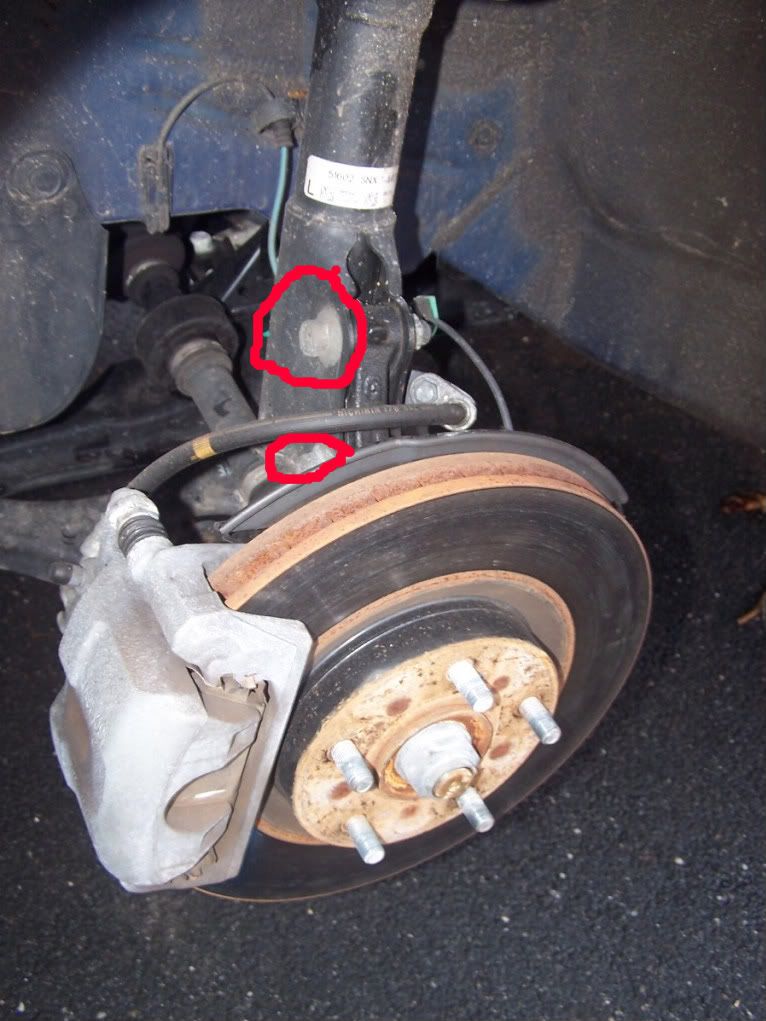
1. Once the wheels are removed, you will see the stock suspension and 2 bolts that attach the bottom of the shock to the arm right behind the brake. Using a 19mm socket on one side and an adjustable wrench on the other side, proceed to loosen the bolts.
![Image]()
2. Once the 2 bolts are off, proceed to removing the ABS line and the brake line from the strut. For the brake line, you will need a 13mm socket, while the ABS line you will just need to undo the clip from the opening.
![Image]()
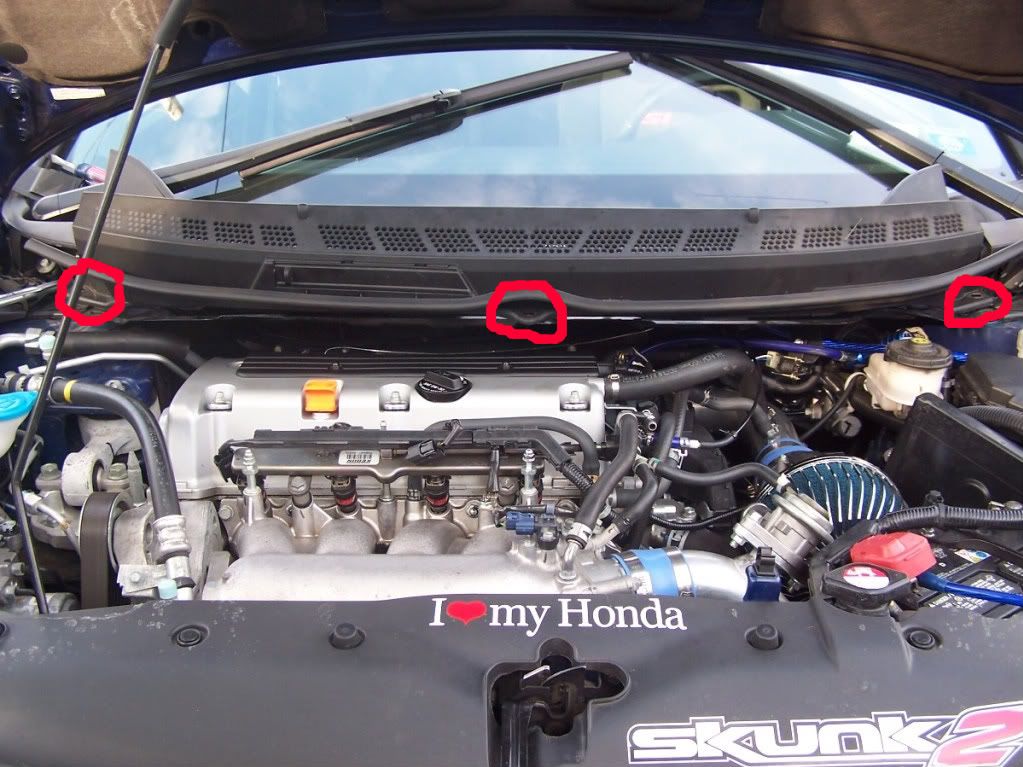
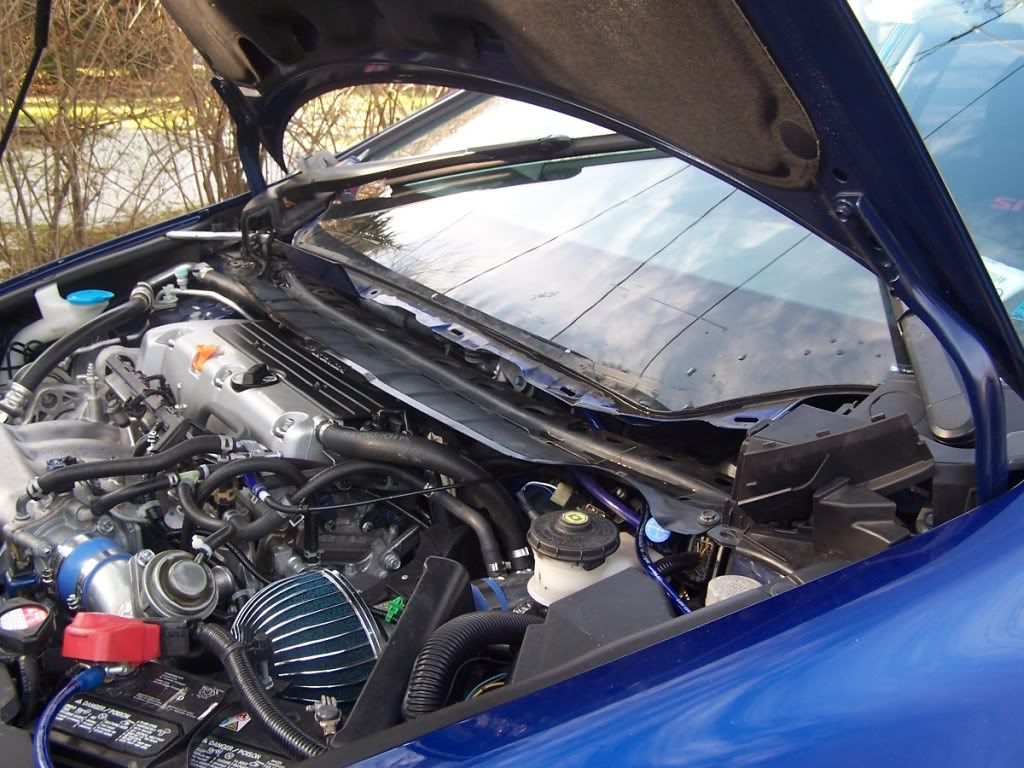
3. After that has been achieved, you will move onto the engine bay. First, unclip the plastic cover below the windshield, which is held by 3 clips. Don't forget to undo the winshield wiper fluid line!!!!
![Image]()
![Image]()
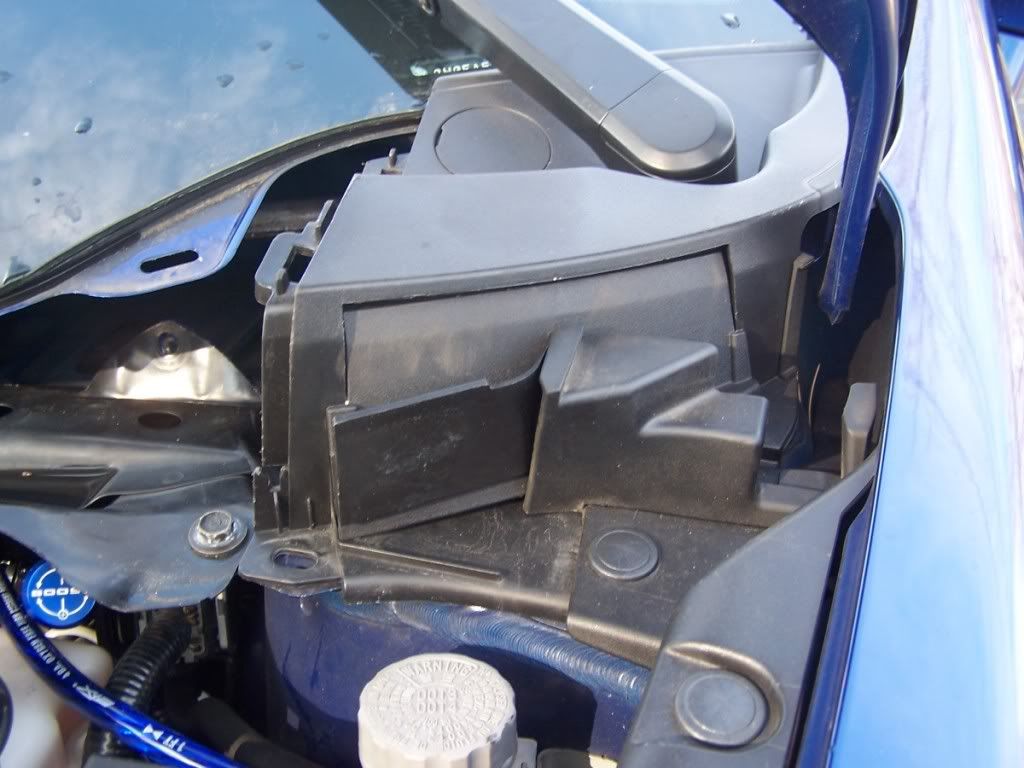
4. Then once that is off, remove the small plastic cover that covers the opening to the top of the strut.
![Image]()
5. Remove all 3 nuts using a 14mm socket. Keep the nuts since you will be using them once the new suspension is in place. Be careful when getting the nuts off, since the shock will fall!
![Image]()
6. After the 3 bolts have been removed, get the shock off the wheel area, making sure no lines are being trapped during the process.
7. It's time to get the front coilovers into the car. First make sure that the perches and every loose part on the coil has been tightened to specs according to the manufacturer. With the Skunk2 Pro-C, the perches need to be tightened.
![Image]()
8. When putting the coilovers in, I found it easier to first bolt the bottom of the shock and then work on the top. The Skunk2 Pro-C came with a bracket that has an opening for the ABS Line as well as a hole to fit the brake line, which is great. Attach the new shock to the arm by using the 19mm bolts and then attach the brake line using the 13mm and inserting the ABS line into the opening.
9. Once the bottom is attached, insert the top of the shock into the mounting point in the engine bay and tighten them. * A quick note with the Pro-C is that you will have to adjust the camber settigs at the top, so that it gives you enough clearance to adjust them as you please. The way they come from Skunk2, they will not clear the hole.
___________________________________________________________________
This pretty much clears the install of the front shocks. It's a pretty easy and straight forward installation. In order to adjust the height of the Skunk2 Pro-C, there's two ways to do it. One is by adjusting the perches that compress the spring, and the other way is to lower or raise the bottom part of the shock. The best way to adjust it is using the bottom part of the shock so that you don't mess with the spring pre-load. If you want to raise the front, you will need to lower the bottom portion by turning it to the left (clockwise). If you want to lower the front, you will do the exact opposite.
Now for the rear install...
___________________________________________________________________
REAR
As previously mentioned, the rear is not as easy as the front. When installing just springs, the rear is a breeze, but the same doesn't apply for coilovers, but I will try to make it seem as painless as possible :dance:
1. You will first have to open the trunk and move the mat that "hides" the OEM shock. You will unscrew 6 plastic bolts (3 on each side) and 2 clips (1 on each side)
![Image]()
![Image]()
2. Remove the mat that covers the spare tire.
3. Once you see the OEM shock, you will need a 14mm wrench and a hex key (sorry forgot the size). Hold the hex key on the top so that the shock doesn't move, and unloosen the nut by turning it counterclockwise (right).
*Skunk2 provides you with a new nut, but I re-used the little round metal plate from the stock shock.
![Image]()
4. Then move to the rear wheel. Remove the camber bolt by using a 14mm socket. That should allow the camber arm to come loose.
5. Remove the lower bolt that attached the shock to the arm. (Sorry forgot the size, but i think it's a 14mm) Once this bolt is out, you should be able to remove the shock from the car.
![Image]()
6. In order to remove the spring, you will need to push down and out. Once the spring is out, remove the bottom rubber boot since you will be re-using that for the Pro-C.
7. Insert the new shock through the top hole, add the metal plate, insert the bolt (14mm) and tighten it enough so that the strut won't come loose. (*Unlike the stock shock, the Skunk2 doesn't have an opening for the hex key, so just turn the 14mm nut until you can't tighten it anymore. DO NOT TIGHTEN THE NUT ALL THE WAY, WAIT UNTIL THE CAR IS ON THE GROUND TO TIGHTEN IT FULLY!!!!*)Once that is done, raise the lower control arm with a jack and then attach it to lower control arm.
8. Once the shock is in, you will insert the spring. The spring comes with 2 parts, one being the spring itself and the other being a metal tube with 2 perches (this is what adjusts ride height from what i've seen until now). You will then add the bottom ruber boot from the stock spring to the bottom of the Skunk2 spring and then just insert the spring in place. During the install, we found that in order to let the spring sit in place, we had to lower the bottom perch to the lowest possible setting.
![Image]()
9. After the shock and spring are installed, re-attach the camber arm using the 14mm bolt. You might have to remove the little nut at the other end and tighten it by hand, since it seems hard to go in. You will use a 10mm socket to remove that. Once it's threaded, re-attach the nut using the 10mm bolt and finish tightening the camber arm bolt.
*You might want to use a jack to bring the lower control arm up so that the camber arm slides right into place.
![Image]()
10. Put the wheels on and lower the car.
**IN ORDER TO LOWER THE REAR OF THE CAR, IT'S DONE THROUGH THE SPRING!!!
Now, from my point of view, I rate the difficulty of this install a 7/10. Installing the coilovers is not too difficult, but the adjusting is. Each one has their own preferences, so it's not like there's a setup that works for everyone. Some people prefer a lower and stiffer car, while others prefer a medium drop with a softer feel.
I hope this DIY helps people tackle a coilover install without too many difficulties. I tried to generalize it as much as I could, but I don't know how different the Skunk2 Pro-C install is compared to other coilover sets available to the 8thgen.
I also wanna mention that I borrowed a few pics from MonkeyConQueso, since there were a few pictures that I needed and I couldn't take, hope you don't mind buddy :thumb:
While the car was on the ground, i loosened the front lug nuts so that when I jacked the car, removing the front wheels wouldn't be a problem. I also jacked both sides and placed the car on 4 jack stands, which allowed me to work on the front and rear without having to lower and raise the car a few times.
FRONT
1. Once the wheels are removed, you will see the stock suspension and 2 bolts that attach the bottom of the shock to the arm right behind the brake. Using a 19mm socket on one side and an adjustable wrench on the other side, proceed to loosen the bolts.
2. Once the 2 bolts are off, proceed to removing the ABS line and the brake line from the strut. For the brake line, you will need a 13mm socket, while the ABS line you will just need to undo the clip from the opening.

3. After that has been achieved, you will move onto the engine bay. First, unclip the plastic cover below the windshield, which is held by 3 clips. Don't forget to undo the winshield wiper fluid line!!!!
4. Then once that is off, remove the small plastic cover that covers the opening to the top of the strut.
5. Remove all 3 nuts using a 14mm socket. Keep the nuts since you will be using them once the new suspension is in place. Be careful when getting the nuts off, since the shock will fall!

6. After the 3 bolts have been removed, get the shock off the wheel area, making sure no lines are being trapped during the process.
7. It's time to get the front coilovers into the car. First make sure that the perches and every loose part on the coil has been tightened to specs according to the manufacturer. With the Skunk2 Pro-C, the perches need to be tightened.

8. When putting the coilovers in, I found it easier to first bolt the bottom of the shock and then work on the top. The Skunk2 Pro-C came with a bracket that has an opening for the ABS Line as well as a hole to fit the brake line, which is great. Attach the new shock to the arm by using the 19mm bolts and then attach the brake line using the 13mm and inserting the ABS line into the opening.
9. Once the bottom is attached, insert the top of the shock into the mounting point in the engine bay and tighten them. * A quick note with the Pro-C is that you will have to adjust the camber settigs at the top, so that it gives you enough clearance to adjust them as you please. The way they come from Skunk2, they will not clear the hole.
___________________________________________________________________
This pretty much clears the install of the front shocks. It's a pretty easy and straight forward installation. In order to adjust the height of the Skunk2 Pro-C, there's two ways to do it. One is by adjusting the perches that compress the spring, and the other way is to lower or raise the bottom part of the shock. The best way to adjust it is using the bottom part of the shock so that you don't mess with the spring pre-load. If you want to raise the front, you will need to lower the bottom portion by turning it to the left (clockwise). If you want to lower the front, you will do the exact opposite.
Now for the rear install...
___________________________________________________________________
REAR
As previously mentioned, the rear is not as easy as the front. When installing just springs, the rear is a breeze, but the same doesn't apply for coilovers, but I will try to make it seem as painless as possible :dance:
1. You will first have to open the trunk and move the mat that "hides" the OEM shock. You will unscrew 6 plastic bolts (3 on each side) and 2 clips (1 on each side)


2. Remove the mat that covers the spare tire.
3. Once you see the OEM shock, you will need a 14mm wrench and a hex key (sorry forgot the size). Hold the hex key on the top so that the shock doesn't move, and unloosen the nut by turning it counterclockwise (right).
*Skunk2 provides you with a new nut, but I re-used the little round metal plate from the stock shock.

4. Then move to the rear wheel. Remove the camber bolt by using a 14mm socket. That should allow the camber arm to come loose.
5. Remove the lower bolt that attached the shock to the arm. (Sorry forgot the size, but i think it's a 14mm) Once this bolt is out, you should be able to remove the shock from the car.

6. In order to remove the spring, you will need to push down and out. Once the spring is out, remove the bottom rubber boot since you will be re-using that for the Pro-C.
7. Insert the new shock through the top hole, add the metal plate, insert the bolt (14mm) and tighten it enough so that the strut won't come loose. (*Unlike the stock shock, the Skunk2 doesn't have an opening for the hex key, so just turn the 14mm nut until you can't tighten it anymore. DO NOT TIGHTEN THE NUT ALL THE WAY, WAIT UNTIL THE CAR IS ON THE GROUND TO TIGHTEN IT FULLY!!!!*)Once that is done, raise the lower control arm with a jack and then attach it to lower control arm.
8. Once the shock is in, you will insert the spring. The spring comes with 2 parts, one being the spring itself and the other being a metal tube with 2 perches (this is what adjusts ride height from what i've seen until now). You will then add the bottom ruber boot from the stock spring to the bottom of the Skunk2 spring and then just insert the spring in place. During the install, we found that in order to let the spring sit in place, we had to lower the bottom perch to the lowest possible setting.
9. After the shock and spring are installed, re-attach the camber arm using the 14mm bolt. You might have to remove the little nut at the other end and tighten it by hand, since it seems hard to go in. You will use a 10mm socket to remove that. Once it's threaded, re-attach the nut using the 10mm bolt and finish tightening the camber arm bolt.
*You might want to use a jack to bring the lower control arm up so that the camber arm slides right into place.

10. Put the wheels on and lower the car.
__________________________________________________________________Ok, so I just finished talking with Tony at Skunk2 and I finally know how to adjust the rears.
Pretty much you only adjust the height with the spring perches, the shock shouldn't have to be touched. You want to bring the bottom of the shock all the way to the top as high as it goes (shorter the shock gets) and tighten the perch. This will allow the spring to sit tight in place.
Then lower or raise the car by adjusting the perches on the spring. To lower the car, raise the perches up, to raise the car, lower them. You can do this without removing the spring from the car. I just lifted one side and turned them counterclockwise to lower the car a little bit.
*You will need a lot of patience to do this. It takes a long time and your hand will get tired.
It should look something like this...but both perches need to be tightened to each other on the spring.
![Image]()

**IN ORDER TO LOWER THE REAR OF THE CAR, IT'S DONE THROUGH THE SPRING!!!
Now, from my point of view, I rate the difficulty of this install a 7/10. Installing the coilovers is not too difficult, but the adjusting is. Each one has their own preferences, so it's not like there's a setup that works for everyone. Some people prefer a lower and stiffer car, while others prefer a medium drop with a softer feel.
I hope this DIY helps people tackle a coilover install without too many difficulties. I tried to generalize it as much as I could, but I don't know how different the Skunk2 Pro-C install is compared to other coilover sets available to the 8thgen.
I also wanna mention that I borrowed a few pics from MonkeyConQueso, since there were a few pictures that I needed and I couldn't take, hope you don't mind buddy :thumb:


