Ok, well this is my first DIY to do so PLEASE bear with me. I'm re-doing the idea from another thread on painting your Manifold cover but every picture on there is an SI so I thought I would help out some of the R18 owners out there:thumb:
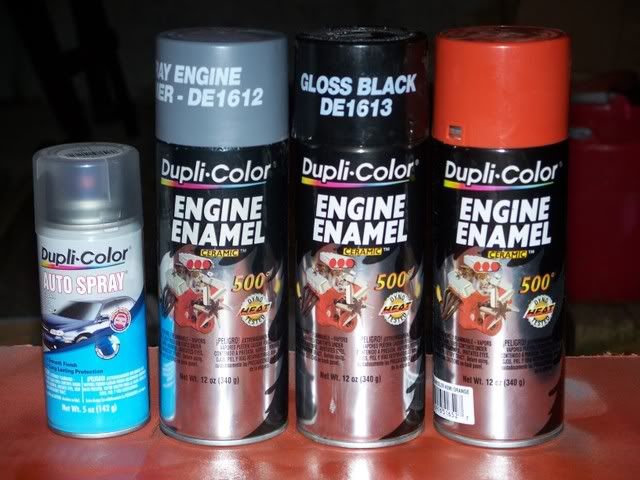
First you will need a few number of supplies.
-Screwdiver
-1000 grit Sanding block
-Duplicolor High Heat Engine Enamel
(NOTE: Please do not use spray paint, make sure the paint can withstand high tempurature. Doesnt have to be duplicolor but engine enamel works best, as opposed to the spray paint that will not hold up against high heat.)
-Duplicolor Auto Spray Clear Coat
-A Razor Blade/Exacto blade
-Painter's masking tape, or whatever your preference
-Blowdryer
Here's what needs to be used on it...
![Image]()
1. First, use the screwdriver to unscrew the engine over off. It takes like half a turn to do it, and note that I used my bottle opener from my keys to get it off :laughing:
![Image]()
2. Once you have done that just pull it right off..you might have to jiggle it a little bit to get it removed, but no force is needed
![Image]()
3. Now that you have that off, you will need to wash it good. Keep it free from dirt and dust. Then dry it off well.
![Image]()
4. This is where things start getting fun! Go ahead and sand down the cover using the 1000 grit sand block, or whatever you have handy, making sure that you arent trying to dig deep into it only just skimming the surface off.
![Image]()
5. Next, go ahead and wipe off the dust from the cover that you have just sanded off. Its good to have a damp towel handy as well so you can wipe anything off and keep it lookin clean and free of junk. After you got that done, spray your first coart of Primer onto it. This is where the Blowdryer comes into play. It speeds up the process a little bit. I went ahead and put three coats of primer onto this before going any further, and blowdried after each application for at least 5-10 mins.
![Image]()
![Image]()
6. Ok..now its time to paint the honda the color of your choice. Go ahead and tape off the HONDA around the letters making it enclosed. There are so many other methods of doing this as well, but this is what worked for me. After applying, then blowdry really good.
![Image]()
7. And this is where it gets tricky. Please make sure that you have blowdried this completely or you will have problems....trust me. Do exactly the opposite of what you did in step 6. Place a strip of tape over the letters, then using the exacto blade, CAUTIOUSLY cut the letters out. You need some patience for this method, there will be some trial and error.
![Image]()
8. Now its time to paint your cover!! Go ahead and spray your first coat on, then blow dry for 5-10 mins just as you did with the primer and continue do so for however many coats of paint you apply.
![Image]()
9. Once you have finished painting, and completely dried your cover, you are ready to take off your tape and take a look. If you are satisfied with your work, please go ahead and apply your clear coat to it. Apply as much as desired, and remember to blowdry after each application.
![Image]()
10. You are FINISHED!!:woowoo:
Go ahead and install your engine cover back on and you are ready to go my friend. And if you want you can also get a little creative with it as I did.
![Image]()
Here's where I got a creative. I went ahead and painted my spark plug covers and intake filter cover to give it some life under there. I felt the cover alone was really..well..alone and looked outta place so there ya go.
![Image]()
I hope this is usefull to all of you R18 owners out there.
Comments and feedback are welcome and appreciated:thumb:
First you will need a few number of supplies.
-Screwdiver
-1000 grit Sanding block
-Duplicolor High Heat Engine Enamel
(NOTE: Please do not use spray paint, make sure the paint can withstand high tempurature. Doesnt have to be duplicolor but engine enamel works best, as opposed to the spray paint that will not hold up against high heat.)
-Duplicolor Auto Spray Clear Coat
-A Razor Blade/Exacto blade
-Painter's masking tape, or whatever your preference
-Blowdryer
Here's what needs to be used on it...

1. First, use the screwdriver to unscrew the engine over off. It takes like half a turn to do it, and note that I used my bottle opener from my keys to get it off :laughing:

2. Once you have done that just pull it right off..you might have to jiggle it a little bit to get it removed, but no force is needed

3. Now that you have that off, you will need to wash it good. Keep it free from dirt and dust. Then dry it off well.

4. This is where things start getting fun! Go ahead and sand down the cover using the 1000 grit sand block, or whatever you have handy, making sure that you arent trying to dig deep into it only just skimming the surface off.

5. Next, go ahead and wipe off the dust from the cover that you have just sanded off. Its good to have a damp towel handy as well so you can wipe anything off and keep it lookin clean and free of junk. After you got that done, spray your first coart of Primer onto it. This is where the Blowdryer comes into play. It speeds up the process a little bit. I went ahead and put three coats of primer onto this before going any further, and blowdried after each application for at least 5-10 mins.


6. Ok..now its time to paint the honda the color of your choice. Go ahead and tape off the HONDA around the letters making it enclosed. There are so many other methods of doing this as well, but this is what worked for me. After applying, then blowdry really good.

7. And this is where it gets tricky. Please make sure that you have blowdried this completely or you will have problems....trust me. Do exactly the opposite of what you did in step 6. Place a strip of tape over the letters, then using the exacto blade, CAUTIOUSLY cut the letters out. You need some patience for this method, there will be some trial and error.

8. Now its time to paint your cover!! Go ahead and spray your first coat on, then blow dry for 5-10 mins just as you did with the primer and continue do so for however many coats of paint you apply.

9. Once you have finished painting, and completely dried your cover, you are ready to take off your tape and take a look. If you are satisfied with your work, please go ahead and apply your clear coat to it. Apply as much as desired, and remember to blowdry after each application.

10. You are FINISHED!!:woowoo:
Go ahead and install your engine cover back on and you are ready to go my friend. And if you want you can also get a little creative with it as I did.

Here's where I got a creative. I went ahead and painted my spark plug covers and intake filter cover to give it some life under there. I felt the cover alone was really..well..alone and looked outta place so there ya go.

I hope this is usefull to all of you R18 owners out there.
Comments and feedback are welcome and appreciated:thumb:
 hsnap: