

EDIT2: I haven't logged onto this forum for months now but I've still been getting numerous PM's (which do bounce to the email that I check) about stuff, so I'm going to come back on and leave a little FAQ here lol. Been getting these non stop!
Q: How did you get that shift boot on your auto?/Where did you get it from?
A: I got the shift boot off of eBay, cheapest one I could find there. It's alcantara with red stitching. I just cut off the excess on the bottom so it would fit our car, then I took off the PRND plate and used a sewing needle to poke a number of holes on the edge/bottom of the shift boot. Then I put zipties through the holes and stuck them on the bottom of the shifter bezel so there wouldn't be any gaps. Experiment with this, I did and it turned out okay. It was only around $10 iirc") Have fun. Oh and yes the ring on top of the shift boot is attached to the shift boot, it was the specific design that I just happened to get.
Have fun. Oh and yes the ring on top of the shift boot is attached to the shift boot, it was the specific design that I just happened to get.
Q: Do you ever rub with that stance?
A: I don't rub with the 17x9 +42 rear and +40 fronts on 225/45 tires. That's about as far as they would go without rubbing. As for the 18" specs, I would rub a lot if the fenders were stock. I did shave my fenders all around with an angle grinder, so now they do not rub and I actually can go a few mm more pushed out if I had the spacer size for it. Only because the fenders are shaved though, which gave a lot more clearance.
Q: Did you keep the air bag light off with your aftermarket seats?
A: No, I didn't. But you can if you take the right ohm resistor and put it in the plug for the airbag sensor. I didn't mind the airbag light on, and from what I've heard the rest of the airbags do come on even with the airbag light on from the seats. Don't quote me on that though, since I haven't tried that first hand (thankfully).
Q: Where do the seatbelt points mount onto the car? Seat/B pillar?
A: Other than the part where the seat belt comes of from, there is only one other place that it mounts to, and that is to the seat itself. The driver's side has a bolt right on the left side edge of the seat facing the door, and the passenger side has a bolt right on the right edge of the seat facing the door. The seat belt buckle also mounts to the seat itself and not the car, on the opposite side of the seat belt. The wedge brackets will give you both mounting points
Q: Flip key! How did you do it/where did you get it cut?
A: I got my flip key off of an eBay seller called dsp.store. The local dealership cut my key for about $25 iirc, but in some places you can also get it cut at Ace Hardware for a lot cheaper if they have the specific machine for it. You just need to get the keyblade cut and then move the electrical components from your OEM key fob into the flip key case (everything will swap right over). Then you have to decide to either use the transponder from your valet key (burn the rubber plastic off the valet key to get to the wireless transponder), or take apart your OEM key fob's board and extend the transponder with wires via soldering. I did the valet key method because it's much more simple. Regarding painting, I sand it down, spray adhesion promotor, then lay 3-4 coats of primer, 3-4 coats of color. If you're doing white I suggest NO cleat coat because it will yellow (mine has yellow'd), or only spray a light 1 or 2 coats at most.
Q: How did you get your interior panels black?
A: Door panels were replaced with black ones. The rest were plastidipped, and have held up great.
Q: How did you do your shift knob/where did you get it?
A: eBay. Don't remember the specifics anymore but there is a DIY on this that I followed on this forum. I have also posted the thread pitch that you need to put it on an auto so search through that DIY thread for it. It's just lying on top of the shifter, it is a little bit loose but because the threading of the shift knob is so deep it stays on the shifter perfectly fine, even on P and D3 or whatever's the lowest gear. It does spin because nothing is holding onto it except its own weight.
I hope this helps you guys
______________________________________________________________________________________________________________________________________________________________________________________________
EDIT: Wow I’ve gotten a lot farther than I thought I would with this car lol. I definitely couldn’t have done it without 8thcivic, when I first got this car I was completely clueless about modding. Reading through all the DIYs here several times and making a lot of noob threads has helped a ton haha
Check out my blog for hi res pictures of my car if you have time!
http://bc2photography.blogspot.com
This is the build thread for my 2009 Civic Hybrid. I'm still a student, and this is my first car ever. My mom actually bought this for me as a present, brand new from the dealership on Aug 2010. At the time she did not want me to drive manual because she thought it was too dangerous, so she decided to buy me a hybrid so I could save gas. The hybrid wasn't my first pick, and I'm actually pretty annoyed with how slow it is but it's a HUGE present, and I'm very thankful that I even get a new car for my first car A lot of people have been asking me why I don't just trade it in for an Si if I'm doing so many mods. I actually want a lot of other cars that have some actual power, but my mom threw in $28k for this present. I'm not sure how to explain it, but I think it wouldn't be right to just trade it in after just a year, and I do want to show her I'm VERY grateful for it. Maybe I'll be able to get another car in a 5-6 years after I've saved up enough for one. She paid for the car, but I'm saving up slowly for all the mods.
Like I said, I'm a complete noob when it comes to cars. I've been slowly trying to learn along the way, so you'll see a lot of different phases lol. First year or so didn't look so good. Anyways onto the build thread
Currently: updated (April 10th, 2012)
![Image]()
___________________________________________________________
First day;
Purchased August 2010 brand new from a Richmond Honda dealer;
![Image]()
Debadged the CIVIC and HYBRID emblems, and added a 'got hybrid?' decal
![Image]()
![Image]()
When I first got the car, I knew close to nothing about cars. I'm still learning right now, but I had this phase where I wanted my civic to be a bit more 'unique'.. in the wrong way.
As you can see here. LED DRL's installed
Interior LED's (still presently on my car) hooked up to my lowbeams
![Image]()
![Image]()
[Oct 02 2010], had a hood swap with a nice guy on revscene Seibon oem style carbon fiber hood
![Image]()
[Oct 26, 2010] Got some new wheels.. XXR 525 16x7 +38
![Image]()
![Image]()
![Image]()
And here comes the popular overpriced JDM emblems.. $150 for the set from AJR :\
![Image]()
Dec 1 Bought a Mugen RR 4 pc spoiler from a guy on revscene brand new unpainted for less than half the retail price. Got it painted in a shop since Spectrum White Pearl is a tricoat so I couldn't rattle can it or even spray the color properly with a spray gun.. Wrapped the top piece in CF and didn't paint it.
And also relocated my license plate with 2 L brackets, installed my fogs. Had those chrome trim pieces on my door handles from a few weeks ago
![Image]()
Feb 4 2011 Mail just came in from grafi Blue JDM steering wheel emblem, and some decals
![Image]()
Feb 15 2011 Got some new wheels for a great price. Advan RS replicas 18x8 +40 on 215/40/18 tires, took off the tacky chrome pieces on the door handles
![Image]()
![Image]()
April 19 2011 Wrapped my ugly chrome trim on the grill in a gloss black vinyl, wrapped the bottom of my bumper in CF 3m di noc, and got a license plate frame and wrapped that in CF as well.
![Image]()
May 13 2011 Finally installed my lowering springs that were sitting around for 4 months lol. H&R ones, pics was taken a hour or so after installation, hopefully it'll get lower after it settles in.
Also got some insanely ugly mugen style visors off ebay that are on my car in these pictures. Just purchased some kplayground mugen visors from a local member here just today and haven't put them on my car yet
Also wrapped my trunk chrome trim in CF 3m di noc a while back. 8th civic license plate from on my rear license plate too
Relocated my license plate to the lower middle in a few minutes using L brackets on the stock license plate holes in the grill, no new holes
![Image]()
![Image]()
![Image]()
May 15 2011 Replaced my crappy ebay mugen visors with some kplaygorund ones
Rear one = eBay
Front one = kplayground
![Image]()
The results:
![Image]()
![Image]()
Much better
My new favourite mod red out tails from grafi! Also have a muffler tip on there that looks similar to the Si one but a bit better, too bad it's not really visible in the picture Sorry for the crappy iphone pic
![Image]()
I took a lot more pictures with my gf's Nikon of my car lowered but they're all about 6mb each so imageshack won't upload it, and I'm too lazy to reduce their size right now lol.
DIY ebay flip key, plastidipped white
![Image]()
![Image]()
![Image]()
Mugen front lip, sides and rear are finally painted and was installing them with a friend today. Front lip was amazing.. took seconds to get a few screws in and done! Rear lip was a PITA. Fitment was terrible.. spent hours with a heat gun and tape and still couldn't get rid of the gap. Teaser pics for now, ran out of time to put on the sideskirts today because I had to run back and forth to buy the tools I was missing lol
My driveway that goes into the garage has a retarded slant, so I scrape coming into my garage :facepalm:
![Image]()
Rear lip, gave up trying to fill in the gap. Not noticeable in this pic but in person.. sigh lol
![Image]()
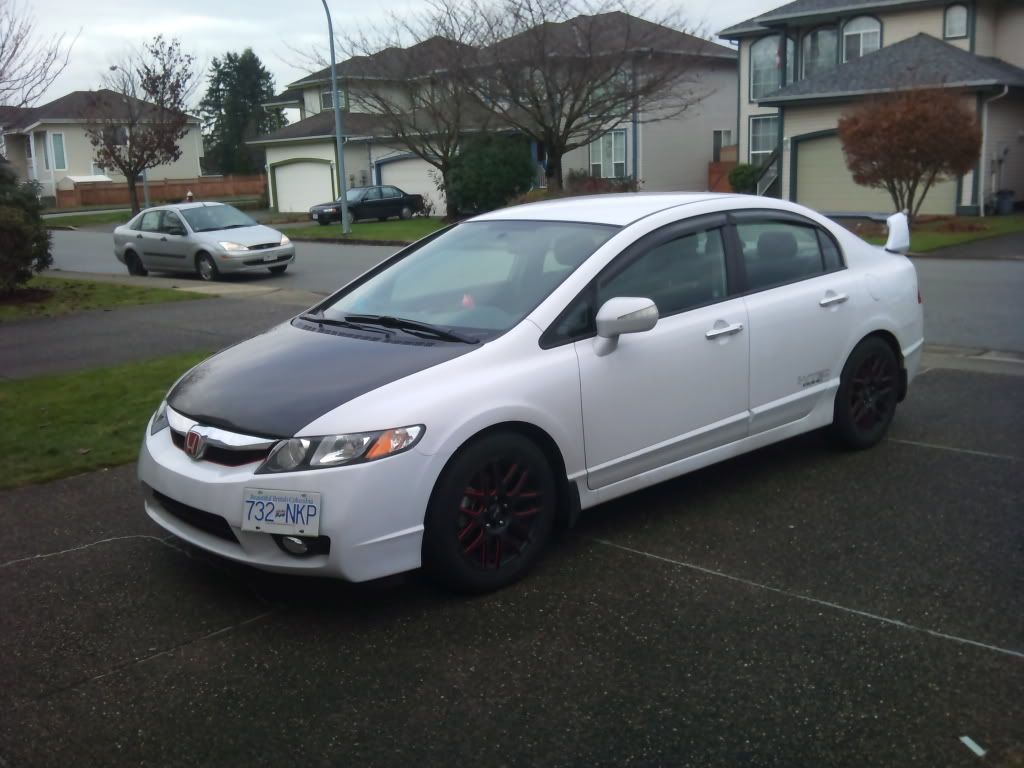
Got passenger sideskirt on properly but the driver side sideskirt just wouldn't go on, so taking it to a shop tomorrow to get them to fix the driver sideskirt and the rear lip as well. Here's a shot of my car with the good sideskirt and my winter wheels lols.
![Image]()
![Image]()
Here's where the wheels are! Getting plastidipped white
![Image]()
Had no index cards so did some ghetto masking that took an hour lol
![Image]()
Done for the night at 1:20am!
![Image]()
Just to see what it looks like , I think it'd be a better match for taffeta white rather than pearl white. Plastidip is still drying lol
![Image]()
Completely forgot to add this, I wrapped part of my interior a while ago in CF wrap Didn't get many pictures, but here they are
![Image]()
![Image]()
![Image]()
![Image]()
Got the bodyshop to fix my rear lip and sideskirts for me! Car's exterior is pretty much done now
![Image]()
![Image]()
![Image]()
![Image]()
Loving the white on white, plastidip
![Image]()
Just got my HFP exhaust installed today! Less than $200 shipped, just had to drive an hour cross border to pick it up Worth it for sure
Some random shots with bad lighting, my bad lol
![Image]()
![Image]()
Last addition to the car Wasn't planning on adding anything else since I will want to trade this in for another car in a few years, but got an amazing deal that consists of these 3 pieces, a FD headlight and some other little pieces for just $50 haha. Going to put my order in for the trunk tomorrow and hopefully have the rear done in 2-3 months when it comes in!
![Image]()
At the Cypress premeet with a crazy nice csx!
![Image]()
![Image]()
![Image]()
![Image]()
Fujita SRI polished coming in soon, as well as my JDM rear conversion!
Just picked up my new shift knob, fujita sri and progress rear sway bar today from the states! Intake install took less than an hour with a friend of mine, and we're just 18 years old lol. Saved $100 from the crazy shops here that want to charge that much for an intake install :/ Going to install my rear sway bar when I have time. The SRI really sounds amazing, but I honestly did not feel much of a gain lol. I have just resetted the ECU and hopefully when I drive it again tomorrow or in a week or so the ECU will have adjusted to the intake and maybe give me some gains.
Here are some pictures! Excuse the dirty engine bay and interior, haven't had time to clean up :x
![Image]()
Stock engine bay, super dirty
![Image]()
All the parts in the box! Fujita gave me a shet load of stickers lol
![Image]()
After 45 minutes, done!
![Image]()
![Image]()
Instructions were pretty straight forward, given that I could install it and have no idea what half the words used meant lol. Sound clip is currently being uploaded! Will post here when it's done
FD2 trunk will be coming in this week or next week! Can't wait
FD2 trunk here, painted and installed! First time with a dremel and freaked the hell out of me, but overall it was okay A great learning experience that's for sure, I'm glad I did it myself instead of taking it to a shop.
So the trunk got on pretty easily,
![Image]()
then came time for the side tail lights.. My dremel actually broke half way and I had to drive a few blocks down to Lordco and pick up a new one lol. Didn't want to put my bumper back on or tail light all over again so drove like this for a few blocks down to the store..
![Image]()
Dremel starts here! And drilll
![Image]()
![Image]()
Almost there...
![Image]()
Done! 4 hours of back and forth well spent lol.
![Image]()
![Image]()
![Image]()
![Image]()
Can barely see anything in this shot but it's my favourite lol
![Image]()
Some more shots! Local 8thcivic friday night meet and some shots by a new place that my friend found
![Image]()
![Image]()
[imghttp://a4.sphotos.ak.fbcdn.net/hphotos-ak-snc7/377590_10150946535625582_559120581_21540649_1221401745_n.jpg[/img]
![Image]()
Comparison between original and photoshopped
![Image]()
![Image]()
![Image]()
Got around to installing my blue hazard button vinyl from grafi today. Looks great when lit up Here are some pictures
![Image]()
![Image]()
Lights on, sorry my LEDs in the footwell are connected to my parking lights/lowbeams so I couldn't turn them off for the pictures
![Image]()
![Image]()
Oh and I also installed the Mugen pedals a few weeks ago when the rubber piece on my original brake pedal fell off lol
If you guys wanna see the high res and high quality pictures, or if you guys have time check them out here; c2Photography
Just click on any picture to expand them
First three shots are my first attempts at actual close up shots, so they're not the best. They were taken for a contest that had close up's as its theme
![Image]()
![Image]()
![Image]()
![Image]()
![Image]()
![Image]()
The pictures here were taken in a underground parking lot, it was yellow as hell lol.
Here's a difference between a unedited shot (1st pic) and an edited shot (2nd pic)
![Image]()
![Image]()
Picked up my Depo headlights today, and having mixed feelings about them atm. The LEDs kind of kill it.. but doesn't look too bad. I needed projectors but didn't want to mess up my OEM headlights since I might be turning the car back to stock in the future. Wanted projectors headlights that looked as close as stock as possible, so picked up this set for $160 shipped.
![Image]()
![Image]()
![Image]()
![Image]()
![Image]()
I also have new Luminics 5000k bulbs in the high beam/drl area with a blue tinted bulb You can kind of notice it in the last picture
The cut off! I'm happy with it. Even though I aimed my stock reflector headlights a LOT lower, the glare would still light up over 2 stories high (if it was OEM headlights w/ hids, the glare would be past that garage roof on the right of this picture)
![Image]()
DDM 55w 6000k HIDs coming in soon!
Few updates coming up. Just got my DDM 55w 6000k HIDs installed Looks a lot better than my old 35w 8000k. GF's dad has a 10" sub that he used to use in his civic, and he didn't want it anymore so he's giving it to me woot. Got a Sony 6.1" double din for christmas, so I'm gonna get a pair of front speakers and an amp to tie everything together!
Here's a photoshoot that I shot with a 370z a few nights ago;
The favourite shot I took of the night, sadly it wasn't on my camera (my camera's the one in the picture) so the quality wasn't the best. I also had a shaky hand lol
![Image]()
Rest of the shots are taken with my camera
![Image]()
![Image]()
![Image]()
![Image]()
![Image]()
![Image]()
![Image]()
http://a7.sphotos.ak.fbcdn.net/hphotos-ak-snc7/393602_10151066193800582_559120581_21962175_1363546526_n.jpg[/ig]
[img]http://a5.sphotos.ak.fbcdn.net/hphotos-ak-snc7/396470_10151066194000582_559120581_21962176_526487778_n.jpg
![Image]()
![Image]()
Trying to do some motion editing.. these are all still shots that I've TRIED to make look like rolling shots lol
![Image]()
![Image]()
![Image]()
Happy 2012 guys! Christmas was awesome, my girlfriend bought me a set of component speakers for the front <3 and her dad gave me his old 10" sub that he doesn't use anymore haha. Mom bought me a Sony XAV-62BT double din as well! So I decided to get myself the things needed to finish off a very basic I.C.E set up; Speaker adaptors, a double din kit (which was surprisingly almost $100 ), an amp and an amp kit (the kit was expensive too lol ), and a bunch of sound deadening material! Started to work on some stuff;
Missing from picture: Amp+amp kit
![Image]()
Lets start!
![Image]()
Running wires for the amp.. stupid hybrid battery makes everything so much harder. Look at that tight space
![Image]()
![Image]()
Sound deadening begins!
![Image]()
![Image]()
![Image]()
![Image]()
![Image]()
Done!
![Image]()
![Image]()
Door speakers;
![Image]()
Sound deadening the floors of the cabin, and underneath the rear seats as well. Also running wires for my amp at the same time. Oh and also plastidipped my center console in black, I hate beige anything
![Image]()
![Image]()
![Image]()
Sound deadening and wire running begins! All the wires were ziptied to OEM wires that were already clipped onto the chassis
![Image]()
![Image]()
RCA/Remote wires along the center console
![Image]()
Putting everything back together...
![Image]()
Total time it took me to take apart the interior, paint the center console, sound deaden, and also run the power/rca/remote wires was about 5 hours. It was my first time doing anything of the sort, but definitely worth it. Learned a lot and saved $200 for just running the wires myself lol. I can see why shops charge that much money though, it's a real pita.
Now everythings prepped and I just need to get my double din installed and sub/amp set up!
Got the double din installed and ready to go! Amp is finally hooked up along with the sub, tunes sound so much better with that thump
![Image]()
![Image]()
New shoes for 2012! Went with 17s this time, sticking with the white on white Sold my advan rs reps to a local on 8th and he's fixing up all the curbs to get it ready to put on his car this summer! Can't wait to see it on his coupe
Fitment isn't that great, being 17x7.5 +38. The tires are awesome though compared to my old ones! 215/45/17 Hankook Ventus HR2
![Image]()
Looking into either getting some spacers or coils very soon! Can't wait to slam this ish. Driving a hybrid, I'm already slow so might as well go low too lol
Alright so 3 days after I got my work reps, I also bought a set of used skunk 2 pro s v2 coils. The guy also traded me his legit enkei rpf1 for my work wheels + cash haha. Oh and also got some blue Muteki lugs to match the blue valve stem 17x9 +45 with 3mm spacers up front so it'll clear my brakes. I'm looking to get some thicker spacers soon And also go lower! Haven't adjusted the height yet, or done any fender work. Right now I'm at 1 tight finger gap all around, and getting out of my slanted driveway is still a nightmare...
![Image]()
![Image]()
![Image]()
Excuse my dirty car lol. Going to make my car way lower when I have time to adjust the coil settings, and also spacers are just waiting to be put on as well! They're just sitting in my garage atm
Friend got an RX8 recently, and we went to go take some quick pics today. It was raining so we went to an underground parking lot, man those lights are so yellow.. it's so hard to balance the color properly lol. Here's the original picture, and edit below
![Image]()
![Image]()
![Image]()
![Image]()
Oh and also got one of the seats in today... finally. The other seat is in my garage waiting to be swapped in. These things are a real pita... lol
![Image]()
Other seat is in Not too sure how I feel about the blue leds in the footwell anymore lol
![Image]()
So I won a photography contest hosted by Yospeed at late December 2011, not sure if any of you noticed but my car was on their front page for a while It's gone now though sadly lol But I did get an awesome free battery tiedown from them! Quality is amazing Adds a nice little flare to my boring engine bay
Before;
![Image]()
After;
![Image]()
![Image]()
Thought it would match the red in my SRI more, but turns out my red filter isn't really noticeable lol
I also got a LED strip from superbrightleds in my trunk now! It's so much brighter than the little oem bulb lol. I'm not sure why it shows up so blue in the pictures, in person it looks more like a 5000k shade of white
![Image]()
Also hid my amp underneath my spare tire cover so I could get a bit more space out of my already small trunk
![Image]()
![Image]()
And a random picture from a different angle I haven't tried before.
![Image]()
So I got around to lowering my car finally, but still can't get it to the height I want lol. Haven't done any fender work but took one of those clips holding my fender liner in place. Right now I rub a litttttle bit if I do realllly hard u turns lol, but other than that I'm fine.
What matters the most is my driveway clearance.. going out/into my stupid slanted driveway as parallel as I can lol. Level up from iphone clearance to toonie clearance XD Need way more low, haven't installed the front camber bolts yet and may get some sliders for the rear. Front is at 0 finger gap atm Rear needs to be lowered a lot still, couldn't figure out how to do it for some reason :/ Will work on that.
![Image]()
Also put 5mm spacers up front and swapped the 3mm spacers to the rear. Needs more flush still, plan to get 10mm spacers for the front then put the 5mm spacers in the rear and see how that goes. Def need some camber if I do that + go lower though so I don't rub. How it's currently sitting right now
![Image]()
Oh and I put my red work lugs back on and plastidipped the cap red as well My friend has some left over red caliper paint that he offered to give me, so now I'm trying to decide if I want to paint my calipers or not...
![Image]()
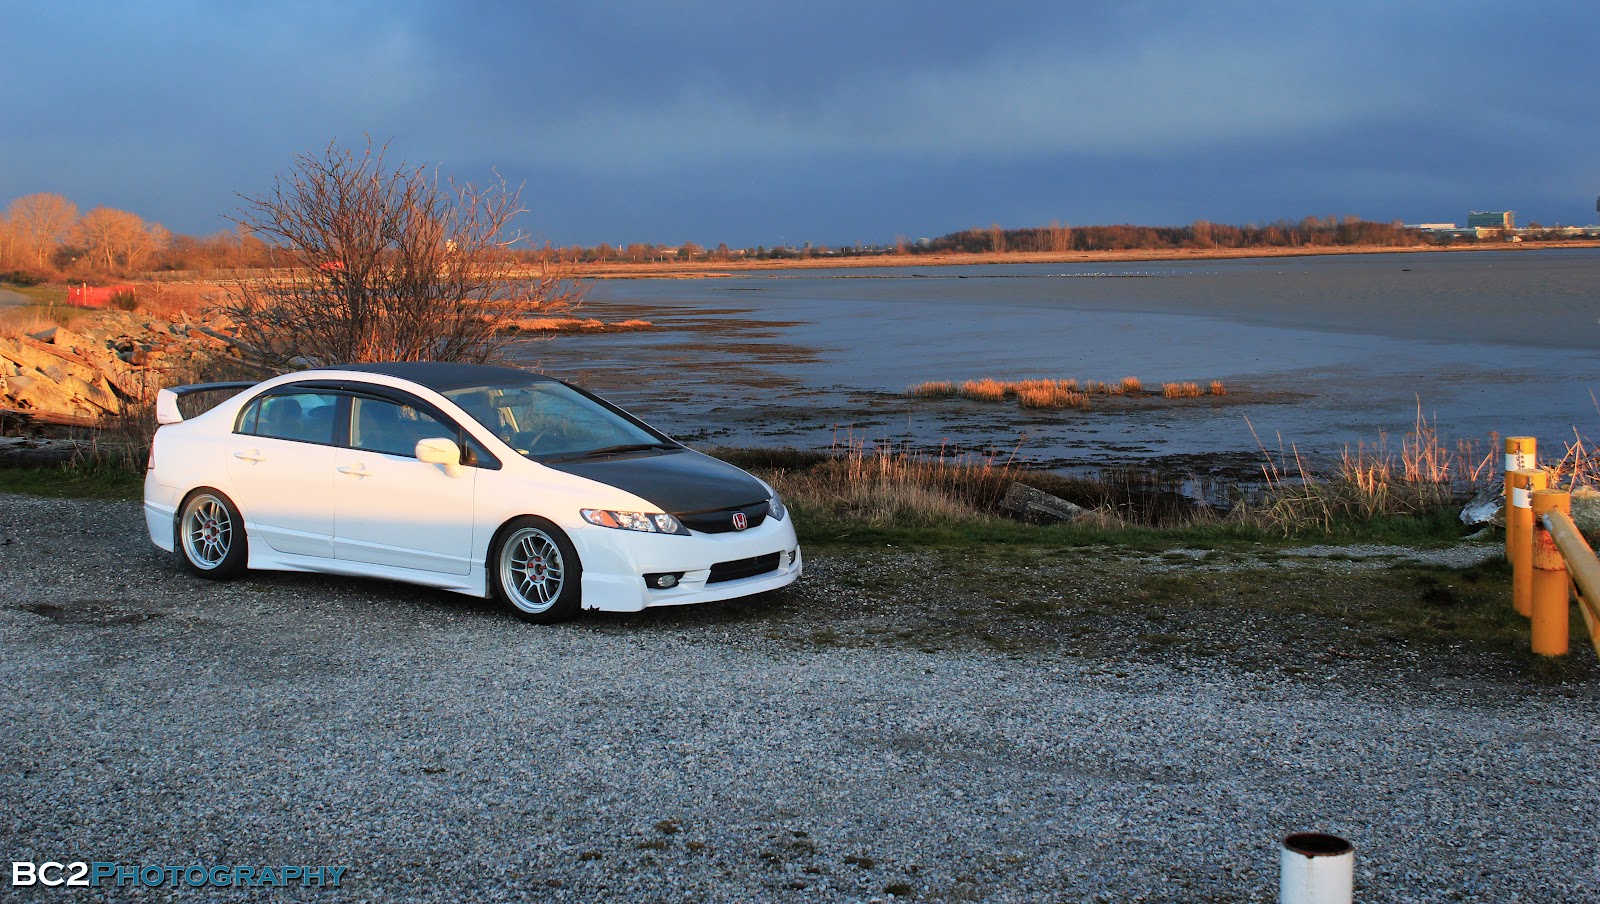
Pictures in the daylight How she sits for now
![Image]()
![Image]()
![Image]()
![Image]()
Anndd I got completely stuck trying to get out of my driveway today, luckily my neighbor came and saved me with some blocks of wood lol... I bought myself a block of wood too so hopefully I can make it in and out without dying too
![Image]()
Sideskirt on cement :hiding:
Tried looking for some new spots today to take pictures, found an area that has a crazyyy looking sky All shots were taken at 10pm, low iso + tripod + photoshop does wonders
Unedited
![Image]()
Edited
![Image]()
![Image]()
![Image]()
![Image]()
![Image]()
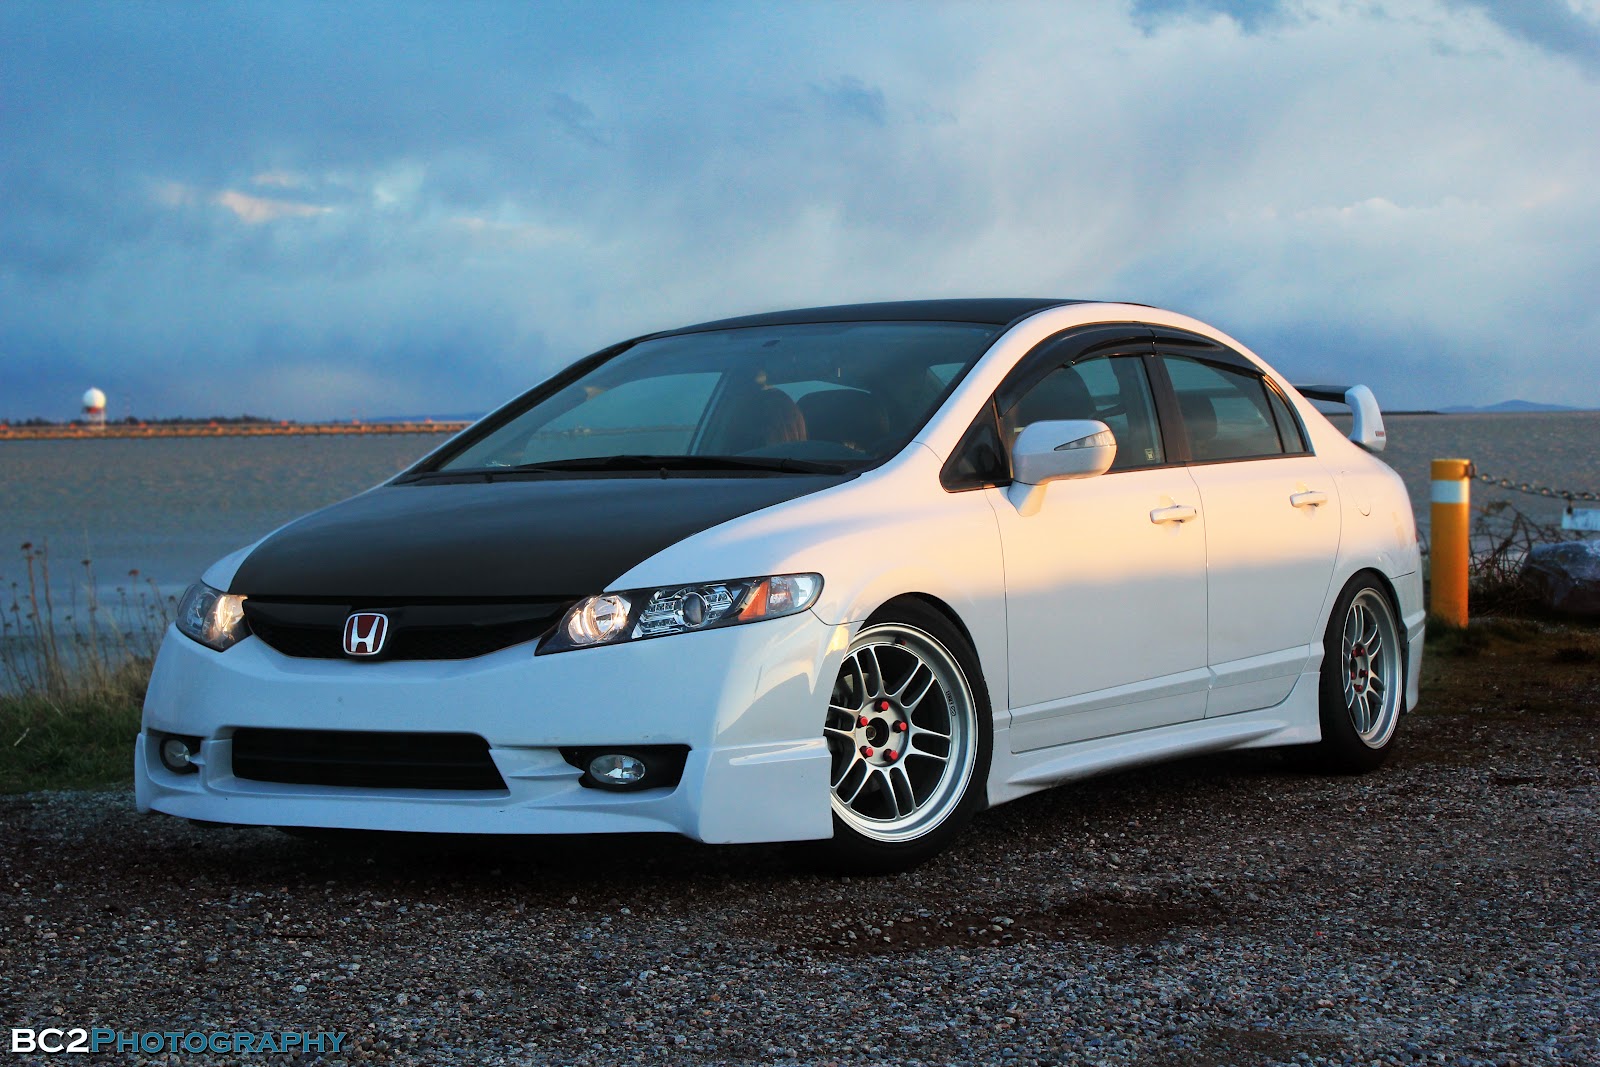
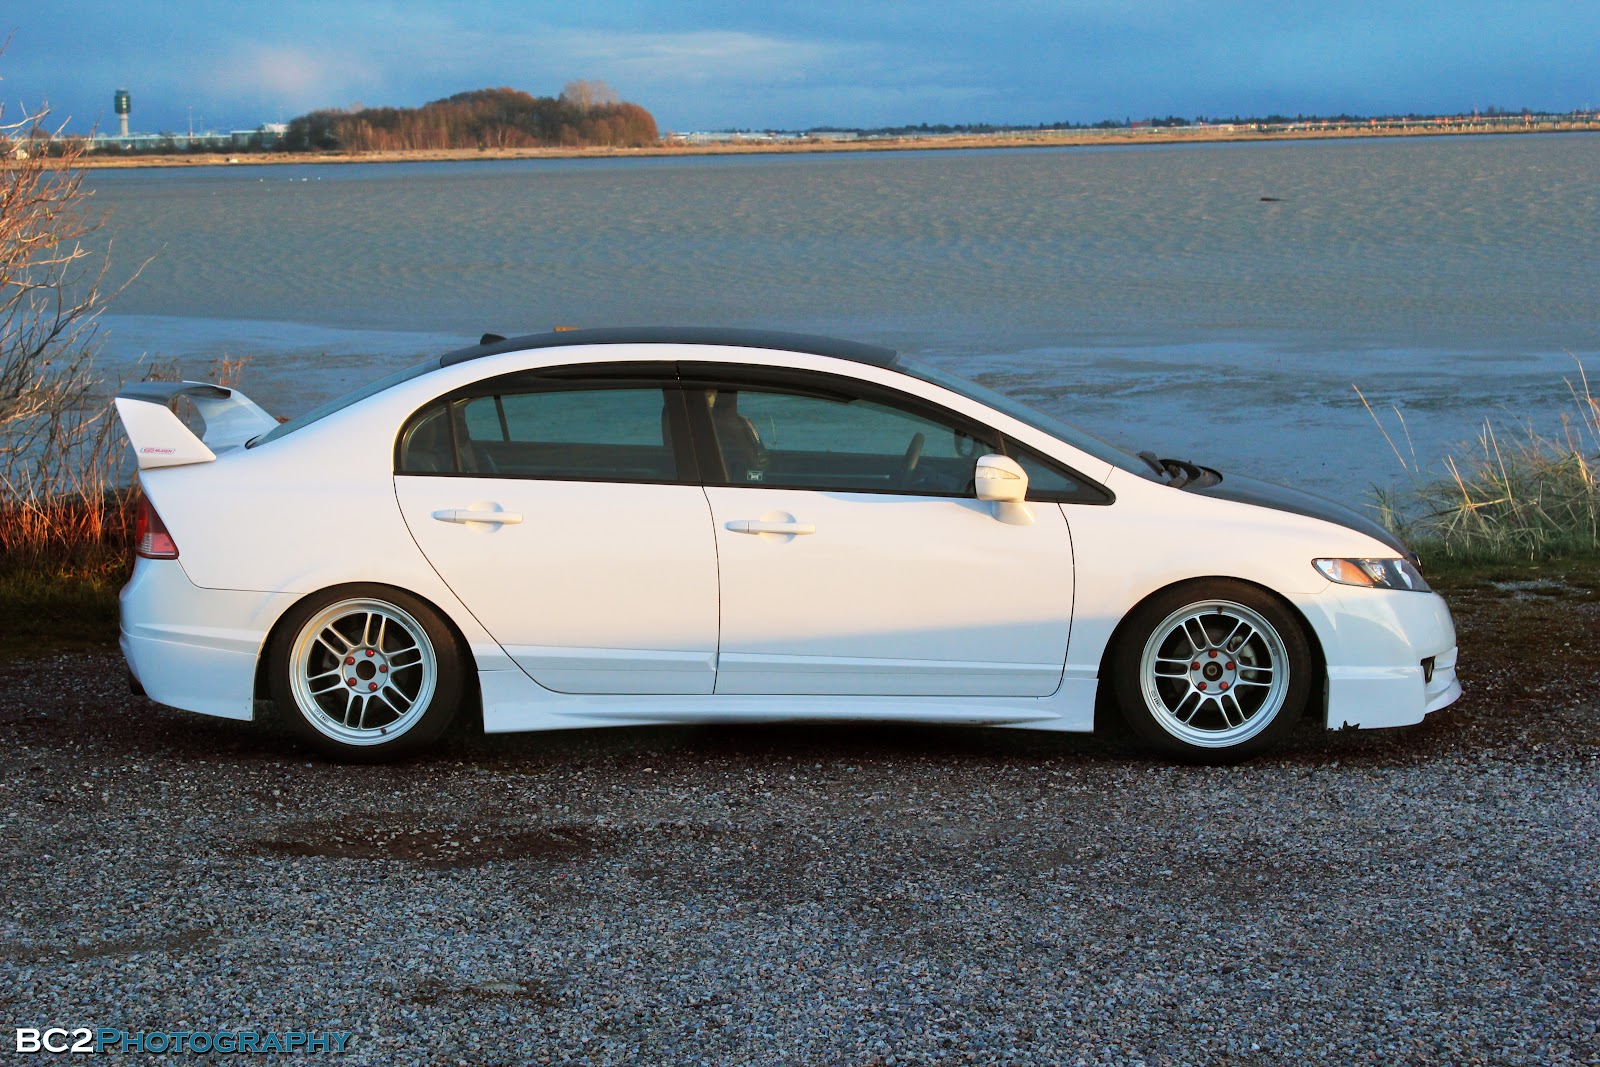
How she sits for now
Picked up my roof wrap from autocityimports and went straight to work on the same night with 2 friends at 8pm. Wasn't a good idea lol, since my friends both had classes the next day. We worked on it until 12:30am and then they had to go home, and I worked on it until 2am until I decided to go to sleep. Left it like this overnight in the garage, still had to do the rear behind my stupid hybrid antenna and the driver side
![Image]()
Woke up the next morning and got to work, in total it took me 7 hours... lol. I've had a lot of experience wrapping small-medium sized parts before but never big parts such as the roof. It was pretty hard, but I guess you live and learn right? There's a bunch of wrinkles on it and air bubbles so I'm going to have to redo it again. I got the normal gloss black wrap from autocityimports for a crazy price, thanks to Brad :thumbs: But when I'm free I'm going to pick up the higher quality roof wrap which is almost double the price, but should be worth it for sure. It'll definitely make installation a LOT easier lol. This wrap was fustrating to say the least, hoping to have a different experience with the more expensive gloss black from them that's supposed to let air bubbles out easier
![Image]()
You can't really see the imperfections from this picture, but trust me it's there lol
On valentines day... Had fun getting into my car... :facepalm: On the bright side I like how my car looks here
![Image]()
Got a cf center piece for my spoiler Bit hard to see the weaves because of the rain. It's the center piece from a VIS cf type R spoiler
![Image]()
And the WORSE part of my wrap... :'(
![Image]()
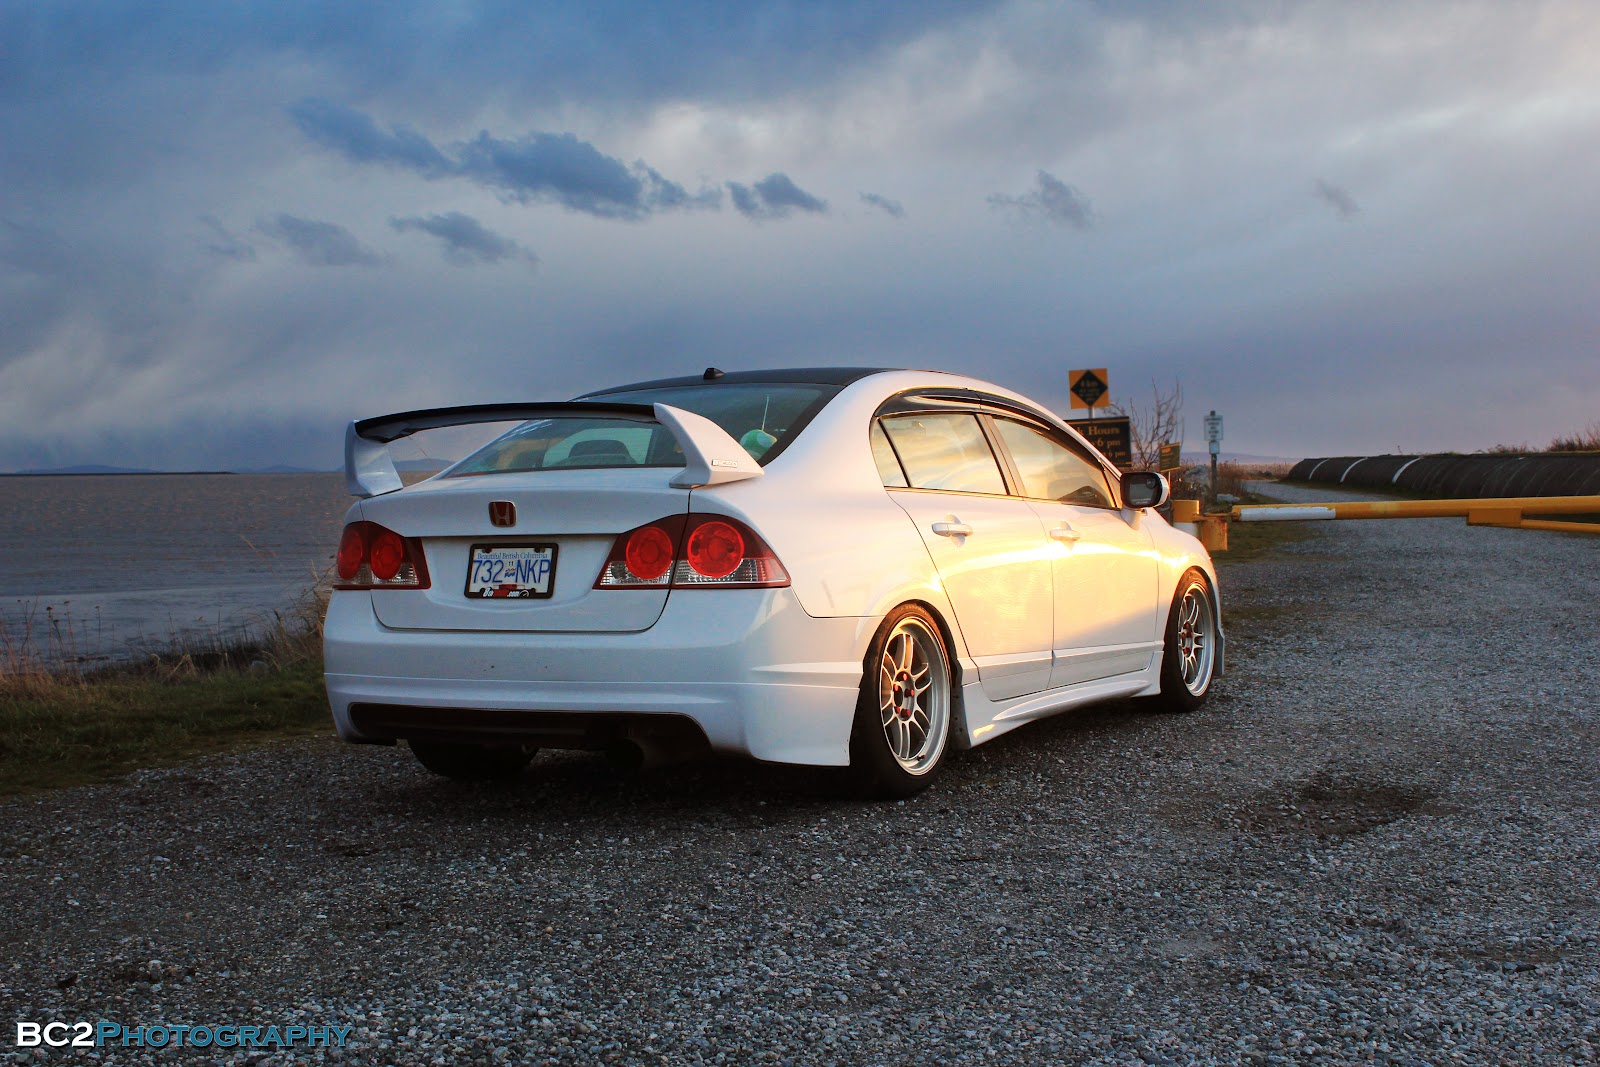
Broke my original jdm H emblem for my USDM trunk while trying to get off the backing lol.. so ordered another one from grafi and came in the mail today Also got my roof redone professionally in carbon fiber lol, looks a loooot better now. All I need is to get the 4th piece of my mugen spoiler off my USDM trunk and onto my JDM trunk and the rear will be done!
Though I could use a bit more poke on my stance..
![Image]()
Sticker
![Image]()
High res: http://1.bp.blogspot.com/-8RnVTi9Q8LM/T1MQxsHORLI/AAAAAAAAAFs/YXEIYrhl3EI/s1600/IMG_2020.JPG
The way it reflects light
![Image]()
High res: http://1.bp.blogspot.com/-ZmApz543LKE/T1MM9Iv8qwI/AAAAAAAAAE0/gJiuFMeueyQ/s1600/IMG_2011.JPG
The weave, flash was on in this picture
![Image]()
High res: http://3.bp.blogspot.com/-qb3enHNeVZM/T1MNK4QvqZI/AAAAAAAAAFM/gmkZWq2cFS4/s1600/IMG_2014.JPG
Some other high res pictures:
http://2.bp.blogspot.com/-lq-mr1TJZZo/T1MQn6mTRvI/AAAAAAAAAFc/xvTqOt40VpM/s1600/IMG_2016.JPG
http://1.bp.blogspot.com/-hoavnXCFbAA/T1MNcn_zNjI/AAAAAAAAAFU/FINbClJdyjg/s1600/IMG_2015.JPG
Some more pictures
![Image]()
![Image]()
![Image]()
![Image]()
![Image]()
![Image]()
![Image]()
Tried to edit this one into a rolling shot... still have a long way to go lol
![Image]()
![Image]()
Random updated picture of the interior that I found Taken a few months ago but never uploaded
![Image]()
Local revscene meet today Washed, claybarred and waxed my car... except I still didn't fix the paint peeling on the front lip and had to put a license plate on sigh. Working on a better way to mount my plate atm. I love this picture that someone took of my car
![Image]()
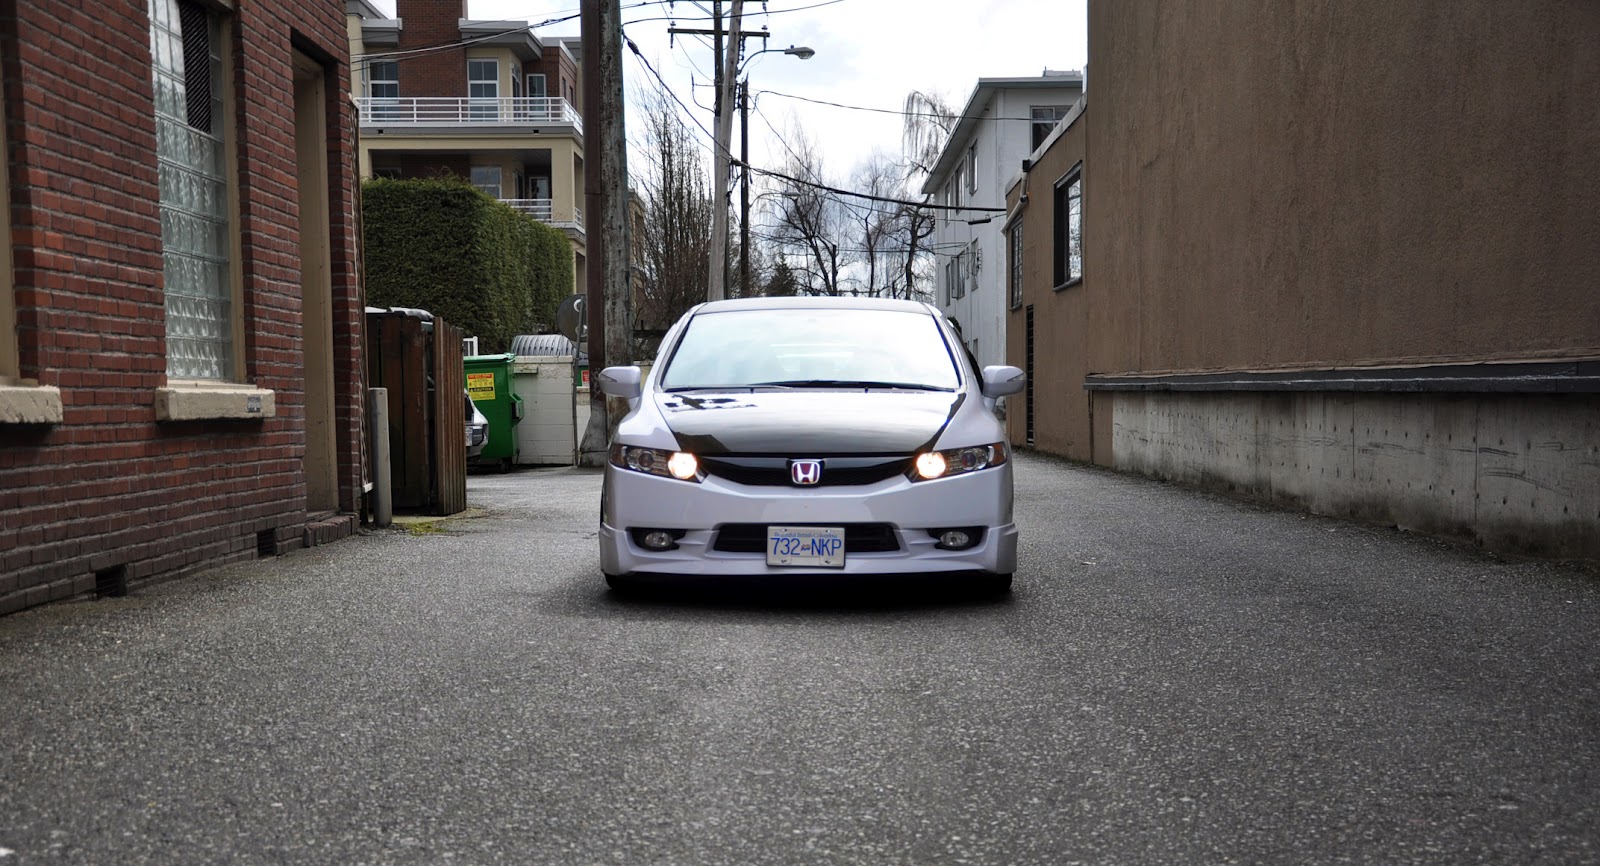
Then while I was driving back home through an area that was somewhat downtown, corner of my eye caught these two buildings and an alleyway and I thought wow that'd be an awesome place for a picture... So I went there and blocked the alleyway for a few seconds to take a quick shot lol. Turned out okay But still no where near as good as the one that was taken at the meet by someone else... I need to learn how to use my camera haha
![Image]()
![Image]()
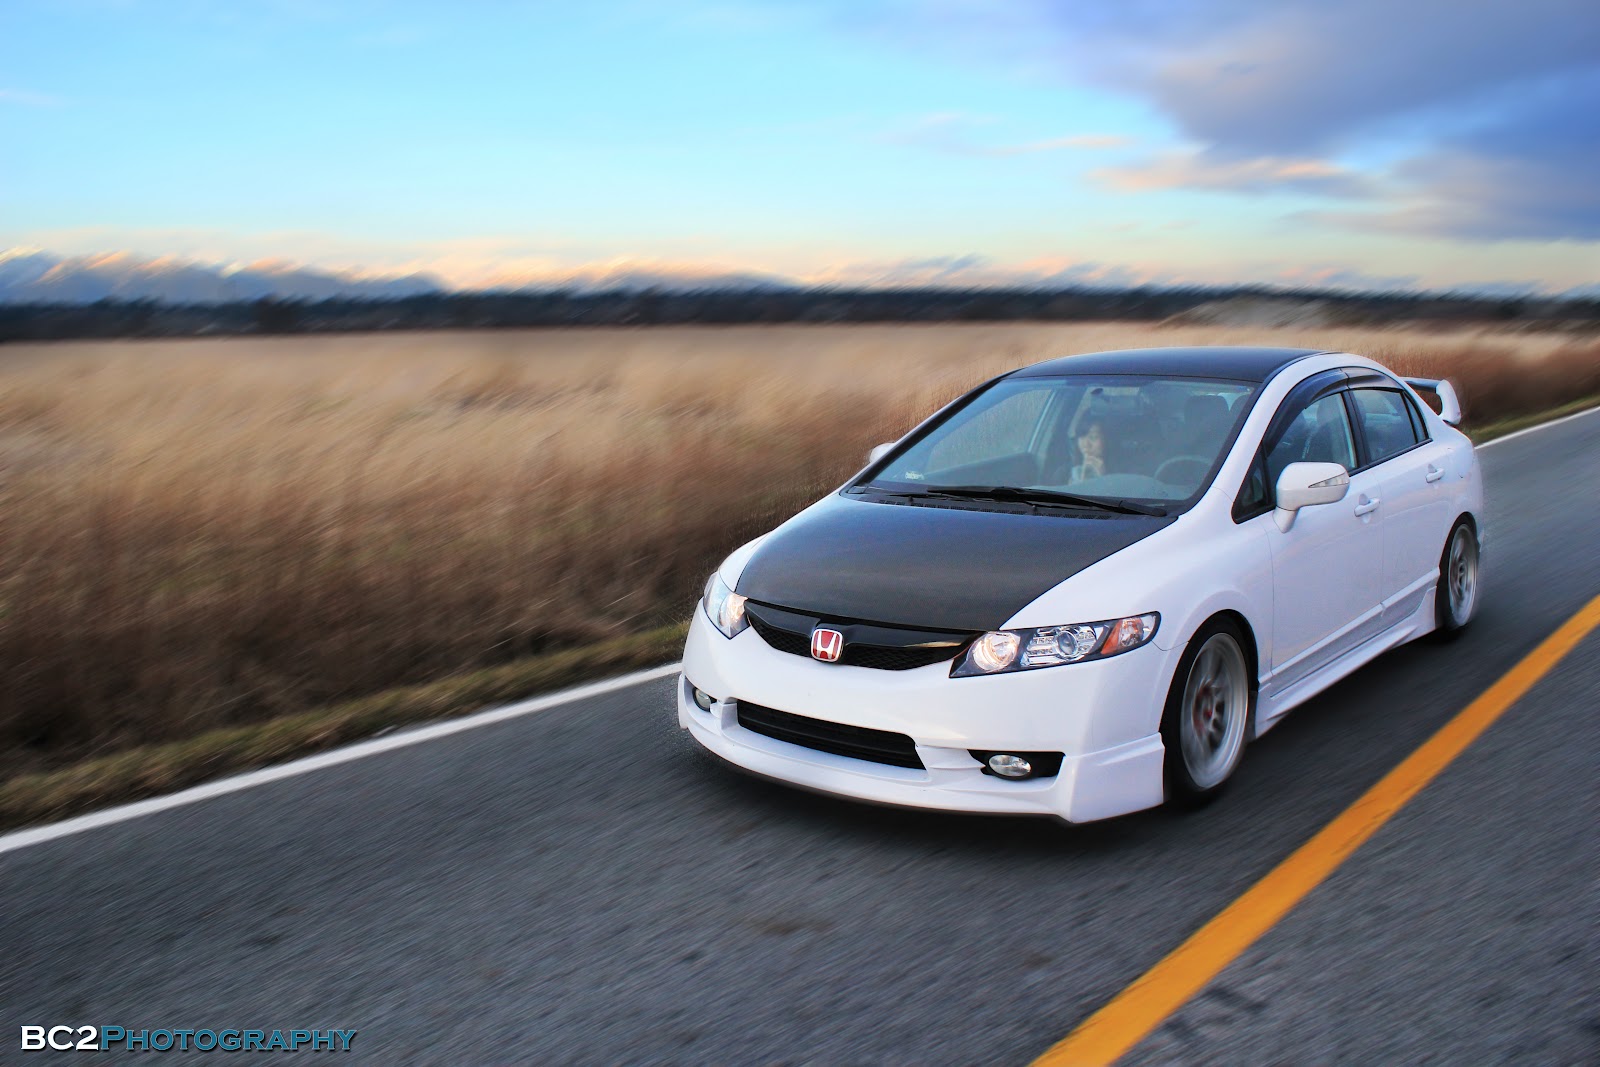
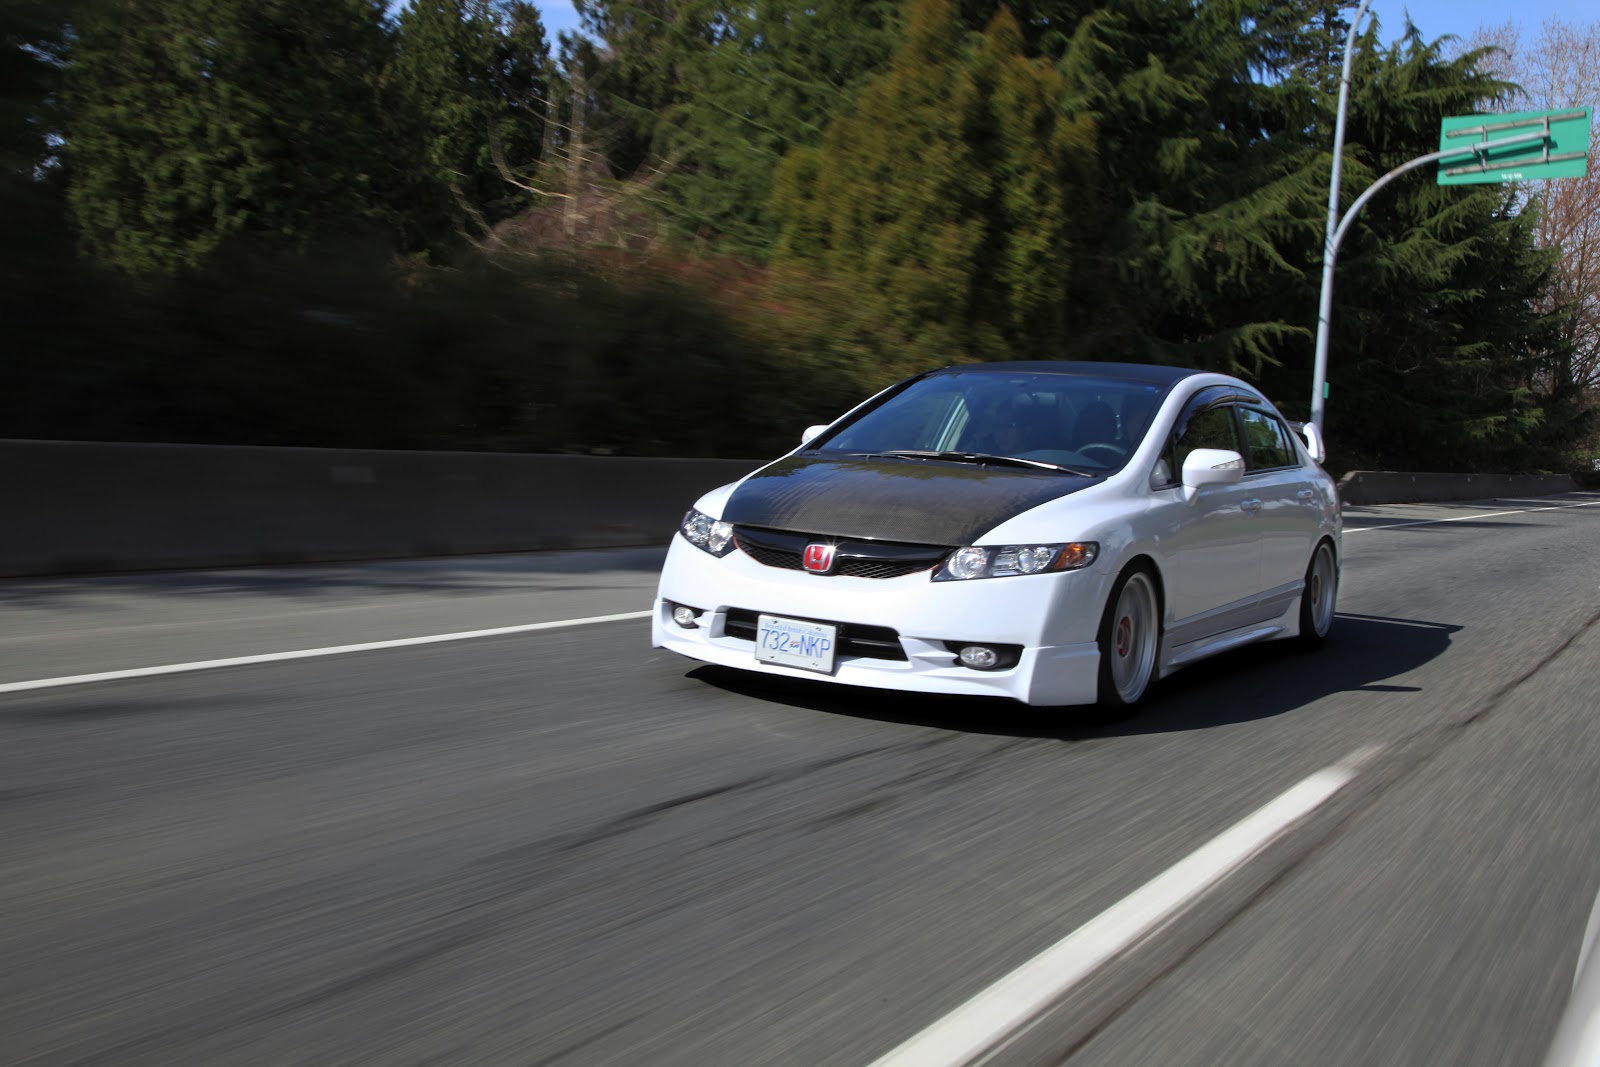
Finally a rolling shot!
![Image]()
Dat ass
![Image]()
Took a leap and got a kinda ricey exhaust put on this time lool.. spec d catback. Just wanted the burnt tip look, I hate the whole fart can kinda look lol.. getting it moved up a bit though because it sits too low atm
Raw teaser shot, too lazy to edit anything atm
![Image]()
Realized I've been through a number of different wheels the past 1 and a half years... Car's been through a lot of changes, I'm glad my car is where it's at right now The gold->white wheels are the same wheels, and someone pointed out that they all look about the same and I've realized he's right LOL. Rolling on some RE30 reps right now that are almost as light as my rpf1s O_O
![Image]()
Another small update, wrapped my arm rest thing with a black leather with red stitching cover from eBay that I got for about $20 Took apart the arm rest, took off the oem blue fabric and wrapped the leather one around it and kinda secured it underneath the black plastic cover with tape. Then screwed the black plastic cover back on (which when tightened holds the leather tightly in place). Looks 10x better and matches my seats now!
OEM blue fabric arm rest
![Image]()
Out with the old, in with the new!
![Image]()
![Image]()
Just got my catback fixed today! No more piping rubbing near the resonator, though the pipe at the end of the catback still scrapes sometimes :/ Also got the muffler raised so it looks like it actually fits now instead of hanging down. I can clear the exhaust in my garage now too! Though I literally have 0.5cm clearance on my exhaust tip/muffler and 0.5cm clearance on my front lip too lol
Fixed exhaust Before and after, though it's not that noticeable in the pic it's VERY noticeable in person! Hid my fart can a bit better lol
![Image]()
Driveway y u no let me lower front more
![Image]()
Picked up my spacers and lugs today 15mm spacers for the front, and swapped my 5mm spacers for the rear. Have to work on the rear still.. shaved my fronts today though! From looking at it I think I got about 8mm or so off First time and it turned out pretty good I have about 1 finger gap between tire and fender (clearance, not height wise) so I can push it out 5mm more when the car is on a level surface. BUT my stupid huge hill on my driveway puts my car on a VERY awkward angle every single time I go out, so on that very awkward angle the front has about 1mm clearance before it rubs... meaning I can't push it out any further unless I get more camber sigh. Will get a pic tomorrow in daylight
Lugs
![Image]()
Before and after
![Image]()
Sprayed some clear rust protectant
![Image]()
Bought a pair of 20mm spacers for the front (5mm thicker than what I have atm) and gonna put the 15mm spacers in the rear (10mm more than what I have atm in the rear). Went back with an angle grinder and shaved the ish out of my fenders lol, while still keeping it looking stock on the outside of course Hopefully I'll have a good stance with these spacers without rubbing or needed to add camber with the shaved fenders
Front fender; I sanded it down after I took the picture to make everything more smooth, even though when it wasn't sanded down from the outside it looks completely stock. I cut off almost the entire lip lol, pretty happy
![Image]()
Rear fender, looks stock too from the outside The rear fender IS SO THICK. The double lip thing is a huge pain to shave down, still working on it after an hour (yes I'm a noob with the angle grinder). Before/after pic, the middle of the fender in the after pic is pretty much as thin as I want to go. Going to make the rest of the fender level with it, sand it down, rust protection etcetc and call it a day. Finger in the picture for reference
![Image]()
Starting to plastidip the inside trim to black it out Going one step at a time. Also picked up 4 black door panels for $100 off craigslist, woot. Another good deal
![Image]()
My friend and I bought some red H stickers for his center caps since he plastidipped his wheels white, and found out that a well known member from 8thcivic actually makes these and sells them on ebay! I got some brake caliper stickers from him as well in red, so decided to paint my calipers black so it's subtle yet better than silver. Everyone asks me why I didn't paint my calipers red, well... imo my calipers are too small and would look tacky in red. The only good looking red calipers would be bbk ones, of course purely my own opinion.
Anyways, portabuddy does sell them in packs of 4, but gives you 2 extra ones for free in case you mess up or anything So 6 actually came in the mail for me
Fronts
![Image]()
![Image]()
Rear
![Image]()
And how she sits now
![Image]()
![Image]()
![Image]()
Sorry some shots are a bit blurry, was in a rush to get back in the house haha. Haven't been able to get a picture of the red H center cap stickers on my friend's Si wheels yet, but will post them up here too when I get a chance to take some!
If you guys have time, check out portabuddy's shop on eBay Some good quality stuff, and precision cuts!
portabuddy | eBay
Mods;
Engine;
Spec D catback
Fujita SRI
Yospeed JDM shocker battery tie down
Exterior;
Carbon fiber roof wrap
Seibon carbon fiber hood
JDM Red H Emblems (front and back)
8thcivic license plate frame (rear)
55w 6000k HID low beams
OEM style foglights w/ 3000k HIDs
Mugen window visors
Mugen 4 pc RR wing w/ a CTR carbon fiber center piece
Carbon Fiber wrapped trunk chrome license plate trim
Gloss black wrapped front grill
Red molding on grill
Grafi Red out tail light overlays
Mugen (USDM) front lip
Mugen sideskirts
Mugen (JDM) rear lip
FD2 Tail lights
FD2R trunk
Luminics blue 5000k DRL/high beam bulb
DEPO projector headlights
Shaved front and rear fenders
Painted black brake calipers
Red HONDA brake caliper stickers
Interior;
Cipher seats (similar to dc2 recaros) Black w/ red stitching
Leather black w/ red stitching arm rest cover
Blue JDM H steering wheel emblem
Blue LED strip in passenger and driver footwell
White LEDs in dome light
White LEDs in map lights
White LED strip in the trunk
Carbon Fiber wrapped shifter bezel, ebrake handle, door trims and trim underneath speedometer
Black suede shift boot w/ red stitching
Blue round shift knob
Carbon fiber Mugen emblem below shifter
Mugen pedals
JDM Blue Hazard button overlay
Black door panels
Plastidipped black interior trim pieces
Wheels/Suspension;
RE30 replicas 18x8 +42
20mm spacers front
15m spacers rear
215/40/18 Achilles ATR Sport
Spec D neo chrome lugs
Shaved front fenders
Skunk 2 Pro S II coilovers
Progress rear swaybar
I.C.E
JBL GTO7001 Amp
JBL 10" sub
JBL GTO628 component speakers
Stinger 600w amp kit
Sound deadened trunk/car cabin
Sony XAV-62BT double din
Misc
Flip key
Q: How did you get that shift boot on your auto?/Where did you get it from?
A: I got the shift boot off of eBay, cheapest one I could find there. It's alcantara with red stitching. I just cut off the excess on the bottom so it would fit our car, then I took off the PRND plate and used a sewing needle to poke a number of holes on the edge/bottom of the shift boot. Then I put zipties through the holes and stuck them on the bottom of the shifter bezel so there wouldn't be any gaps. Experiment with this, I did and it turned out okay. It was only around $10 iirc
Have fun. Oh and yes the ring on top of the shift boot is attached to the shift boot, it was the specific design that I just happened to get.Q: Do you ever rub with that stance?
A: I don't rub with the 17x9 +42 rear and +40 fronts on 225/45 tires. That's about as far as they would go without rubbing. As for the 18" specs, I would rub a lot if the fenders were stock. I did shave my fenders all around with an angle grinder, so now they do not rub and I actually can go a few mm more pushed out if I had the spacer size for it. Only because the fenders are shaved though, which gave a lot more clearance.
Q: Did you keep the air bag light off with your aftermarket seats?
A: No, I didn't. But you can if you take the right ohm resistor and put it in the plug for the airbag sensor. I didn't mind the airbag light on, and from what I've heard the rest of the airbags do come on even with the airbag light on from the seats. Don't quote me on that though, since I haven't tried that first hand (thankfully).
Q: Where do the seatbelt points mount onto the car? Seat/B pillar?
A: Other than the part where the seat belt comes of from, there is only one other place that it mounts to, and that is to the seat itself. The driver's side has a bolt right on the left side edge of the seat facing the door, and the passenger side has a bolt right on the right edge of the seat facing the door. The seat belt buckle also mounts to the seat itself and not the car, on the opposite side of the seat belt. The wedge brackets will give you both mounting points
Q: Flip key! How did you do it/where did you get it cut?
A: I got my flip key off of an eBay seller called dsp.store. The local dealership cut my key for about $25 iirc, but in some places you can also get it cut at Ace Hardware for a lot cheaper if they have the specific machine for it. You just need to get the keyblade cut and then move the electrical components from your OEM key fob into the flip key case (everything will swap right over). Then you have to decide to either use the transponder from your valet key (burn the rubber plastic off the valet key to get to the wireless transponder), or take apart your OEM key fob's board and extend the transponder with wires via soldering. I did the valet key method because it's much more simple. Regarding painting, I sand it down, spray adhesion promotor, then lay 3-4 coats of primer, 3-4 coats of color. If you're doing white I suggest NO cleat coat because it will yellow (mine has yellow'd), or only spray a light 1 or 2 coats at most.
Q: How did you get your interior panels black?
A: Door panels were replaced with black ones. The rest were plastidipped, and have held up great.
Q: How did you do your shift knob/where did you get it?
A: eBay. Don't remember the specifics anymore but there is a DIY on this that I followed on this forum. I have also posted the thread pitch that you need to put it on an auto so search through that DIY thread for it. It's just lying on top of the shifter, it is a little bit loose but because the threading of the shift knob is so deep it stays on the shifter perfectly fine, even on P and D3 or whatever's the lowest gear. It does spin because nothing is holding onto it except its own weight.
I hope this helps you guys
______________________________________________________________________________________________________________________________________________________________________________________________
EDIT: Wow I’ve gotten a lot farther than I thought I would with this car lol. I definitely couldn’t have done it without 8thcivic, when I first got this car I was completely clueless about modding. Reading through all the DIYs here several times and making a lot of noob threads has helped a ton haha
Some awesome shops to check out!
[BoomPlusToys]
Got my FD2 trunk from him at a great price. Morris is a great guy, definitely hit him up if you want to do a front or rear JDM conversion!
[BoomPlusToys]
Got my FD2 trunk from him at a great price. Morris is a great guy, definitely hit him up if you want to do a front or rear JDM conversion!
Hands down one of the best customer service I have experienced with these guys I got a bunch of stuff from them, and will definitely be getting more in the future. They have awesome prices and are there to support you before and after the sale!
I got a bunch of stuff from them, and will definitely be getting more in the future. They have awesome prices and are there to support you before and after the sale!An eBay shop owned by one of the members here on 8thcivic Got my brake caliper stickers and red H center cap stickers from him! Great guy, and precision quality cut stickers! Definitely go to him if you need something like that
Got my brake caliper stickers and red H center cap stickers from him! Great guy, and precision quality cut stickers! Definitely go to him if you need something like that Check out my blog for hi res pictures of my car if you have time!
http://bc2photography.blogspot.com
This is the build thread for my 2009 Civic Hybrid. I'm still a student, and this is my first car ever. My mom actually bought this for me as a present, brand new from the dealership on Aug 2010. At the time she did not want me to drive manual because she thought it was too dangerous, so she decided to buy me a hybrid so I could save gas. The hybrid wasn't my first pick, and I'm actually pretty annoyed with how slow it is but it's a HUGE present, and I'm very thankful that I even get a new car for my first car
A lot of people have been asking me why I don't just trade it in for an Si if I'm doing so many mods. I actually want a lot of other cars that have some actual power, but my mom threw in $28k for this present. I'm not sure how to explain it, but I think it wouldn't be right to just trade it in after just a year, and I do want to show her I'm VERY grateful for it. Maybe I'll be able to get another car in a 5-6 years after I've saved up enough for one. She paid for the car, but I'm saving up slowly for all the mods. Like I said, I'm a complete noob when it comes to cars. I've been slowly trying to learn along the way, so you'll see a lot of different phases lol. First year or so didn't look so good. Anyways onto the build thread
Currently: updated (April 10th, 2012)

___________________________________________________________
First day;
Purchased August 2010 brand new from a Richmond Honda dealer;

Debadged the CIVIC and HYBRID emblems, and added a 'got hybrid?' decal


When I first got the car, I knew close to nothing about cars. I'm still learning right now, but I had this phase where I wanted my civic to be a bit more 'unique'.. in the wrong way.
As you can see here. LED DRL's installed
Interior LED's (still presently on my car) hooked up to my lowbeams


[Oct 02 2010], had a hood swap with a nice guy on revscene
Seibon oem style carbon fiber hood
[Oct 26, 2010] Got some new wheels.. XXR 525 16x7 +38


And here comes the popular overpriced JDM emblems.. $150 for the set from AJR :\

Dec 1 Bought a Mugen RR 4 pc spoiler from a guy on revscene brand new unpainted for less than half the retail price. Got it painted in a shop since Spectrum White Pearl is a tricoat so I couldn't rattle can it or even spray the color properly with a spray gun.. Wrapped the top piece in CF and didn't paint it.
And also relocated my license plate with 2 L brackets, installed my fogs. Had those chrome trim pieces on my door handles from a few weeks ago
Feb 4 2011 Mail just came in from grafi
Blue JDM steering wheel emblem, and some decals
Feb 15 2011 Got some new wheels for a great price. Advan RS replicas 18x8 +40 on 215/40/18 tires, took off the tacky chrome pieces on the door handles


April 19 2011 Wrapped my ugly chrome trim on the grill in a gloss black vinyl, wrapped the bottom of my bumper in CF 3m di noc, and got a license plate frame and wrapped that in CF as well.

May 13 2011 Finally installed my lowering springs that were sitting around for 4 months lol. H&R ones, pics was taken a hour or so after installation, hopefully it'll get lower after it settles in.
Also got some insanely ugly mugen style visors off ebay that are on my car in these pictures. Just purchased some kplayground mugen visors from a local member here just today and haven't put them on my car yet
Also wrapped my trunk chrome trim in CF 3m di noc a while back. 8th civic license plate from on my rear license plate too
Relocated my license plate to the lower middle in a few minutes using L brackets on the stock license plate holes in the grill, no new holes


May 15 2011 Replaced my crappy ebay mugen visors with some kplaygorund ones
Rear one = eBay
Front one = kplayground

The results:


Much better
My new favourite mod
red out tails from grafi! Also have a muffler tip on there that looks similar to the Si one but a bit better, too bad it's not really visible in the picture Sorry for the crappy iphone pic
I took a lot more pictures with my gf's Nikon of my car lowered but they're all about 6mb each so imageshack won't upload it, and I'm too lazy to reduce their size right now lol.
DIY ebay flip key, plastidipped white


Mugen front lip, sides and rear are finally painted and was installing them with a friend today. Front lip was amazing.. took seconds to get a few screws in and done! Rear lip was a PITA. Fitment was terrible.. spent hours with a heat gun and tape and still couldn't get rid of the gap. Teaser pics for now, ran out of time to put on the sideskirts today because I had to run back and forth to buy the tools I was missing lol
My driveway that goes into the garage has a retarded slant, so I scrape coming into my garage :facepalm:

Rear lip, gave up trying to fill in the gap. Not noticeable in this pic but in person.. sigh lol

Got passenger sideskirt on properly but the driver side sideskirt just wouldn't go on, so taking it to a shop tomorrow to get them to fix the driver sideskirt and the rear lip as well. Here's a shot of my car with the good sideskirt and my winter wheels lols.


Here's where the wheels are! Getting plastidipped white

Had no index cards so did some ghetto masking that took an hour lol

Done for the night at 1:20am!

Just to see what it looks like , I think it'd be a better match for taffeta white rather than pearl white. Plastidip is still drying lol

Completely forgot to add this, I wrapped part of my interior a while ago in CF wrap
Didn't get many pictures, but here they are


Got the bodyshop to fix my rear lip and sideskirts for me! Car's exterior is pretty much done now


Loving the white on white, plastidip

Just got my HFP exhaust installed today! Less than $200 shipped, just had to drive an hour cross border to pick it up
Worth it for sureSome random shots with bad lighting, my bad lol


Last addition to the car
Wasn't planning on adding anything else since I will want to trade this in for another car in a few years, but got an amazing deal that consists of these 3 pieces, a FD headlight and some other little pieces for just $50 haha. Going to put my order in for the trunk tomorrow and hopefully have the rear done in 2-3 months when it comes in!
At the Cypress premeet with a crazy nice csx!


Fujita SRI polished coming in soon, as well as my JDM rear conversion!
Just picked up my new shift knob, fujita sri and progress rear sway bar today from the states! Intake install took less than an hour with a friend of mine, and we're just 18 years old lol. Saved $100 from the crazy shops here that want to charge that much for an intake install :/ Going to install my rear sway bar when I have time. The SRI really sounds amazing, but I honestly did not feel much of a gain lol. I have just resetted the ECU and hopefully when I drive it again tomorrow or in a week or so the ECU will have adjusted to the intake and maybe give me some gains.
Here are some pictures! Excuse the dirty engine bay and interior, haven't had time to clean up :x

Stock engine bay, super dirty

All the parts in the box! Fujita gave me a shet load of stickers lol

After 45 minutes, done!


Instructions were pretty straight forward, given that I could install it and have no idea what half the words used meant lol. Sound clip is currently being uploaded! Will post here when it's done
FD2 trunk will be coming in this week or next week! Can't wait
FD2 trunk here, painted and installed! First time with a dremel and freaked the hell out of me, but overall it was okay
A great learning experience that's for sure, I'm glad I did it myself instead of taking it to a shop.So the trunk got on pretty easily,

then came time for the side tail lights.. My dremel actually broke half way and I had to drive a few blocks down to Lordco and pick up a new one lol. Didn't want to put my bumper back on or tail light all over again so drove like this for a few blocks down to the store..

Dremel starts here! And drilll


Almost there...

Done! 4 hours of back and forth well spent lol.


Can barely see anything in this shot but it's my favourite lol

Some more shots! Local 8thcivic friday night meet and some shots by a new place that my friend found


[imghttp://a4.sphotos.ak.fbcdn.net/hphotos-ak-snc7/377590_10150946535625582_559120581_21540649_1221401745_n.jpg[/img]

Comparison between original and photoshopped


Got around to installing my blue hazard button vinyl from grafi today. Looks great when lit up
Here are some pictures

Lights on, sorry my LEDs in the footwell are connected to my parking lights/lowbeams so I couldn't turn them off for the pictures


Oh and I also installed the Mugen pedals a few weeks ago when the rubber piece on my original brake pedal fell off lol
If you guys wanna see the high res and high quality pictures, or if you guys have time check them out here; c2Photography
Just click on any picture to expand them
First three shots are my first attempts at actual close up shots, so they're not the best. They were taken for a contest that had close up's as its theme


The pictures here were taken in a underground parking lot, it was yellow as hell lol.
Here's a difference between a unedited shot (1st pic) and an edited shot (2nd pic)


Picked up my Depo headlights today, and having mixed feelings about them atm. The LEDs kind of kill it.. but doesn't look too bad. I needed projectors but didn't want to mess up my OEM headlights since I might be turning the car back to stock in the future. Wanted projectors headlights that looked as close as stock as possible, so picked up this set for $160 shipped.


I also have new Luminics 5000k bulbs in the high beam/drl area with a blue tinted bulb
You can kind of notice it in the last pictureThe cut off! I'm happy with it. Even though I aimed my stock reflector headlights a LOT lower, the glare would still light up over 2 stories high (if it was OEM headlights w/ hids, the glare would be past that garage roof on the right of this picture)

DDM 55w 6000k HIDs coming in soon!
Few updates coming up. Just got my DDM 55w 6000k HIDs installed
Looks a lot better than my old 35w 8000k. GF's dad has a 10" sub that he used to use in his civic, and he didn't want it anymore so he's giving it to me woot. Got a Sony 6.1" double din for christmas, so I'm gonna get a pair of front speakers and an amp to tie everything together!Here's a photoshoot that I shot with a 370z a few nights ago;
The favourite shot I took of the night, sadly it wasn't on my camera (my camera's the one in the picture) so the quality wasn't the best. I also had a shaky hand lol

Rest of the shots are taken with my camera


http://a7.sphotos.ak.fbcdn.net/hphotos-ak-snc7/393602_10151066193800582_559120581_21962175_1363546526_n.jpg[/ig]
[img]http://a5.sphotos.ak.fbcdn.net/hphotos-ak-snc7/396470_10151066194000582_559120581_21962176_526487778_n.jpg


Trying to do some motion editing.. these are all still shots that I've TRIED to make look like rolling shots lol


Happy 2012 guys!
Christmas was awesome, my girlfriend bought me a set of component speakers for the front <3 and her dad gave me his old 10" sub that he doesn't use anymore haha. Mom bought me a Sony XAV-62BT double din as well! So I decided to get myself the things needed to finish off a very basic I.C.E set up; Speaker adaptors, a double din kit (which was surprisingly almost $100 ), an amp and an amp kit (the kit was expensive too lol ), and a bunch of sound deadening material! Started to work on some stuff;Missing from picture: Amp+amp kit

Lets start!

Running wires for the amp.. stupid hybrid battery makes everything so much harder. Look at that tight space


Sound deadening begins!


Done!


Door speakers;

Sound deadening the floors of the cabin, and underneath the rear seats as well. Also running wires for my amp at the same time. Oh and also plastidipped my center console in black, I hate beige anything


Sound deadening and wire running begins! All the wires were ziptied to OEM wires that were already clipped onto the chassis


RCA/Remote wires along the center console

Putting everything back together...

Total time it took me to take apart the interior, paint the center console, sound deaden, and also run the power/rca/remote wires was about 5 hours. It was my first time doing anything of the sort, but definitely worth it. Learned a lot and saved $200 for just running the wires myself lol. I can see why shops charge that much money though, it's a real pita.
Now everythings prepped and I just need to get my double din installed and sub/amp set up!
Got the double din installed and ready to go! Amp is finally hooked up along with the sub, tunes sound so much better with that thump


New shoes for 2012! Went with 17s this time, sticking with the white on white
Sold my advan rs reps to a local on 8th and he's fixing up all the curbs to get it ready to put on his car this summer! Can't wait to see it on his coupeFitment isn't that great, being 17x7.5 +38. The tires are awesome though compared to my old ones! 215/45/17 Hankook Ventus HR2

Looking into either getting some spacers or coils very soon! Can't wait to slam this ish. Driving a hybrid, I'm already slow so might as well go low too lol
Alright so 3 days after I got my work reps, I also bought a set of used skunk 2 pro s v2 coils. The guy also traded me his legit enkei rpf1 for my work wheels + cash haha. Oh and also got some blue Muteki lugs to match the blue valve stem
17x9 +45 with 3mm spacers up front so it'll clear my brakes. I'm looking to get some thicker spacers soon And also go lower! Haven't adjusted the height yet, or done any fender work. Right now I'm at 1 tight finger gap all around, and getting out of my slanted driveway is still a nightmare...


Excuse my dirty car lol. Going to make my car way lower when I have time to adjust the coil settings, and also spacers are just waiting to be put on as well!
They're just sitting in my garage atmFriend got an RX8 recently, and we went to go take some quick pics today. It was raining so we went to an underground parking lot, man those lights are so yellow.. it's so hard to balance the color properly lol. Here's the original picture, and edit below


Oh and also got one of the seats in today... finally. The other seat is in my garage waiting to be swapped in. These things are a real pita... lol

Other seat is in
Not too sure how I feel about the blue leds in the footwell anymore lol
So I won a photography contest hosted by Yospeed at late December 2011, not sure if any of you noticed but my car was on their front page for a while
It's gone now though sadly lol But I did get an awesome free battery tiedown from them! Quality is amazing Adds a nice little flare to my boring engine bayBefore;

After;


Thought it would match the red in my SRI more, but turns out my red filter isn't really noticeable lol
I also got a LED strip from superbrightleds in my trunk now! It's so much brighter than the little oem bulb lol. I'm not sure why it shows up so blue in the pictures, in person it looks more like a 5000k shade of white

Also hid my amp underneath my spare tire cover so I could get a bit more space out of my already small trunk


And a random picture from a different angle I haven't tried before.

So I got around to lowering my car finally, but still can't get it to the height I want lol. Haven't done any fender work but took one of those clips holding my fender liner in place. Right now I rub a litttttle bit if I do realllly hard u turns lol, but other than that I'm fine.
What matters the most is my driveway clearance.. going out/into my stupid slanted driveway as parallel as I can lol. Level up from iphone clearance to toonie clearance XD Need way more low, haven't installed the front camber bolts yet and may get some sliders for the rear. Front is at 0 finger gap atm
Rear needs to be lowered a lot still, couldn't figure out how to do it for some reason :/ Will work on that.
Also put 5mm spacers up front and swapped the 3mm spacers to the rear. Needs more flush still, plan to get 10mm spacers for the front then put the 5mm spacers in the rear and see how that goes. Def need some camber if I do that + go lower though so I don't rub. How it's currently sitting right now

Oh and I put my red work lugs back on and plastidipped the cap red as well
My friend has some left over red caliper paint that he offered to give me, so now I'm trying to decide if I want to paint my calipers or not...
Pictures in the daylight
How she sits for now


Anndd I got completely stuck trying to get out of my driveway today, luckily my neighbor came and saved me with some blocks of wood lol... I bought myself a block of wood too so hopefully I can make it in and out without dying too

Sideskirt on cement :hiding:
Tried looking for some new spots today to take pictures, found an area that has a crazyyy looking sky
All shots were taken at 10pm, low iso + tripod + photoshop does wondersUnedited

Edited


How she sits for now
Picked up my roof wrap from autocityimports and went straight to work on the same night with 2 friends at 8pm. Wasn't a good idea lol, since my friends both had classes the next day. We worked on it until 12:30am and then they had to go home, and I worked on it until 2am until I decided to go to sleep. Left it like this overnight in the garage, still had to do the rear behind my stupid hybrid antenna and the driver side

Woke up the next morning and got to work, in total it took me 7 hours... lol. I've had a lot of experience wrapping small-medium sized parts before but never big parts such as the roof. It was pretty hard, but I guess you live and learn right? There's a bunch of wrinkles on it and air bubbles so I'm going to have to redo it again. I got the normal gloss black wrap from autocityimports for a crazy price, thanks to Brad :thumbs: But when I'm free I'm going to pick up the higher quality roof wrap which is almost double the price, but should be worth it for sure. It'll definitely make installation a LOT easier lol. This wrap was fustrating to say the least, hoping to have a different experience with the more expensive gloss black from them that's supposed to let air bubbles out easier

You can't really see the imperfections from this picture, but trust me it's there lol
On valentines day... Had fun getting into my car... :facepalm: On the bright side I like how my car looks here

Got a cf center piece for my spoiler
Bit hard to see the weaves because of the rain. It's the center piece from a VIS cf type R spoiler
And the WORSE part of my wrap... :'(

Broke my original jdm H emblem for my USDM trunk while trying to get off the backing lol.. so ordered another one from grafi and came in the mail today
Also got my roof redone professionally in carbon fiber lol, looks a loooot better now. All I need is to get the 4th piece of my mugen spoiler off my USDM trunk and onto my JDM trunk and the rear will be done!Though I could use a bit more poke on my stance..

Sticker

High res: http://1.bp.blogspot.com/-8RnVTi9Q8LM/T1MQxsHORLI/AAAAAAAAAFs/YXEIYrhl3EI/s1600/IMG_2020.JPG
The way it reflects light

High res: http://1.bp.blogspot.com/-ZmApz543LKE/T1MM9Iv8qwI/AAAAAAAAAE0/gJiuFMeueyQ/s1600/IMG_2011.JPG
The weave, flash was on in this picture

High res: http://3.bp.blogspot.com/-qb3enHNeVZM/T1MNK4QvqZI/AAAAAAAAAFM/gmkZWq2cFS4/s1600/IMG_2014.JPG
Some other high res pictures:
http://2.bp.blogspot.com/-lq-mr1TJZZo/T1MQn6mTRvI/AAAAAAAAAFc/xvTqOt40VpM/s1600/IMG_2016.JPG
http://1.bp.blogspot.com/-hoavnXCFbAA/T1MNcn_zNjI/AAAAAAAAAFU/FINbClJdyjg/s1600/IMG_2015.JPG
Some more pictures

Tried to edit this one into a rolling shot... still have a long way to go lol

Random updated picture of the interior that I found
Taken a few months ago but never uploaded
Local revscene meet today
Washed, claybarred and waxed my car... except I still didn't fix the paint peeling on the front lip and had to put a license plate on sigh. Working on a better way to mount my plate atm. I love this picture that someone took of my car 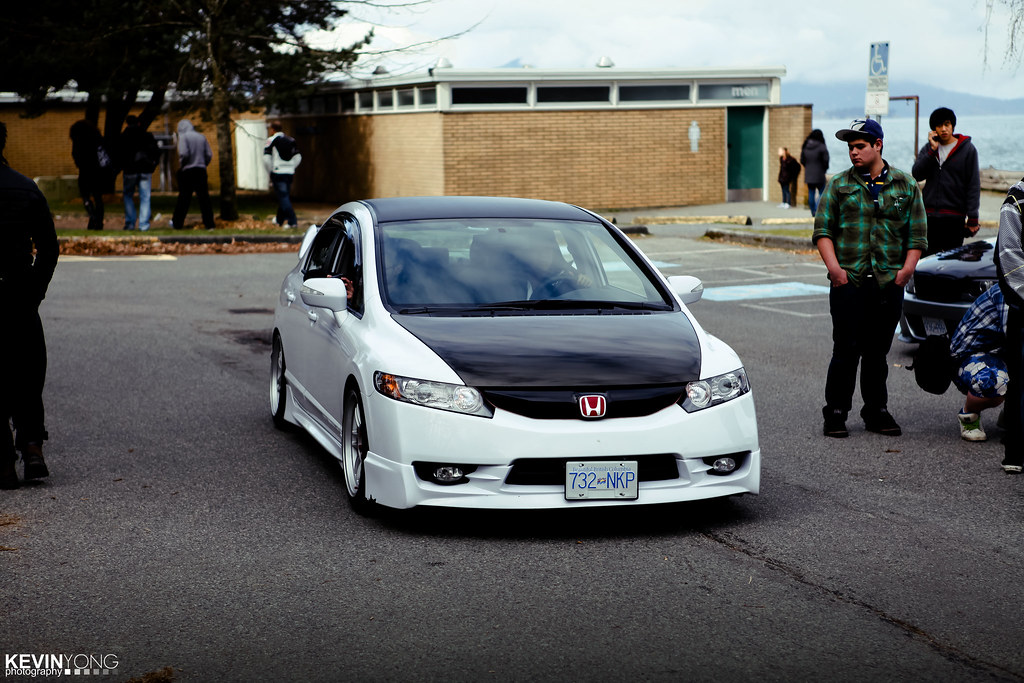
Then while I was driving back home through an area that was somewhat downtown, corner of my eye caught these two buildings and an alleyway and I thought wow that'd be an awesome place for a picture... So I went there and blocked the alleyway for a few seconds to take a quick shot lol. Turned out okay
But still no where near as good as the one that was taken at the meet by someone else... I need to learn how to use my camera haha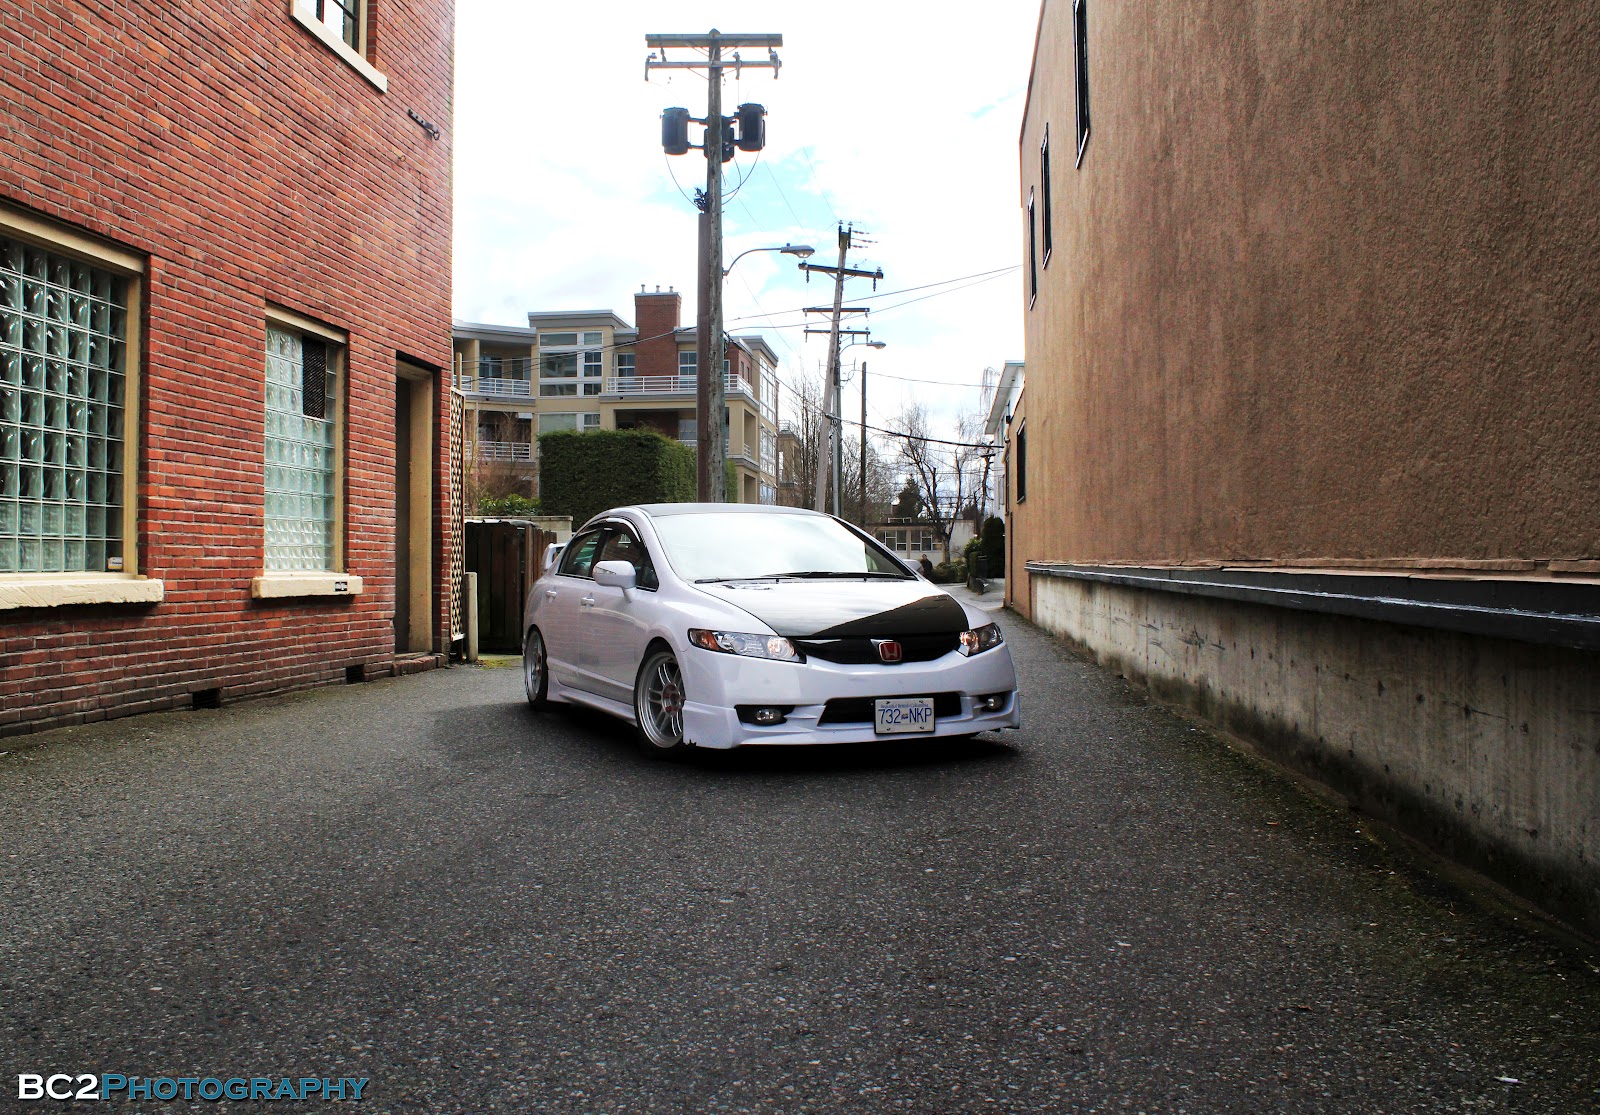
Finally a rolling shot!
Dat ass

Took a leap and got a kinda ricey exhaust put on this time lool.. spec d catback. Just wanted the burnt tip look, I hate the whole fart can kinda look lol.. getting it moved up a bit though because it sits too low atm
Raw teaser shot, too lazy to edit anything atm

Realized I've been through a number of different wheels the past 1 and a half years... Car's been through a lot of changes, I'm glad my car is where it's at right now
The gold->white wheels are the same wheels, and someone pointed out that they all look about the same and I've realized he's right LOL. Rolling on some RE30 reps right now that are almost as light as my rpf1s O_O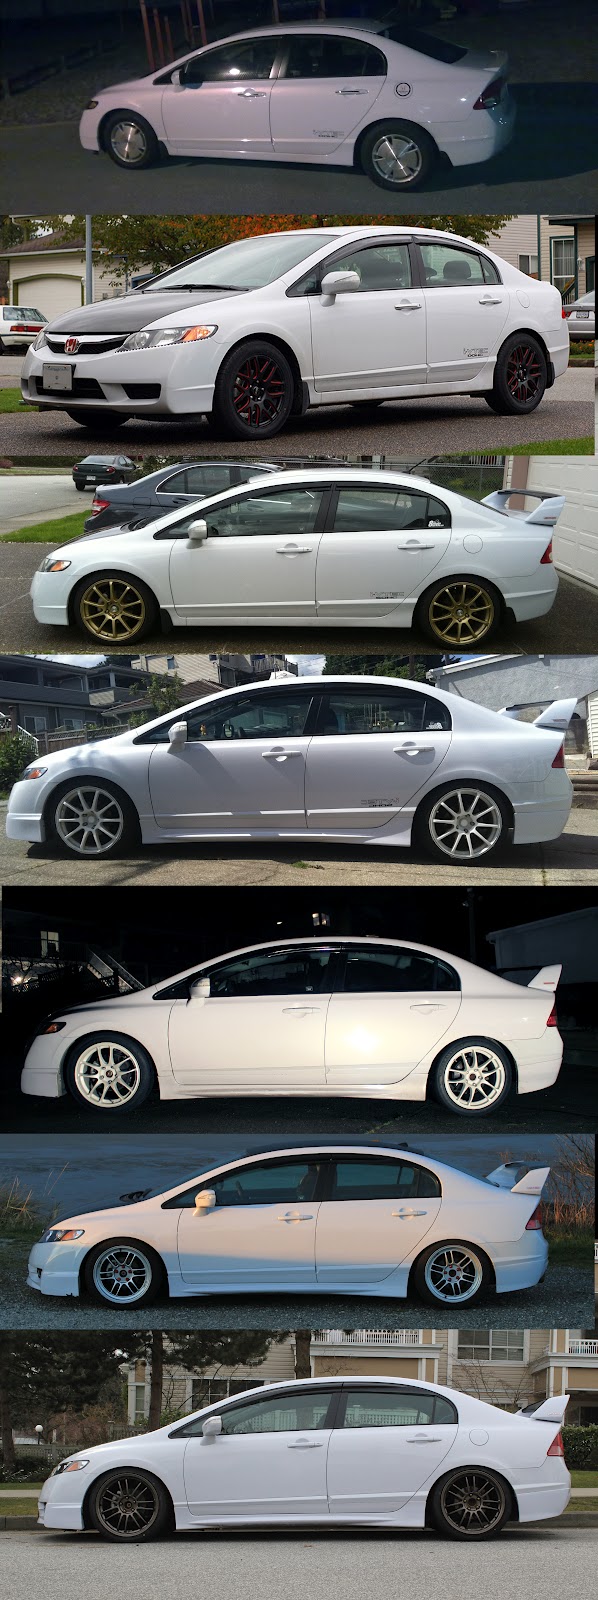
Another small update, wrapped my arm rest thing with a black leather with red stitching cover from eBay that I got for about $20
Took apart the arm rest, took off the oem blue fabric and wrapped the leather one around it and kinda secured it underneath the black plastic cover with tape. Then screwed the black plastic cover back on (which when tightened holds the leather tightly in place). Looks 10x better and matches my seats now! OEM blue fabric arm rest
 Out with the old, in with the new!

Just got my catback fixed today! No more piping rubbing near the resonator, though the pipe at the end of the catback still scrapes sometimes :/ Also got the muffler raised so it looks like it actually fits now instead of hanging down. I can clear the exhaust in my garage now too! Though I literally have 0.5cm clearance on my exhaust tip/muffler and 0.5cm clearance on my front lip too lol
Fixed exhaust
Before and after, though it's not that noticeable in the pic it's VERY noticeable in person! Hid my fart can a bit better lol
Driveway y u no let me lower front more

Picked up my spacers and lugs today
15mm spacers for the front, and swapped my 5mm spacers for the rear. Have to work on the rear still.. shaved my fronts today though! From looking at it I think I got about 8mm or so off First time and it turned out pretty good I have about 1 finger gap between tire and fender (clearance, not height wise) so I can push it out 5mm more when the car is on a level surface. BUT my stupid huge hill on my driveway puts my car on a VERY awkward angle every single time I go out, so on that very awkward angle the front has about 1mm clearance before it rubs... meaning I can't push it out any further unless I get more camber sigh. Will get a pic tomorrow in daylightLugs

Before and after

Sprayed some clear rust protectant

Bought a pair of 20mm spacers for the front (5mm thicker than what I have atm) and gonna put the 15mm spacers in the rear (10mm more than what I have atm in the rear). Went back with an angle grinder and shaved the ish out of my fenders lol, while still keeping it looking stock on the outside of course
Hopefully I'll have a good stance with these spacers without rubbing or needed to add camber with the shaved fendersFront fender; I sanded it down after I took the picture to make everything more smooth, even though when it wasn't sanded down from the outside it looks completely stock. I cut off almost the entire lip lol, pretty happy

Rear fender, looks stock too from the outside
The rear fender IS SO THICK. The double lip thing is a huge pain to shave down, still working on it after an hour (yes I'm a noob with the angle grinder). Before/after pic, the middle of the fender in the after pic is pretty much as thin as I want to go. Going to make the rest of the fender level with it, sand it down, rust protection etcetc and call it a day. Finger in the picture for reference
Starting to plastidip the inside trim to black it out
Going one step at a time. Also picked up 4 black door panels for $100 off craigslist, woot. Another good deal 
My friend and I bought some red H stickers for his center caps since he plastidipped his wheels white, and found out that a well known member from 8thcivic actually makes these and sells them on ebay!
I got some brake caliper stickers from him as well in red, so decided to paint my calipers black so it's subtle yet better than silver. Everyone asks me why I didn't paint my calipers red, well... imo my calipers are too small and would look tacky in red. The only good looking red calipers would be bbk ones, of course purely my own opinion. Anyways, portabuddy does sell them in packs of 4, but gives you 2 extra ones for free in case you mess up or anything
So 6 actually came in the mail for meFronts


Rear

And how she sits now


Sorry some shots are a bit blurry, was in a rush to get back in the house haha. Haven't been able to get a picture of the red H center cap stickers on my friend's Si wheels yet, but will post them up here too when I get a chance to take some!
If you guys have time, check out portabuddy's shop on eBay
Some good quality stuff, and precision cuts!portabuddy | eBay
Mods;
Engine;
Spec D catback
Fujita SRI
Yospeed JDM shocker battery tie down
Exterior;
Carbon fiber roof wrap
Seibon carbon fiber hood
JDM Red H Emblems (front and back)
8thcivic license plate frame (rear)
55w 6000k HID low beams
OEM style foglights w/ 3000k HIDs
Mugen window visors
Mugen 4 pc RR wing w/ a CTR carbon fiber center piece
Carbon Fiber wrapped trunk chrome license plate trim
Gloss black wrapped front grill
Red molding on grill
Grafi Red out tail light overlays
Mugen (USDM) front lip
Mugen sideskirts
Mugen (JDM) rear lip
FD2 Tail lights
FD2R trunk
Luminics blue 5000k DRL/high beam bulb
DEPO projector headlights
Shaved front and rear fenders
Painted black brake calipers
Red HONDA brake caliper stickers
Interior;
Cipher seats (similar to dc2 recaros) Black w/ red stitching
Leather black w/ red stitching arm rest cover
Blue JDM H steering wheel emblem
Blue LED strip in passenger and driver footwell
White LEDs in dome light
White LEDs in map lights
White LED strip in the trunk
Carbon Fiber wrapped shifter bezel, ebrake handle, door trims and trim underneath speedometer
Black suede shift boot w/ red stitching
Blue round shift knob
Carbon fiber Mugen emblem below shifter
Mugen pedals
JDM Blue Hazard button overlay
Black door panels
Plastidipped black interior trim pieces
Wheels/Suspension;
RE30 replicas 18x8 +42
20mm spacers front
15m spacers rear
215/40/18 Achilles ATR Sport
Spec D neo chrome lugs
Shaved front fenders
Skunk 2 Pro S II coilovers
Progress rear swaybar
I.C.E
JBL GTO7001 Amp
JBL 10" sub
JBL GTO628 component speakers
Stinger 600w amp kit
Sound deadened trunk/car cabin
Sony XAV-62BT double din
Misc
Flip key


