Thanks to Steve (BV1) and w00t692 for their valuable information!
The following is a calibration procedure for anyone running a TSX, Maxbore-modified or otherwise larger-than-stock TB. A few things I learned along the way:
- The "normal" idle of approximately 850RPM is fully ECU-controlled.
- Removal of ECU control or coasting at speeds above 5mph induces a higher idle point that is commonly referred to as the "cruise" idle. I also call it the "mechanical" idle, because it is the idle point that results if the ECU is no longer controlling the idle point, and the point at which the throttle plate rests when the engine is off. This is also called the "default position" in the service manual.
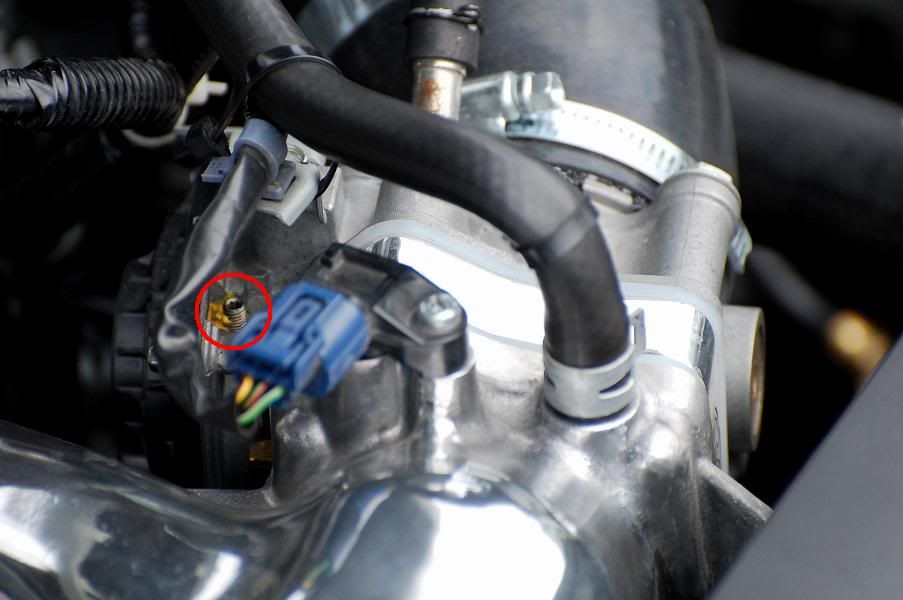
- The default position is set via a set screw on top of the throttle body. It can be easily identified by a dab of yellow thread locker applied by the throttle body manufacturer (probably during calibration at the factory).
- Speculation is that this higher idle point exists to allow normal engine warm-up in the event that the throttle body plate is stuck with ice in freezing temperatures.
- The service manual is useless for this issue, and offers zero suggestion as to how to alter this set point because it assumes that you are only using a stock throttle body and would have no reason to alter the calibration point.
- Because the new throttle body has a larger opening, resetting of the default position is required for proper operation and to prevent the P1683 - "Throttle Valve Default Position Spring Performance Problem" CEL. If the CEL is reset but the throttle body is not calibrated, the CEL will return every time the engine is started.
- This is a patience-testing process...
Without further ado, here is the process, in as complete a form as I could get it:
1. Hook up FP and laptop to car.
2. Confirm DTC code P1683 - "Throttle Valve Default Position Spring Performance Problem." If there is no P1683 code, TB calibration is not a problem.
3. Reset the ECU via FP or by disconnecting the negative battery terminal to clear all previous codes and "start from scratch."
4. Perform the idle learn procedure.
(a) Warm up the car @ ~3000RPM until ECT > 196°F.
(b) Idle the car for 5 minutes. If the radiator fans come on, do not include their running time in the 5-minute idle time.
5. Confirm "ECU" idle speed of ~850RPM.
6. Unplug the TB harness. RPMs will jump up and stay up as long as the car is running (even if you plug the harness back in). This is the "cruise" or "mechanical" idle.
(a) If the RPMs appear to start "jumping" +/-50RPM, the set screw is out of allowable idle range. Note the average RPMs, shut off the engine and proceed to Step 7.
(b) If the RPMs are holding at a steady value, skip Step 7 and proceed to Step 8 (the engine can be shut off but leave the ignition in the ON(II) position).
7. Bring the cruise idle into the allowable idle range.
(a) Using a 2.5mm allen key (nothing else otherwise you risk stripping the screw), turn the set screw CCW to bring RPMs down, CW to bring RPMs up. Target is between 1000-1200RPM. Adjust by a maximum of 1 full turn per attempt.
(b) Plug the TB harness back in.
(c) Shut off the engine and reset the ECU via FP or by disconnecting the negative battery terminal. Resetting must be performed to clear the P0102 code that was created when the TB harness was unplugged.
(d) Start the engine and return to Step 4.
8. Set the default position within the range allowed by the ECU.
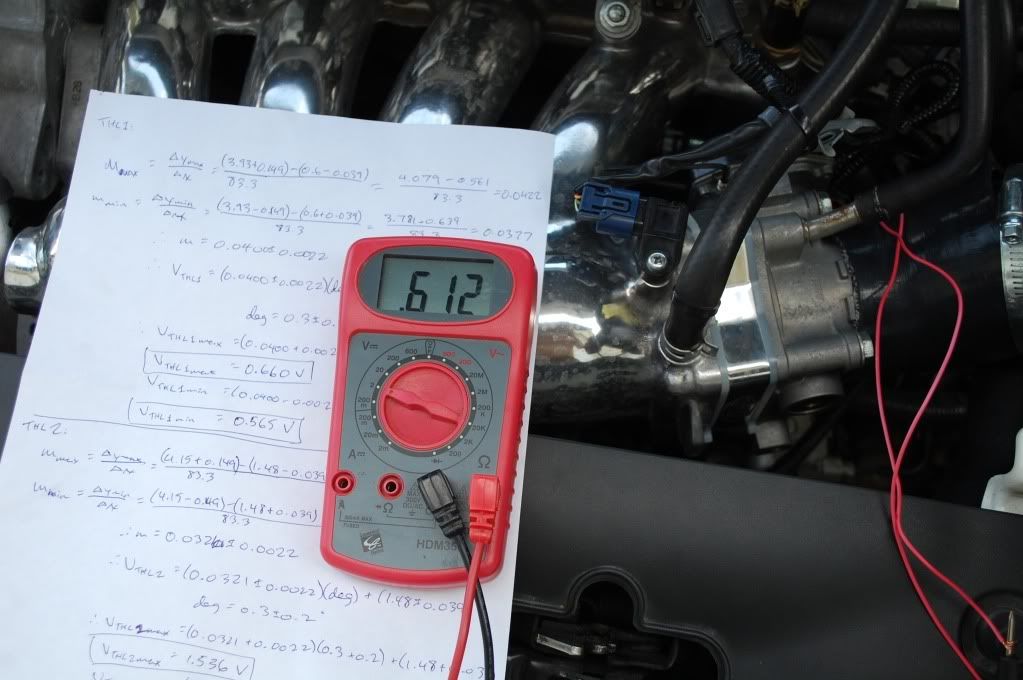
(a) With a voltmeter, measure the voltage across THL1 and SG (if the voltmeter probes are sharp, stick them into the wires, since the pinhole left over can be resealed later).
(b) While continuing to monitor the THL1 voltage, using a 2.5mm allen key (nothing else otherwise you risk stripping the screw), turn the set screw as required to bring THL1 into the allowable range. Confirm the set position by measuring the voltage across THL2 and SG in the same manner as Step 8a. THL1 and THL2 should be as follows:
THL1: min 0.818V, max 0.943V, median: 0.881V
THL2: min 1.644V, max 1.766V, median: 1.705V
9. Turn the car off and remove the key, then turn to the ON (II) position again but do not start the engine.
(a) If the engine warning light stays on for 20 seconds, flashes 5 times then shuts off, the calibration procedure is complete (the ECU is advising you that the readiness codes are not set). Drive the car normally for a few days to reset the readiness codes.
(b) If the engine warning light stays on and does not disappear, there is still a code present. Return to Step 2.
10. To prevent the set screw from migrating out of position with vibration, shave a small portion of the TB around the set screw and install an M5x0.8mm jam nut, then paint mark the set screw and nut.
That's it! Any questions or picture-requests, let me know.
The default position set screw, in its "untouched" state:
![Image]()
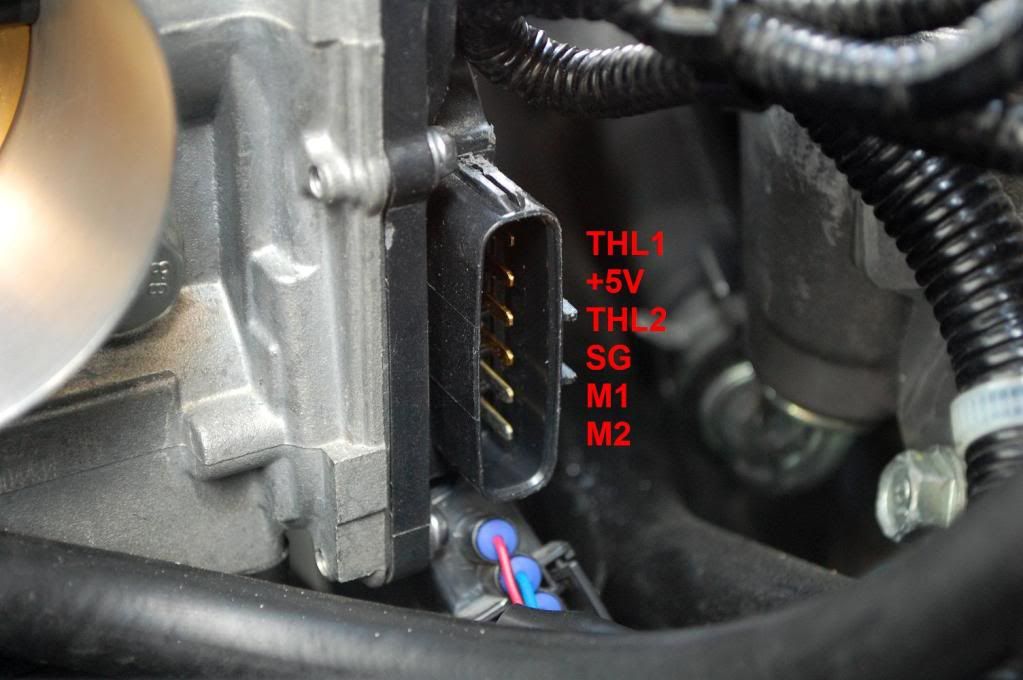
The pin IDs for the throttle body harness:
![Image]()
Measuring the voltage:
![Image]()
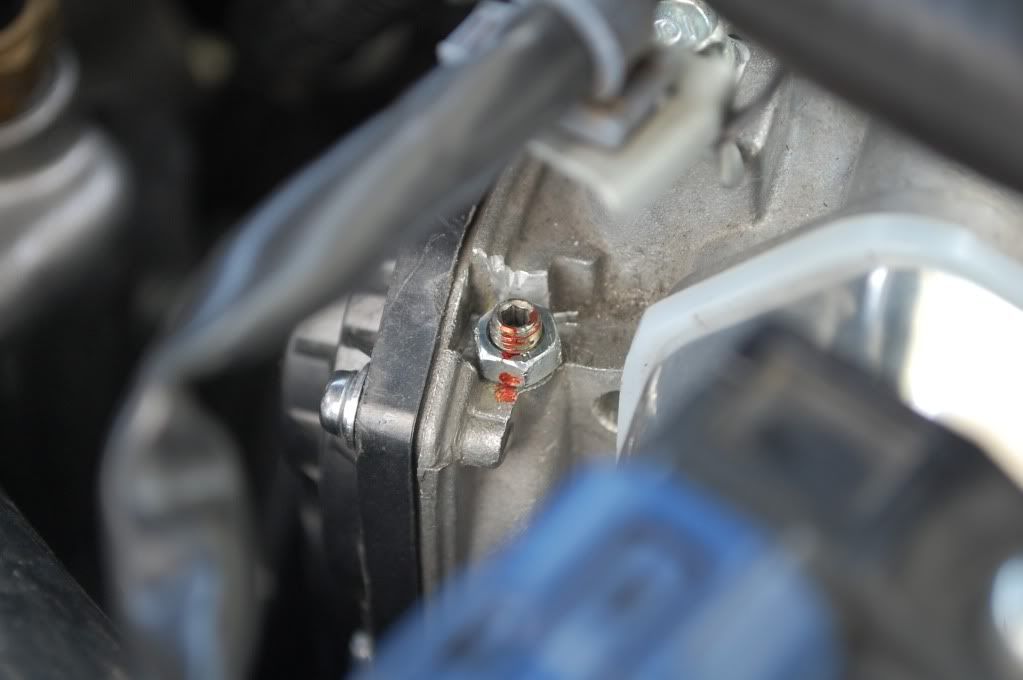
The jam nut installed and paint marked:
![Image]()
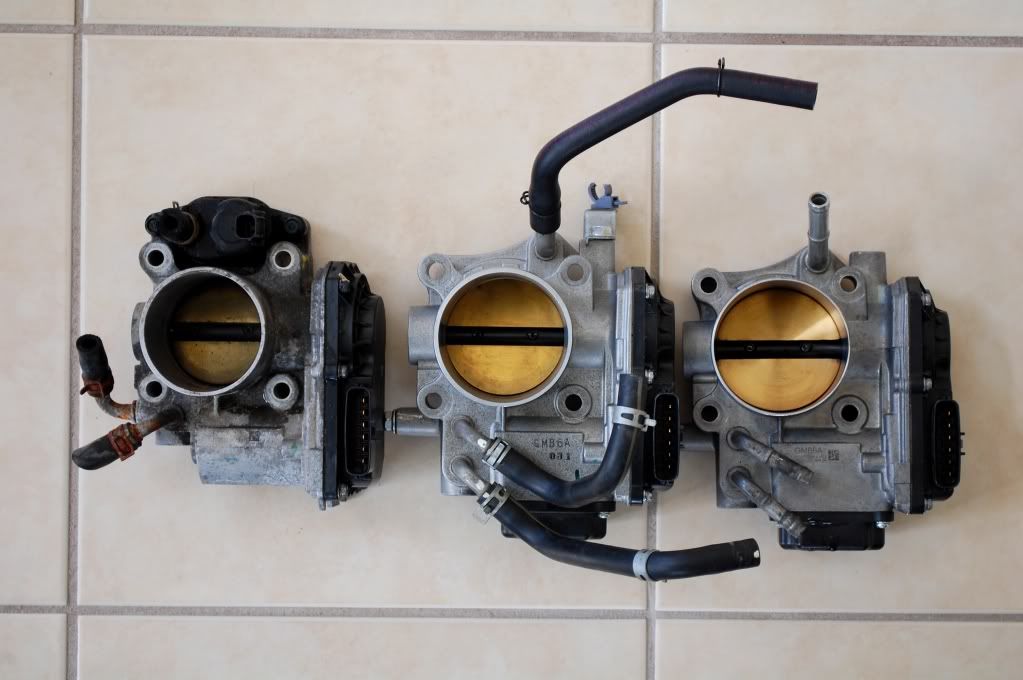
An interesting comparison of bore diameters, from left to right: base Civic (55mm), stock Si (60mm), bored Si (64mm).
![Image]()
The following is a calibration procedure for anyone running a TSX, Maxbore-modified or otherwise larger-than-stock TB. A few things I learned along the way:
- The "normal" idle of approximately 850RPM is fully ECU-controlled.
- Removal of ECU control or coasting at speeds above 5mph induces a higher idle point that is commonly referred to as the "cruise" idle. I also call it the "mechanical" idle, because it is the idle point that results if the ECU is no longer controlling the idle point, and the point at which the throttle plate rests when the engine is off. This is also called the "default position" in the service manual.
- The default position is set via a set screw on top of the throttle body. It can be easily identified by a dab of yellow thread locker applied by the throttle body manufacturer (probably during calibration at the factory).
- Speculation is that this higher idle point exists to allow normal engine warm-up in the event that the throttle body plate is stuck with ice in freezing temperatures.
- The service manual is useless for this issue, and offers zero suggestion as to how to alter this set point because it assumes that you are only using a stock throttle body and would have no reason to alter the calibration point.
- Because the new throttle body has a larger opening, resetting of the default position is required for proper operation and to prevent the P1683 - "Throttle Valve Default Position Spring Performance Problem" CEL. If the CEL is reset but the throttle body is not calibrated, the CEL will return every time the engine is started.
- This is a patience-testing process...
Without further ado, here is the process, in as complete a form as I could get it:
1. Hook up FP and laptop to car.
2. Confirm DTC code P1683 - "Throttle Valve Default Position Spring Performance Problem." If there is no P1683 code, TB calibration is not a problem.
3. Reset the ECU via FP or by disconnecting the negative battery terminal to clear all previous codes and "start from scratch."
4. Perform the idle learn procedure.
(a) Warm up the car @ ~3000RPM until ECT > 196°F.
(b) Idle the car for 5 minutes. If the radiator fans come on, do not include their running time in the 5-minute idle time.
5. Confirm "ECU" idle speed of ~850RPM.
6. Unplug the TB harness. RPMs will jump up and stay up as long as the car is running (even if you plug the harness back in). This is the "cruise" or "mechanical" idle.
(a) If the RPMs appear to start "jumping" +/-50RPM, the set screw is out of allowable idle range. Note the average RPMs, shut off the engine and proceed to Step 7.
(b) If the RPMs are holding at a steady value, skip Step 7 and proceed to Step 8 (the engine can be shut off but leave the ignition in the ON(II) position).
7. Bring the cruise idle into the allowable idle range.
(a) Using a 2.5mm allen key (nothing else otherwise you risk stripping the screw), turn the set screw CCW to bring RPMs down, CW to bring RPMs up. Target is between 1000-1200RPM. Adjust by a maximum of 1 full turn per attempt.
(b) Plug the TB harness back in.
(c) Shut off the engine and reset the ECU via FP or by disconnecting the negative battery terminal. Resetting must be performed to clear the P0102 code that was created when the TB harness was unplugged.
(d) Start the engine and return to Step 4.
8. Set the default position within the range allowed by the ECU.
(a) With a voltmeter, measure the voltage across THL1 and SG (if the voltmeter probes are sharp, stick them into the wires, since the pinhole left over can be resealed later).
(b) While continuing to monitor the THL1 voltage, using a 2.5mm allen key (nothing else otherwise you risk stripping the screw), turn the set screw as required to bring THL1 into the allowable range. Confirm the set position by measuring the voltage across THL2 and SG in the same manner as Step 8a. THL1 and THL2 should be as follows:
THL1: min 0.818V, max 0.943V, median: 0.881V
THL2: min 1.644V, max 1.766V, median: 1.705V
9. Turn the car off and remove the key, then turn to the ON (II) position again but do not start the engine.
(a) If the engine warning light stays on for 20 seconds, flashes 5 times then shuts off, the calibration procedure is complete (the ECU is advising you that the readiness codes are not set). Drive the car normally for a few days to reset the readiness codes.
(b) If the engine warning light stays on and does not disappear, there is still a code present. Return to Step 2.
10. To prevent the set screw from migrating out of position with vibration, shave a small portion of the TB around the set screw and install an M5x0.8mm jam nut, then paint mark the set screw and nut.
That's it! Any questions or picture-requests, let me know.
The default position set screw, in its "untouched" state:
The pin IDs for the throttle body harness:
Measuring the voltage:
The jam nut installed and paint marked:
An interesting comparison of bore diameters, from left to right: base Civic (55mm), stock Si (60mm), bored Si (64mm).