

I got tired of the dangling coiled SmartCord that came with my Escort radar detector and so I decided to hardwire it. I wanted to do it in a way that does not make any modifications to the car and not have to remove pieces of the interior/dash. Basically, what I did was mount the radar detector on the top of the windshield, to the left of the rear view mirror. Then ran the power cord across the headliner to the A-pillar. The cable then goes through the A-pillar into the place where the weather strip for the driver's door is set into the car body. It continues to run down the length of the door frame inside the interior trim plastic pieces and exits right next to the interior fuse box under the dash. The mute switch/light module that is part of the SmartCord is mounted to the bottom left of the dash. Power is taken from the #8 fuse in the interior fuse box and grounded to a metal bolt under the dash.
The Escort Direct Wire SmartCord.
![Image]()
The blue clip is for splicing into a 12v wire and is not needed. The grounding wire connector can be left as is, but the connector on the hot wire of the SmartCord needs to be cut off. That is because the hot wire will be attached to the Add-A-Circuit module.
Our Civic's interior fuse box uses these small fuses called "Low profile mini fuse." They are basically the same as regular mini fuses, just shorter.
![Image]()
A product called "Add-A-Circuit" made by Littelfuse works with mini fuses. There are two "Add-A-Circuit" models. One is for ATO sizes and the other is for mini fuses.
Add-A-Circuit for mini fuses.
![Image]()
Add-A-Circuit for ATO fuses (does not work in the Civic's interior fuse box).
![Image]()
The Add-A-Circuit kit comes with 4 fuses. The smallest one (3 amps) will work fine with the module since radar detectors uses less than 2 amps.
The Civic has a few unused fuse slots, so I decided to plug the radar detector into one of those instead of tapping a slot that is currently in use. I decided to use fuse slot #8 because that one is switched and is powered when the key is turned to the "on" position.
![Image]()
Some of the fuse slots are always powered and others turn on when the key is turned to the "on" mode. Only 1 unused fuse slot (#34) powers on in “accessory” mode.
Note: When using “on” position fuse slots like #8, the radar detector will show “Low Voltage” when starting the engine because of the current draw. If an “accessory” fuse slot is used, this will not happen because upon starting the engine, those circuits are turned off and then back on when the engine is running. I may decide to tap an existing “accessory” fuse slot if the low voltage situation starts to annoy me.
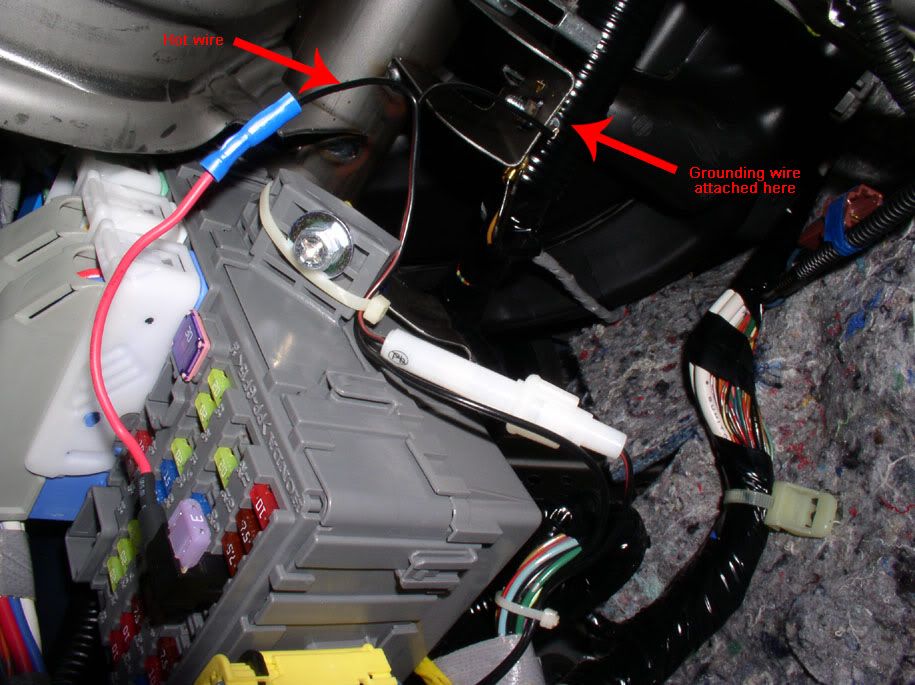
The connector on the hot line of the SmartCord has to be cut off and plugged into the Add-A-Circuit module's red wire. The grounding wire from the SmartCord is hooked up to a metal bolt attached to the car frame. There are 3 other wires already attached to this bolt, so it is a good place to hook up a ground. The wires are tie-wrapped to the side of the fuse box just to prevent the wires and fuse holder from swinging around when the car is moving.
![Image]()
Now, with the SmartCord's hot and ground lines hooked up, it's time to run the cord that goes into the radar detector. At this point, I disconnected the car's battery and waited 30 minutes to prevent complications with the side curtain airbag.
I pulled out the weather strip that seals the door to the frame when the door is shut. It was not necessary to pull out the whole thing. I started at the spot where it says “SRS Airbag.”
![Image]()
I took the other end of the SmartCord (the one with the phone jack) and slipped it inside the newly exposed trench.
Note: It is very important that the cord be routed behind the airbag—the long thing covered with white fabric—because you don’t want to block the airbag’s ability to deploy in the event of a collision.
![Image]()
The jack should come out right here.
![Image]()
I settled on an optimal spot for the radar detector and pulled enough cord through to the detector. When the amount of cord needed was reached, I pushed the cord under the front of the headliner. The headliner was a bit stiff. But with enough force, the headliner will pull back just enough to slip the cord inside.
![Image]()
Now I just tucked the cord into the trench that was behind the weather strip. This is near the bottom of the A-pillar.
![Image]()
The cord continues its journey inside the trench down the side of the door.
![Image]()
There is a neat little opening right next to the interior fuse box that the cord can exit the trench into the interior of the car.
![Image]()
With the weather strip pushed back into place, the excess wires are stuffed inside the little compartment above the hood release handle.
![Image]()
Since I didn’t want to drill/cut holes into the dash, I mounted the mute switch/light module onto a clip.
![Image]()
The module is clipped here. It’s not as clean as an in-dash installation, but from most positions inside the car, the wire can’t be easily seen.
![Image]()
Module finished and in place.
![Image]()
View of the module from the driver’s seat.
![Image]()
Again, there are cleaner in dash installation options, but this is probably one of the better options without removing pieces of the interior.
The Escort Direct Wire SmartCord.

The blue clip is for splicing into a 12v wire and is not needed. The grounding wire connector can be left as is, but the connector on the hot wire of the SmartCord needs to be cut off. That is because the hot wire will be attached to the Add-A-Circuit module.
Our Civic's interior fuse box uses these small fuses called "Low profile mini fuse." They are basically the same as regular mini fuses, just shorter.
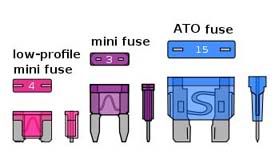
A product called "Add-A-Circuit" made by Littelfuse works with mini fuses. There are two "Add-A-Circuit" models. One is for ATO sizes and the other is for mini fuses.
Add-A-Circuit for mini fuses.

Add-A-Circuit for ATO fuses (does not work in the Civic's interior fuse box).

The Add-A-Circuit kit comes with 4 fuses. The smallest one (3 amps) will work fine with the module since radar detectors uses less than 2 amps.
The Civic has a few unused fuse slots, so I decided to plug the radar detector into one of those instead of tapping a slot that is currently in use. I decided to use fuse slot #8 because that one is switched and is powered when the key is turned to the "on" position.

Some of the fuse slots are always powered and others turn on when the key is turned to the "on" mode. Only 1 unused fuse slot (#34) powers on in “accessory” mode.
Note: When using “on” position fuse slots like #8, the radar detector will show “Low Voltage” when starting the engine because of the current draw. If an “accessory” fuse slot is used, this will not happen because upon starting the engine, those circuits are turned off and then back on when the engine is running. I may decide to tap an existing “accessory” fuse slot if the low voltage situation starts to annoy me.
The connector on the hot line of the SmartCord has to be cut off and plugged into the Add-A-Circuit module's red wire. The grounding wire from the SmartCord is hooked up to a metal bolt attached to the car frame. There are 3 other wires already attached to this bolt, so it is a good place to hook up a ground. The wires are tie-wrapped to the side of the fuse box just to prevent the wires and fuse holder from swinging around when the car is moving.
Now, with the SmartCord's hot and ground lines hooked up, it's time to run the cord that goes into the radar detector. At this point, I disconnected the car's battery and waited 30 minutes to prevent complications with the side curtain airbag.
I pulled out the weather strip that seals the door to the frame when the door is shut. It was not necessary to pull out the whole thing. I started at the spot where it says “SRS Airbag.”

I took the other end of the SmartCord (the one with the phone jack) and slipped it inside the newly exposed trench.
Note: It is very important that the cord be routed behind the airbag—the long thing covered with white fabric—because you don’t want to block the airbag’s ability to deploy in the event of a collision.

The jack should come out right here.

I settled on an optimal spot for the radar detector and pulled enough cord through to the detector. When the amount of cord needed was reached, I pushed the cord under the front of the headliner. The headliner was a bit stiff. But with enough force, the headliner will pull back just enough to slip the cord inside.

Now I just tucked the cord into the trench that was behind the weather strip. This is near the bottom of the A-pillar.

The cord continues its journey inside the trench down the side of the door.

There is a neat little opening right next to the interior fuse box that the cord can exit the trench into the interior of the car.

With the weather strip pushed back into place, the excess wires are stuffed inside the little compartment above the hood release handle.

Since I didn’t want to drill/cut holes into the dash, I mounted the mute switch/light module onto a clip.

The module is clipped here. It’s not as clean as an in-dash installation, but from most positions inside the car, the wire can’t be easily seen.

Module finished and in place.

View of the module from the driver’s seat.

Again, there are cleaner in dash installation options, but this is probably one of the better options without removing pieces of the interior.
") , also made by Escort. Cannot wait!
, also made by Escort. Cannot wait!

