8th Generation Honda Civic Forum banner

My First SQ Install, 2009 Honda Civic SI Sedan Redline Orange Pearl

1 reading
132K views 406 replies 39 participants last post by  Hugos0  
#1 · (Edited)
Hi,

This is my first lengthy post on this forum, but wanted to share regarding my audio install. I’ve worked on car audio of a few different cars over the years as a hobby since I was a teen (not for a shop, but mainly just DIY on family members cars). This is my first SQ install on my own car. I wasn’t able to take as many pictures as I probably should have but wanted to share my experience since I have learned a lot from others on this forum. I realize after looking at the other builds that what I’ve done definitely is not up to par with some of the top-notch work by others, but I had to start somewhere :).

Anyway, onto some of the install goals:

1. Achieve a decent level of sound quality. This is my daily driver and I don’t intend to enter any competitions.
2. Stealth is priority, show not at all.
3. Utilize the stock navigation head unit that came with the car. Had I to do it over again, would have probably chosen a car that didn't come with stock NAV, and gone aftermarket as I did with our other cars. Got the car though for less than I would have paid for one without, so can't complain too much.
4. Minimize loss of trunk space and retain the spare tire and have the ability to access it.
5. Re-use speakers from a previous car.

I’ll get started with some pics of the car:

Image


Image


Image


As stated, the signal source comes from the stock navigation unit on a 2009 Honda Civic SI sedan that many of you of course have seen:

Image


As many of you know, this HU connects to a 350W amplifier (per Honda’s specs) that resides under the driver’s seat in an SI sedan (the amp is under the center console for SI coupes). The forum has some information on this amp (believe it is a Pioneer amp), but the short and sweet on the factory amp is that there are two harnesses that are connected to it. I left the amp where it is, but unplugged the two harnesses. One harness comes from the HU, and the other harness breaks out to the 7 speakers in the stock locations:

2 tweeters in the dash
2 mids in the front doors
2 rear fills in the rear deck
1 “sub” (really a mid-bass) in the rear deck

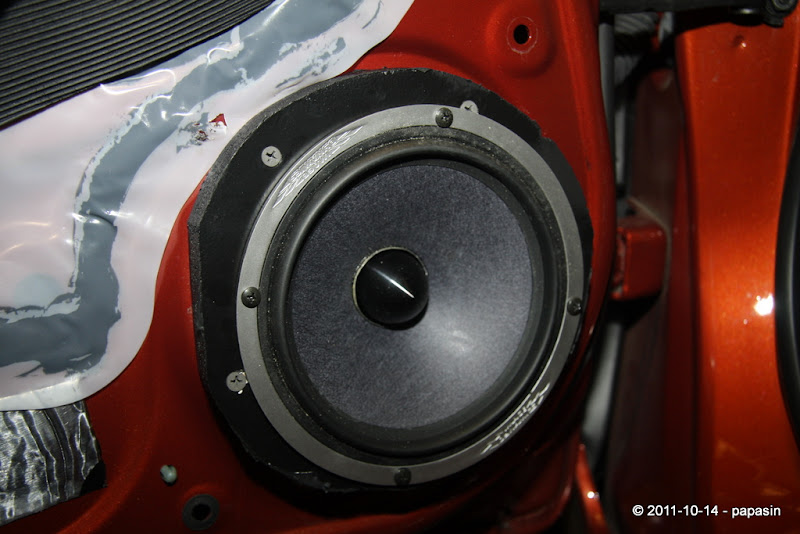
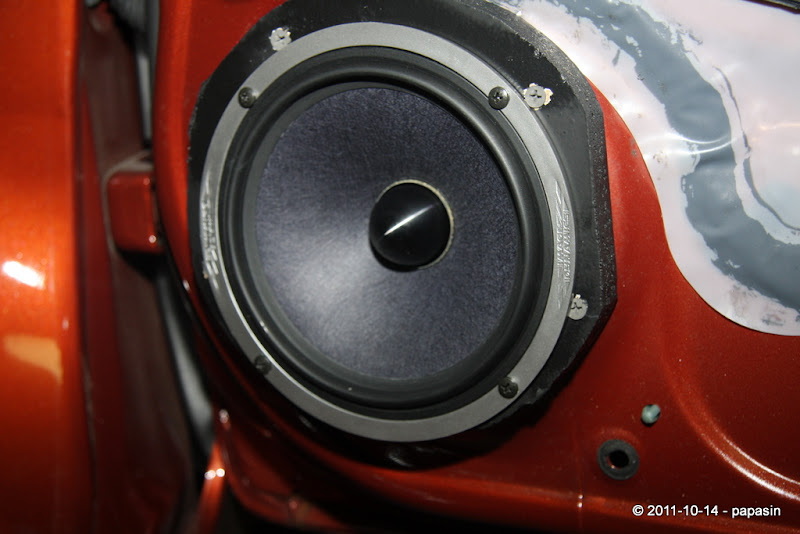
I decided to remove all the stock speakers. I lined the outer door skin of each door and the trunklid with Dynamat Extreme (left over from another install). I realize I need to go back and take care of the inner door skin and seal the doors completely, but that’s for another day, when I get more time and materials.

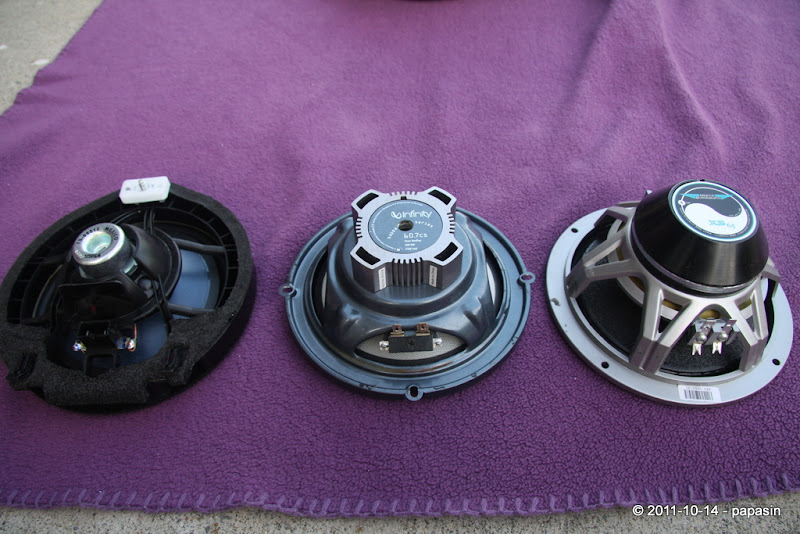
I replaced the stock speakers with a set that I pulled from a previous car. Here’s what I had on hand that went into the stock locations:

Front stage: 2-way Infinity Kappa 60.7cs
Specs from its manual: 6-1⁄2" 2-Way Component set
Kappa Woofers that went into the doors:
Speaker Impedance: 2 ohms
Power Handling: 90W RMS, 270W Peak
Sensitivity: 95dB @ 2.83V, 1m
Frequency Response: 45Hz – 25kHz
Mounting Depth: 2-3⁄ 16" (56mm)
Cutout Diameter: 5" (127mm)

Kappa Tweeters that went into the dash:
Speaker Impedance: 2 ohms
Power Handling: 50W RMS, 150W Peak
Sensitivity: 94dB @ 2.83V, 1m
Frequency Response: 3.5kHz – 25kHz
Mounting Depth: 3/4" (19mm)
Cutout Diameter: 1-7/8" (48mm)

Rear fill: 3-way Infinity Kappa 63.7i (went into the rear deck)
Specs from its manual: 6-1⁄2" 3-Way
Speaker Impedance: 2 ohms
Power Handling: 75W RMS, 225W Peak
Sensitivity (2.83V, 1m): 95dB
Frequency Response: 45Hz – 25kHz
Mounting Depth: 2-3⁄16" (56mm)
Cut-Out Diameter: 5" (127mm)

The stock sub was removed and the opening was left “open” to allow sound to come into the cabin from the sub.

To expedite wiring the speakers, I purchased a “Honda integration adapter” from Crutchfield and this connected to one of the harnesses coming out of the amp (Item #120701728). Again, “for another day”, I’ll probably replace the speaker wires to 14 or 12 gauge since the adapter utilizes what look to be 16 gauge at best, perhaps even 18 gauge.

Processing for this install is done by a JBL MS-8.

Image


I think most are familiar with this unit. There's a massive 200+ page thread on the MS-8 in the DIYMA forum:

JBL's MS-8 processor! - DIYMA.com - Scientific Car Audio - Truth in Sound Quality

but the threads I found quite useful are these ones:

JBL's MS-8 - DIYMA.com - Scientific Car Audio - Truth in Sound Quality

JBL MS-8 FAQ - DIYMA.com - Scientific Car Audio - Truth in Sound Quality

To get the signal from the HU to the MS-8, a custom harness was utilized. The signal from the HU (before going into the amp) is, as I understand, differential-balanced output. Because of this, I decided not to tap from the speakers for hi-level input into the MS-8 as the stock amp probably does some filtering, and utilizing the differential-balanced output direct from the HU is going to be superior. I bought the harness from “Mercman” and this plugged into the harness coming from the HU. Mercman’s harness outputs 4 RCAs (2 RCAs for front and 2 RCAs for rears) and a remote turn on. Only the 2 RCAS for the front + remote turn on is connected to the MS-8. Pictures of the adapters/harnesses are below connected under the driver’s seat (hard to get a good shot since I didn’t remove the front seat for the install).

Image


So basically two wiring bundles went from under the driver’s seat into the trunk. Wire ties were used every 6-8 inches.

Image


Image


Image


Image


For power, wiring from the battery was quite easy, many thanks to a nice write-up from another 8thcivic member (giving credit where credit is due):

http://www.8thcivic.com/forums/audio/87041-running-power-wire-trunk.html

This makes for a super clean power run and I don’t think my pictures do it justice.

Image


Image


I ran the power wire along the driver side all the way to the trunk.

Ground for the amps and the MS-8 was under the back seat, on an existing bolt, sanded down to the metal:

Image


The amps and the MS-8 are mounted behind the back seats, and the amps used for this install are:

Alpine PDX-F4 (powers the front stage, birth sheet indicates 129Wx4 RMS at 4ohm)
Alpine PDX-M6 (powers the sub, birth sheet indicates 650Wx1 RMS at 4ohm)
The MS-8 powers the rear fill

For the sub, I used a JL Audio 10W3V3-4 and a sub enclosure from Audio Integrations (their Perfect Fit Enclosure) is utilized.

06 Honda Civic Sedan 10 Inch Perfect Fit Enclosure

Here’s a pic before installing the trim ring:

Image


and a couple after:

Image


Image


The enclosure blends very well with the carpet in the trunk, and the trim ring provided by Audio Integrations along with a JL Audio speaker grill purchased separately matches nicely. This entire setup is ideal for us since we have to carry a stroller in the trunk a lot. I would be very worried about hitting the sub without a grill :). I had to trim the Honda Civic trunk mat so that it is not “stuck” under the enclosure since it bolts straight down (is subtle and only noticeable if you look very closely). This makes it easy to remove and the spare is still quite accessible with this setup.

What’s next?

1. Install and wire up a backup camera.
2. As stated above, I want to seal the doors completely.
3. Will probably re-wire the speakers to thicker ones (14 or 12 gauge) rather than utilize the Crutchfield adapter. I wired the sub with 12 gauge already straight to the M6 since they are both in the trunk vs. using the sub wire that came with the Crutchfield adapter.
4. Sound deaden the car a bit more (perhaps line the floors and trunk with 25% CLD + CCF + MLV)
5. Upgrade the speakers for my front stage.
6. Install tweeters in the A-pillars.
7. Move the amps under a front seat (since they are stackable) and move the MS-8 under the other seat.
8. Center speaker?

I know and realize, as I stated from the beginning, that my install is not up to par with many other folks in the forum, but for my first SQ install, I’m quite happy how everything turned out and came together. I’m happy to get any feedback, suggestions, and thoughts on the install.
 
#5 ·
Thanks. The hardest part was actually finding "the right way" to get it done, and many of the tips/tricks were on this forum which I'm thankful to various folks already figuring it out. I don't mean to over-generalize, but if I took it to a generic install place, they may not have gone through the thought process, probably would have just drilled a needless hole through the firewall for the power cable, etc. There is a one man operation (Simplicity In Sound) very near me that I am fairly certain I could have entrusted my car to, but he has a waiting list for months. He does phenomenal work, but given what I put together, probably too "simple" (pun intended) for his skills and his choice of components (speakers, subs) are a fair bit "higher-end" than what I've put into my car.
 
#9 · (Edited)
hehe.. Second time I see you cryin' over an MS8. Here's what you do.. buy groceries, get $50 cash at the checkout. Put it in a piggy bank. Count it in 10 weeks and find an MS8 for $500 or so. :) No kidding.. That's literally how I did it.

But yeah I'm stoked.. I've been wanting one since they were a rumor like nearly 5 yrs ago.
 
#6 ·
Adding the zip ties was actually fairly easy and quick. It's routing it neatly along existing channels and/or following other wires that took the time. As for having an MS-8, it definitely is one of the simpler implementations to get good time alignment, staging available for car audio right now that I'm aware off. I helped my brother with his install that included an Alpine processor over 5 years ago, and the MS-8 is a significant advancement over that processor. It's not perfect though, but am pretty happy with it overall.
 
#7 ·
Nicely done!! we have a similar setup. I used Infinity Kappa 60.9 front and rear. Also retained the factory Navi and used Mercman's harness which is connected to 2 J/L audio amps. 2 Bazooka 10in subs that occupies the spare tire. and everything is controlled by Audio Control EQS. :)
 
#8 ·
As I understand, the 60.9 have bigger tweeters than the 60.7. Did you mount your tweeters in the stock location, or on the A-pillars, or ?. Just curious, and would also love to see your build if you have it posted.
 
#10 · (Edited)
papasin,
nice install.. I'd love to see pics of how you mounted your amps, and MS8. I've got a zx700.5 + ms8 to hide in an FA5 myself.

Very very similar plans with massive audio rk comps run active front, vifa/tang-band/pioneer passive comp setup for rear run by the ms-8 directly. cvr12 box in trunk.

When you plan on relocating the ms-8 and amps, which under which seat?

I have the new-version mercman harness with a generous lovely 12' of rca line like yours.. It almost breaks my heart to cut it to basically a pigtail, but it'd really make the install clean to put the ms-8 where the oem amp (formerly resided) and close to the plug. However, I could use the remainder to make some diy rca's to run to the kicker in trunk (it's way too big for underseat). your thoughts?

Also, I assume you used all 4 signals from oem into the ms-8.. How does your ms-8 like those? Input setup nice and easy? Good solid clean signal?

... For a 1st good install. I'd say you have a very good one!! You've definitely read up.
 
#11 ·
papasin,
nice install.. I'd love to see pics of how you mounted your amps, and MS8. I've got a zx700.5 + ms8 to hide in an FA5 myself.
Hard to get a good pic because of the lighting, but basically with the SI sedan, have 60/40 rear seat, so have the two alpine amps bolted to 60 and MS-8 on the 40.

When you plan on relocating the ms-8 and amps, which under which seat?
Probably amps stacked under driver and MS-8 under passenger.

I have the new-version mercman harness with a generous lovely 12' of rca line like yours.. It almost breaks my heart to cut it to basically a pigtail, but it'd really make the install clean to put the ms-8 where the oem amp (formerly resided) and close to the plug. However, I could use the remainder to make some diy rca's to run to the kicker in trunk (it's way too big for underseat). your thoughts?
I would probably not cut. While it's not hard to use the remainder wire and make your own RCAs, I think I'd keep the length intact in case you change your mind later.

Also, I assume you used all 4 signals from oem into the ms-8.. How does your ms-8 like those? Input setup nice and easy? Good solid clean signal?
You're going to want to just use the front L+R (2 channels - that's what I did and recommended in the manual). The only reason you would want or need more than two channels is if your signal from front L+R is not full range. For the factory unit best I can tell, it is. The MS-8 takes two channels and does its magic into Logic 7 based on a stereo signal. Input from HU to MS-8 is very clean since HU output is differential-balanced out.

... For a 1st good install. I'd say you have a very good one!! You've definitely read up.
Thanks! Lots of good tips on this forum, figure I ought to share and return the favor if am able.
 
#15 ·
Hey dumb question.. as you know I'm getting ready myself. When you do the speaker wiring to the front.. where are you going to route it? I assume power runs under the left side so naturally speaker wiring up the right side?

Got my extra tweet grills today. Those rk6 or vifa d26's are going to be tight in those stock locations.

Freakin love that color btw.

Sent from my DROIDX using Tapatalk
 
#16 · (Edited)
Currently, I'm using the stock wiring, so I did not route new speaker wires (on my todo list to re-do - #3 of "what's next"). Since I'm using Kappas (which are a slight step up from stock), I believe the stock wires are fine.

I also plan on upgrading my front stage (#5 of "what's next") - going Image Dynamics XS-28 for tweeters and thinking of X-65 for midrange. With this combo, I plan on having the set-up as follows:

1. Have my PDX-F4 and PDX-M6 under driver's seat stacked. PDX-F4 bridged two channels for front left mid-range, 1 channel for left tweeter, 1 channel for left rear-fill. M6 speaker wire to the sub since the sub is in the back left. All the wires going toward the front and back on the left side. I plan on routing the wires entirely under the carpet vs. on the kick plates - there's a channel there already for the trunk-release wire I believe.
2. Have second PDX-F4 under passenger's seat. Two channels bridged for front right mid-range, 1 channel for right tweeter, 1 channel for right rear-fill. All wires also under the carpet along the right side.
3. Have power coming down the middle under center console.
4. Still undecided where to put the MS-8 (possibly just keep it where it is, or find a place in the cabin).

I also got my XS-28 a couple weeks ago. I just tried it in the stock location. It's a VERY tight fit.

Hope this helps.
 
#17 ·
ID tweets and mids.. NICE!!!! I see Sonic still has some ID stuff. It's cool you can pick up the mids and tweets just themselves without a full component kit with crossovers you won't need.

Interesting.. I didn't think there was enough room under the Si seats for stacked amps. That's cool! I'll find out I guess when I tear out the seats, kicks, molding, console and carpet and see what's going on.

Sizing up the stock grills that arrived.. Larger tweets will be tough to flush mount. You'll have a time I bet with those ID's (Love to see pics of that). The vifa's and the RK6 tweets both are pretty big. I will have to try the w6-789e mids (low-watt, high-efficiency) and vifa's first in a 2-way front-stage because I think the SQ will be significantly better than the SPL'ish RK6 drivers. If the vifa/tb combo rocks, the RK's and matching baffle rings will be for sale to get another set of vifa/tb's for rear fill passive.
 
#18 · (Edited)
Updates (floor/trunk sound proofing)

Sorry for the lack of updates. Like many others, things got busy, and the "what's next" section took a bit of a back seat. Actually, I was able to accomplish a few of these a couple months ago now, just didn't get around to posting them. If you recall I had the following on my "what's next":

What’s next?

1. Install and wire up a backup camera.
2. As stated above, I want to seal the doors completely.
3. Will probably re-wire the speakers to thicker ones (14 or 12 gauge) rather than utilize the Crutchfield adapter. I wired the sub with 12 gauge already straight to the M6 since they are both in the trunk vs. using the sub wire that came with the Crutchfield adapter.
4. Sound deaden the car a bit more (perhaps line the floors and trunk with 25% CLD + CCF + MLV)
5. Upgrade the speakers for my front stage.
6. Install tweeters in the A-pillars.
7. Move the amps under a front seat (since they are stackable) and move the MS-8 under the other seat.
8. Center speaker?
Some of these lend themselves to be done together. I decided to tackle 1 and 4 at the same time. Enough with my excuses and on to some pics.

I'm sure everyone's seen them before, but first, the obligatory tear down photos.

Front and rear seats, center console, radio, and trim panels removed.
Image


Here they are in one big box :)

Image


with the exception of the center console along with the rear seat pictured here

Image


With everything taken out, I went ahead and put some Dynamat Xtreme in the trunk and on the floors, roughly a little over the 25% method.

Image


Image


Image


Next went down a layer of 1/4" CCF and 1/8" MLV. I got the material from here:

Mass Loaded Vinyl 48"W w/Closed Cell (per foot)-Super Soundproofing, Co.

Since I am in CA as is the company, shipping came out to be reasonable. Here it came at my doorstep.

Image


First thing I realized, wow this stuff is HEAVY! I needed to use a hand truck to cart it from my front door to the garage. I believe the packing slip indicated 46lbs. Here it is unpacked

Image


and unrolled.

Image


I ordered 40 sq feet and nearly used all of it. I put it down in pieces across the floors, under back seat, and trunk area. Unfortunately, in my haste, I didn't take any pics of it in the car before putting the carpet and the seats back (eeek). But trust me, it's there, and wow, it is quiet! :) Now don't get any hopes of it being Lexus quiet, since we are talking about two VERY different cars. Also keep in mind that an SI is a car that revs up to 8000 rpm and sounds pretty sweet at high revs. But the before and after is worth it in my opinion. Some might wonder about the weight penalty. For my purposes, as I mentioned above, I usually carry a stroller in the trunk, but to be even more specific, couple that with two car seats, two kids, and two adults, the sound proofing weight penalty becomes very pleasant to keep the cabin noise fairly quiet to hear the conversations coming from the back seat :).
 
#91 ·
Sorry for the lack of updates. Like many others, things got busy, and the "what's next" section took a bit of a back seat. Actually, I was able to accomplish a few of these a couple months ago now, just didn't get around to posting them. If you recall I had the following on my "what's next":


Some of these lend themselves to be done together. I decided to tackle 1 and 4 at the same time. Enough with my excuses and on to some pics.

I'm sure everyone's seen them before, but first, the obligatory tear down photos.

Front and rear seats, center console, radio, and trim panels removed.
image


Here they are in one big box :)

image


with the exception of the center console along with the rear seat pictured here

image


With everything taken out, I went ahead and put some Dynamat Xtreme in the trunk and on the floors, roughly a little over the 25% method.

image


image


image


Next went down a layer of 1/4" CCF and 1/8" MLV. I got the material from here:

Mass Loaded Vinyl 48"W w/Closed Cell (per foot)-Super Soundproofing, Co.

Since I am in CA as is the company, shipping came out to be reasonable. Here it came at my doorstep.

image


First thing I realized, wow this stuff is HEAVY! I needed to use a hand truck to cart it from my front door to the garage. I believe the packing slip indicated 46lbs. Here it is unpacked

image


and unrolled.

image


I ordered 40 sq feet and nearly used all of it. I put it down in pieces across the floors, under back seat, and trunk area. Unfortunately, in my haste, I didn't take any pics of it in the car before putting the carpet and the seats back (eeek). But trust me, it's there, and wow, it is quiet! :) Now don't get any hopes of it being Lexus quiet, since we are talking about two VERY different cars. Also keep in mind that an SI is a car that revs up to 8000 rpm and sounds pretty sweet at high revs. But the before and after is worth it in my opinion. Some might wonder about the weight penalty. For my purposes, as I mentioned above, I usually carry a stroller in the trunk, but to be even more specific, couple that with two car seats, two kids, and two adults, the sound proofing weight penalty becomes very pleasant to keep the cabin noise fairly quiet to hear the conversations coming from the back seat :).

This was very nicely done. :clapping:

I like the soundproofing you did on this. Very maticulous.

IMO i would have a bigger amp/sub but given your circumstances with stroller, children, its completely understandable you want the most trunk space available. And its a very nice setup. :clapping:
 
#19 · (Edited)
Updates (backup camera)

While I had the center console taken out from the above post, I also ventured in installing a backup camera. There are numerous choices for a camera, and I elected going with the following:

Image


However, since I chose the route of retaining the factory navigation unit, it wasn't as simple as plug in the RCA cable, power, and reverse lead. After doing some web searching, I ran across the following module:

Image


The manual the unit came with is actually quite good. For those interested, here's a soft copy:

http://www.pac-audio.com/PACProductData/VCI-HON2/1_Instructions/vci-hon2_instructions_022508.pdf

I followed everything through, and was able to get the backup camera to operate as expected. I consider myself a fairly handy and technical person, but this must have been one of the biggest PITA portions of any install or DIY activity I have undertaken. There were moments where I was seriously wondering if I was going to brick my "$2k" upgraded nav option on the car, since this involved literally taking apart the radio to replace and rewire ribbon cables. But alas, everything came back together, and the end result really does seem "factory"-like. The one major advantage I see comparing it with after-market units is that it is available "instantly", whereas, several of the after-market ones I've used has a sizable delay before the backup camera becomes available.
 
#20 · (Edited)
NICE WORK! Your camera is a far cry from my Droid X. :) That interior strip-down shot is a great reference pic. Thanks for the updates!

On carpet/floorboard:
So I guess it's kosher to just cut those short pieces across the console to get the carpet out? I was || that close to totally pulling it but wasn't so sure if I wanted to cut it to get it out of that console. Looks easy enough though.

Did you also CLD the floorboard area or just the trunk? I think the MLV is the biggie as I bet you might agree, for that area.

On weight addition:
One advantage is the extra weight added by the MLV is low (floorboard), so the center of gravity is kept low and in the center of the car. From a handling standpoint this is good.

On speaker wiring if you're diy'ing yourself... I went with some 16 guage Kicker for lack of better imagination. :) It runs easy, fed through door boots well, and I think is absolutely fine for performance. I wouldn't consider 12 guage for 6.5" mids or tweets, especially considering a short run from under the seats. From trunk to fronts it took all of the 75ft roll I got (two runs each side), so going to under the seats should be a nice savings on length.

I'm really starting to consider my floorboards and trunk now. Thanks.. More work for me! LOL!
 
#22 ·
NICE WORK! Your camera is a far cry from my Droid X. :) That interior strip-down shot is a great reference pic. Thanks for the updates!
The MLV pics are just from an iPhone, but yeah, everything else is from a DSLR - Canon 5D Mark II. Definitely overkill for these sort of pics, but I use it quite a bit for other things :).

On carpet/floorboard:
So I guess it's kosher to just cut those short pieces across the console to get the carpet out? I was || that close to totally pulling it but wasn't so sure if I wanted to cut it to get it out of that console. Looks easy enough though.
I actually didn't cut them. I was tempted to cut, and was willing to do so if I couldn't get things to work. But I just lifted the carpet from each side when putting down the CCF/MLV combo.

Did you also CLD the floorboard area or just the trunk? I think the MLV is the biggie as I bet you might agree, for that area.
I did. I used a little bit of Dynamat Xtreme in certain locations where there wasn't factory deadener similar to the pic of the spare tire well I took. I also put Dynamat Xtreme along the B-pillars, and a few other places where I thought would benefit that exposed sheet metal.

On speaker wiring if you're diy'ing yourself... I went with some 16 guage Kicker for lack of better imagination. :) It runs easy, fed through door boots well, and I think is absolutely fine for performance. I wouldn't consider 12 guage for 6.5" mids or tweets, especially considering a short run from under the seats. From trunk to fronts it took all of the 75ft roll I got (two runs each side), so going to under the seats should be a nice savings on length.
Thanks for the tip, but for now, I'm going to just go with the Crutchfield harness I mentioned. I still have the amps and the MS-8 mounted behind the back seat. It's not the cleanest solution in terms of appearance, but it actually works pretty well since I never put the seats down (I have two car seats pretty much mounted permanently on each side).

I'm really starting to consider my floorboards and trunk now. Thanks.. More work for me! LOL!
Once you have the car taken apart, it actually goes pretty quickly, especially when using the CCF/MLV fused together. Just measure, cut, and lay flat. A little trickier in the rear area because of the spare tire section and its curvature, but overall, probably didn't take more than an hour once everything was taken out. As I mentioned, the PITA was with the backup camera install...and not the camera portion but the interface box to the stock NAV. I still think it was worth it though!
 
#21 ·
Just noticed something:
Image


Whatchu got hiding mounted behind that wheel well? :) Or is that something stock with your nav system? Looks like you found a nice spot to mount something. I looked and snooped around those areas around the wheel wells thinking there's potential there for stuff if it could fit in there.
 
#25 ·
Update (front stage)

Recall

What’s next?

5. Upgrade the speakers for my front stage.
Well, had some time last weekend. The mids will be upgraded with a set of Image Dynamics X65 and the tweeters to a set of Image Dynamics XS28.

First, some comparisons. The mids, from left to right: Stock, Infinity Kappas, Image Dynamics X65

Image


Image


Depth of the X65 mid as you can see is a bit deeper, not to mention won't fit in the stock door location without modifications. The hole needed to be enlarged by cutting into the sheet metal, and a half inch wood baffle was cut to offset the depth. To protect against the elements, the baffle was coated in truck bedliner. Here's the final result.

Driver's side:

Image


Passenger side:

Image


The door card needed a little trimming, and was treated with vibration dampener to prevent buzzing.

Image


Finally, comparison of the tweeters to go into the stock location. From left to right: Stock, Infinity Kappas, Image Dynamics XS28

Image


Spent time retuning the MS-8. At first, I had a center image that was off to the left. I tried various things, including adjusting the crossover frequency, moving the EQ curve around. I checked the speaker polarity and made sure things were wired correctly. I also played around with the tweeter locations just for the heck of it. Wow, everything sounds amazing with the tweeters off-axis just sitting at the little window. Maybe another upgrade for later? ;).

Anyway, I restored the tweeters to the stock location, and retuned with the MS-8. After about 5 days now, and a bit of a break-in, I can definitely say there is a significant improvement. Midrange/midbass is much crisper, and the highs are so much more detailed, without being harsh or bright compared with the Kappas. I was also able to get a better center image, but can't say exactly what I did to get there since I tried a variety of things and not sure which step got me to the final result. Overall, I'm quite happy with the outcome.
 
#26 ·
Absolutely awesome!!! Those baffles kick my rear end on mine for sure. Nicely done. When you say "wood", what kind? I just ran MDF. I think you treated yours far better though. I never thought of bedliner. Nice!

I still have Bikinpunk's front window enclosures that were glassed to fill in those windows and hold a small mid and tweet (he ran scan-speaks in them), should you want them. I bought them from him but since I was scared of doing a 3-way front-stage just yet, they're just sitting on the shelf unutilized. They're definitely used, and need some doctoring up and cosmetic work but are well treated. They need a grill solution that would be fun but would give you an option for tweet location. They fire directly across from each other so being so off-axis might or might not float your boat.
 
#27 ·
Not sure what kind of wood. Had some out back that happened to be 1/2" in thickness. Can't take credit for the Bedliner idea, saw Bing do that on his installs.

I've PM you re: enclosures. I'm intrigued :).
 
#28 · (Edited)
Just showing all kinds of possibilities in those a-pillars. Bikinpunk I think paved the way for us on potential sonic coolness in that regard. I remember firing directly across off-axis he was able to tune the setup pretty spectacular. I think he competed "SQ class" with it with some great results. Keep in mind, there's some serious speakers there in those scan-speaks he was running.

Image


I bet these covered in black instead of tan to match the Si would even look awesome without grills, just drivers flushed in.
 
#32 ·
googling, I saw this on the web as well but I'm betting there's all kinds of reflection issues with this idea.
image
I found this thread at DIYMA. Good info IMHO.

Unique System & Installation - 8th Gen. Civic EX Coupe - DIYMA.com - Scientific Car Audio - Truth in Sound Quality

I also checked to see how much kicks would cost in case I want to drill holes and not happy with them later, and it turns out that they are less than $10 to replace both if you get it from hondapartsnow.com...so might be another short weekend project :).

In most situations, the tuning would take as long (if not longer) than putting the tweets in the kicks. But that's the beauty of the MS-8. I can mount the tweets in the kicks, retune and in 10 minutes see if I like it.
 
#33 ·
Thanks, but I have to thank the various folks on this forum and DIYMA. I've learned a ton through folks' posts, and may not have had the confidence to do what I've done. Glad to post and happy to reciprocate if I can help someone else out.
 
#31 ·
Wow looks great. I'm looking to improve my system and am starting with the HU. Now with the amp bypass harness that will totally eliminate the stock amp? Reason I'm asking is because if possible I would like to retain the stock sub to tide me over till I get a better aftermarket setup in the trunk... similar to the OP's
 
#34 ·
Short answer is yes, the harness eliminates the stock amp and you would need to go directly into an aftermarket amp, or in my case as others, it goes into a processor such as the MS-8.

But IMHO, it all depends on your priorities and your budget. If it were me to do over again (all the way to re-purchasing the car), I probably would have bought a ROP SI sedan without the NAV HU and saved the money and applied it to my build/install. Then, I would have purchased an aftermarket double-din NAV and no longer need the amp bypass harness.

Also, now that I know what I know, I probably could have built my own harness (lol). In fact all the info you need is in this forum! I'm also only using two RCA channels and remote turn on from the Mercman harness (the harness has 4 RCA channels). Since the harness goes into the MS-8 first, I only need the front two channels to get the full-range signal. Don't get me wrong though, the Mercman harness is excellent quality, and he is phenomenaly helpful.

Also, not sure what you have in mind for "improving your system", but my $0.02 is that the stock sub is inferior to a lot of good 6.5" component sets out there. For example, I would contend that the 7-10 year-old Infinity Kappas I previously had in there could hit almost at the same frequency range as the stock sub...and the Image Dynamics X65 definitely can and most likely go lower. Obviously, with my set-up, I cross the IDs and let the JL sub fill in the low-end, but I've played with crossing it as low as 63Hz (the ID specs say it can go as low as 55Hz).

Bottomline, I think if you decide to upgrade your front stage first, you can probably ditch the stock sub and won't miss it (it might even just muddy your system if you get a good front stage).
 
#46 ·
Indeed ruler flat is a goal but within reason of budget and level of build and the intent of the car. Daily-driver only vs also a comp car. I suspect this car is simply a daily driver and the sq "status" is purely subject to its owner rather than an rta or iasca judge. All these builds start somewhere. I'd say this one has definitely evolved nicely. Well beyond just throwing in some polks and a box sub and calling it done. Trick is we need more of these 8th civ builds so I'm encouraging all. This one is great example of what can be done in a garage without taking a second mortgage out. In order to critique cars as to whether they'd be worthy of an sq meet without hearing them, there's always diyma.

Sent from my DROIDX using Tapatalk